background image


July 2016

P 14

da Vinci  

Jr.2.0 Mix

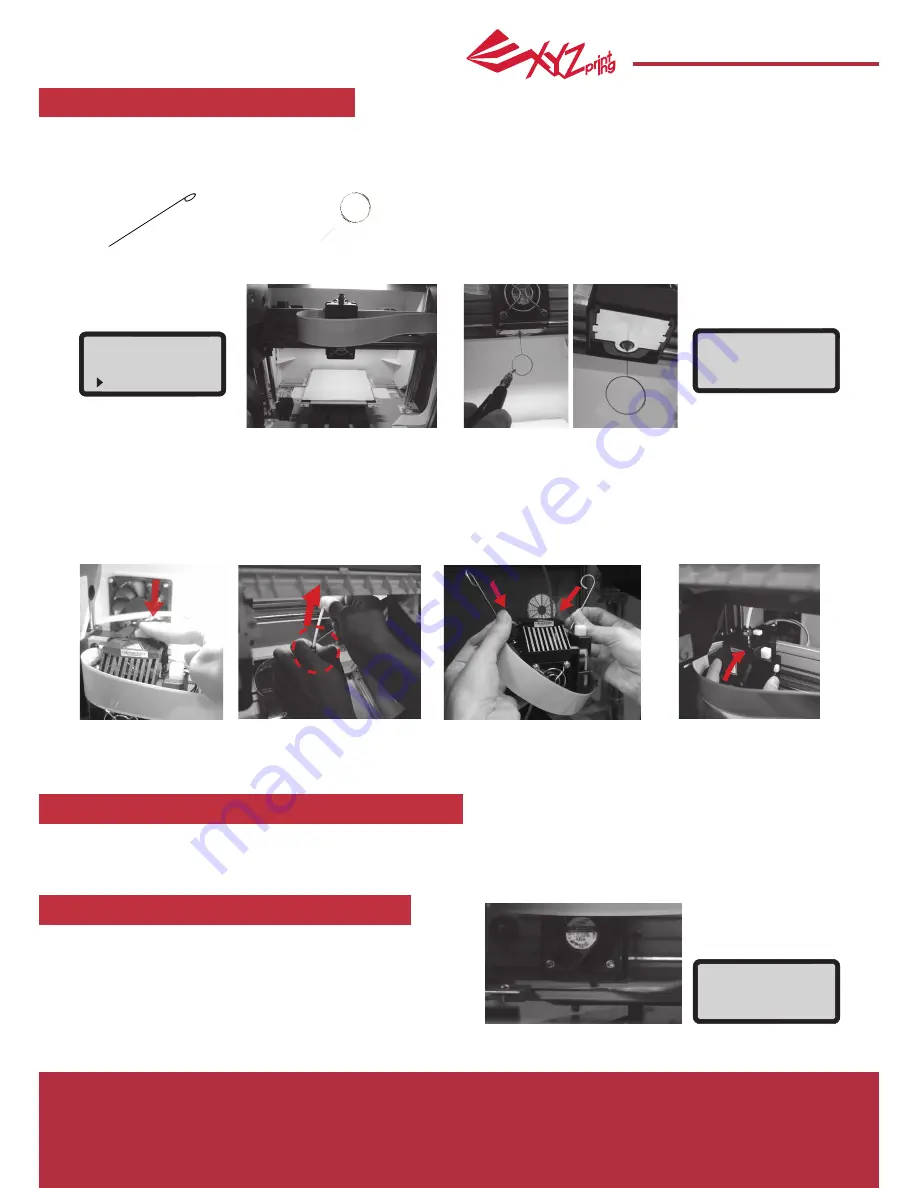
   CLEAN NOZZLE

Z OFFSET (adjust the printer module)

Z OFFSET settings adjustment

The user may use the Z OFFSET function to adjust the gap between the printing nozzle and the printing bed.

Caution: This printer has already been tested and adjusted to the optimal gap between the printing nozzle and printing bed before 

shipping. We recommend recording the original settings before carrying out any adjustments.

If the filament comes out from the nozzle, but doesn’t come out for the first layer while printing, please adjust Z-OFFSET. 

UTILITIES

Over time, carbon deposits or filament dust buildup in the nozzle may decrease its performance. It is advised to clean the nozzle 

after every time of printing. Also, if the print bed calibration shows “ERR” or if there is any residue on your prints, you may want 

to try to clean the nozzle.

For more detailed cleaning methods, please visit Support / FAQ page on website.

To clean the nozzle:

3.Hold the cleaning wire with the 

pliers, and carefully pass the wire 

through the nozzle openning.

1.Select "YES" to begin.

4.Select "OK" to return.

2.Wait until the extruder heats up and 

moves to the front, and the screen 

shows “READY FOR CLEAN”

1.The recommended distance between the nozzle and print bed

(with bed tape securely fastened) is 0.3mm. 

This should allow two sheets of copy paper to be drawn out 

smoothly but six sheets of copy paper cannot be passed.

2.Increase/decrease the value based on a scale of 0.05mm.

Increasing the value will increase the gap between the print module and print bed by 0.05mm 

Decreasing the value will also decrease the gap between the print module and print bed by 0.05mm

                       + [ ^ ] 

Z   OFFSET          0.1 mm

                       ─ [ v ] 

[OK]   TO   SAVE

If the cleaning cycle does not unclog the extruder, try cleaning the feeding path by following the steps below.

1.Unload filament correctly (refer to “UNLOAD FILAMENT”).

2.Move the extruder and the print bed to the home position by using the HOME AXES function. 

3.Activate “UNLOAD FILAMENT” again and wait until the extruder heats up to 150

. (Care should be taken during the operation to 

avoid potential burn injuries.)

CLEAN NOZZLE

ARE YOU SURE ?

  NO

  YES

CLEAN NOZZLE

READY FOR CLEAN


 [ OK ]  TO RETURN

4.Press the white button 

at the back of the 

extruder to release it. 

5.Lightly press the spring around 

the feed hole and remove the 

filament guide tube (do not 

disconnect the white flat cable)

7.After cleaning the feeding 

path, reinstall the guide tube 

to the top of the extruder and 

install the extruder to the 

bracket. 

6.Insert the two leaning pins into the 

two feeding paths all the way down at 

the same time and “floss” the inside of 

the nozzle to pull the residue out.

A.Feeding Path Cleaning Pin

B.Cleaner Wire

Summary of Contents for Da Vinci Jr. 2.0 Mix

Page 1: ...July 2016 P 1 da Vinci Jr 2 0 Mix da Vinci Jr 2 0 Mix User Manual da Vinci Jr 2 0 Mix 3D Printer...

Page 2: ...t removing these fixed materials may damage the machine Registration via XYZware before your first print is strongly recommended When registered with XYZprinting you will receive latest technical supp...

Page 3: ...en The scraper is used to remove the object from the print bed when printing has finished The bed tape is reusable and it can be replaced when it has worn out Store the gear cleaning brush properly Th...

Page 4: ...r module Be sure to remove the paper cardboard on the left side Be sure to remove the fixing cushion on the right side Be sure to remove the fixing tape at the back and front of the print bed Remove t...

Page 5: ...process is complete Installing the Accessories Install the Filament Guide Tube and Extruder Feed module 1 Feed module 2 1 Connect the filament guide tube to the extruder Insert the guide tube into fee...

Page 6: ...filament off at a 45 Open the release arm and push the filament all the way to the top so that the front end of the filament is completely inserted into the feed module Make sure that the filament is...

Page 7: ...ext use the control panel to load the filament 1 1 2 3 Select LOAD FILAMENT on the printer Select UTILITIES CHANGE SPOOL LOAD FILAMENT Wait for the screen to show INSERT FILAMENT and insert the filame...

Page 8: ...website Environmentally friendly 3D printer that satisfies the WEEE recycling requirements and utilizes the environmentally friendly PLA filaments for printing Satisfies electrical appliance safety sp...

Page 9: ...ent Change filament Sample printing SETTINGS The parameters of printer INFO The firmware and printer statistical information MONITOR MODE Monitor of extruder and print bed working temperature and prin...

Page 10: ...LOAD FILAMENT CARREGAR FILAMENTO UNLOAD FILAMENT DESCARREGAR FILAMENTO CHANGE SPOOL TROCA DE CARRETEL BUZZER ALARME SETTINGS CONFIGURA ES HOME AXES EIXO INICIAL STATISTICS ESTAT STICAS INFO INFORMA O...

Page 11: ...ction first to move Z AXIS Y AXIS to move print bed backwards and forwards 2 Select desired increment of travel with and buttons and press or hold or button for desired direction to move the extruder...

Page 12: ...provide the details of leveling information 4 1A If CALIB COMPLETED is shown for the detection result and AUTO LEVELING IS DISABLED NOW is shown on the screen it indicates good platform levelness Pre...

Page 13: ...ush to scrub the feed gear back and forth to remove the chips of filament out of the gear Replace the wire after the cleaning is completed 2 Press the black rubber fixer on top of hole and pull the gu...

Page 14: ...d print bed with bed tape securely fastened is 0 3mm This should allow two sheets of copy paper to be drawn out smoothly but six sheets of copy paper cannot be passed 2 Increase decrease the value bas...

Page 15: ...Para selecionar um intervalo de tempo mais longo Todas as configura es podem ser redefinidas para padr o de f brica com apenas alguns cliques Para redefinir todas as configura es de uma vez Voc pode t...

Page 16: ...encontrada aqui Voc pode ir para o website para as ltimas informa es documentos de produtos tutorial em v deo e muito mais MODO MONITOR mostra a temperatura da extrusora Veja abaixo a temperatura de...

Page 17: ...le Blending Zone Ativar Zona de Mesclagem Para imprimir o modelo em regime de cor monocrom tico por favor desmarque a caixa Uma vez que a fun o da Paleta ativada a m quina ir construir paredes de sepa...

Page 18: ...valor do Ponto de acesso sem fio Para obter mais detalhes do m todo de ajuste por favor consulte o Manual de Opera o do Produto ou as informa es fornecidas pela f brica 3 A Largura do canal que pode...

Page 19: ...s na impressora A fun o de monitoramento da impressora pode ser usada para confirmar o status online e as informa es de IP da impressora conectada O XYZware protege o endere o de IP da impressora e a...

Page 20: ...ctico polimerizado que extra do de milho cana de a car ou de outras plantas que cont m a car e considerado o material para impress o em 3D compat vel ecologicamente Objetos impressos de PLA indesejado...

Page 21: ...einicie a impressora 0 0 5 2 Erro de Armazenamento Substitua a extrusora 0 0 5 4 Extrusora n o suporta Substitua a extrusora 0 0 5 7 N o foi poss vel detectar extrusora Por favor reinstale a extrusora...

Page 22: ...eparo manuten o ou servi o no produto durante o per odo de garantia 4 A XYZprinting pode cobrar taxas em qualquer uma das seguintes circunst ncias Danos de falha humana No caso de danos ao produto cau...

Page 23: ...a danos impressora ou riscos para a seguran a N o utilize produtos qu micos inflam veis ou len os com lcool para limpar o dispositivo N o desmonte ou substitua a tampa da impressora por nenhuma tampa...

Reviews: