background image

P 7

V1

XYZprinting 3D Printer 

User Manual

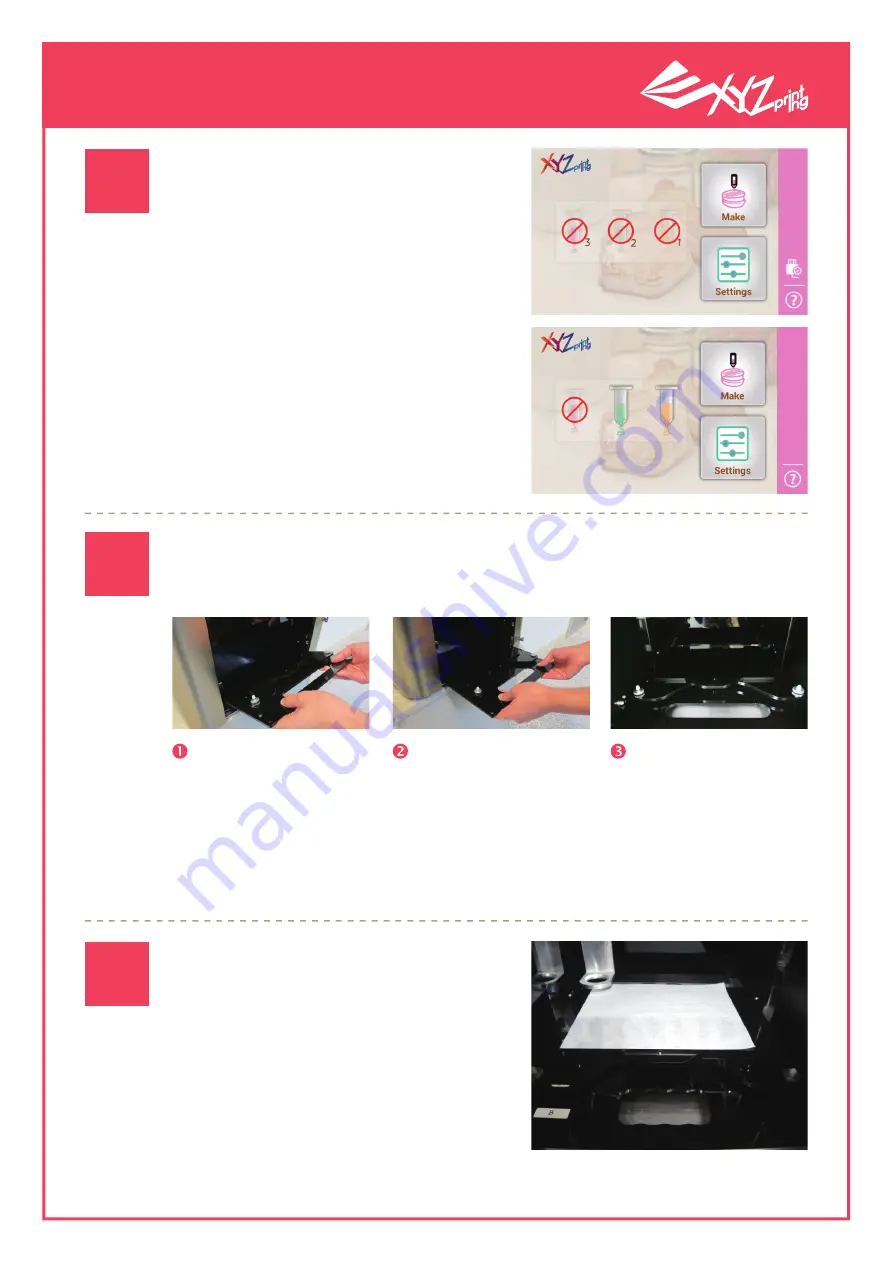
When printing, place the lining paper 
on the printing bed. The user may also 
use double-sided tape to temporarily 
secure and smoothen the lining paper.

Note! Unevenness of the lining paper 
will severely affect printing quality.

Placing the lining paper 

on the printing bed

Cartridges that have been detect-

ed by the printer will be colored 
to provide easy identification. This 
shows that the printer has already 
detected the Ingredient tube.

Please refer to the steps below to combine the printing bed and tray 
and load them into the printing room.

Loading the material plate and tray

Place the material 

plate in the center 

of the tray (the ori-

enting hole must be 

pointing outside).

Orient the tray so 

that it becomes 

horizontal and slide 

it into the printing 

room (please make 

sure that the tray can 

slide back and forth 

smoothly on the roll-

ing rail)

Please slide the front 

edge of the tray 

diagonally so that it 

makes contact with 

the rolling wheel.

Once the Ingredient tube has been 

installed, return to the Main Screen 

to check if the printer has detected 

the Ingredient tube.

Check if the printer has 

detected the ingredient 

tubes

04

05

06

Summary of Contents for 3C10A

Page 1: ...XYZprinting 3D Printer User Manual Model 3C10A P 1 V1 English...

Page 2: ...1 Product appearance 4 1 2 Accessories 5 1 3 Specifications 5 2 Introducing product operations 6 2 1 My Recipe 8 2 2 Printing from the USB drive 10 2 3 Printing from the PC 11 2 4 Settings 12 2 5 Car...

Page 3: ...measure the item s height and print the materials directly upon the item Users may print different materials in a variety of colors on the object to enhance visual aesthet ics The principle of 3D prin...

Page 4: ...P 4 V1 XYZprinting 3D Printer User Manual USB port Touch panel Ingredient tube room Printing room Power jack USB port 1 1 Product appearance...

Page 5: ...2 Accessories 1 3 Specifications Printer dimension Printing method Extruder diameter Operations Connection Maximum printing dimension Printing thickness Software System support File format 150 x 200 x...

Page 6: ...t be loaded in a proper sequence You must start loading from slot 1 be fore proceeding to the slot on the left If the ingredient tubes are not installed in this particular sequence 1 to 3 the carrier...

Page 7: ...fer to the steps below to combine the printing bed and tray and load them into the printing room Loading the material plate and tray Place the material plate in the center of the tray the ori enting h...

Page 8: ...e picture of your desired printing project If you want to print from a USB drive please enter the file name and skip to Step 14 Print data can be derived from 3 sources My Recipe USB Computer connecti...

Page 9: ...wait for the Ingredient tube to be returned to its original location before retrieving the finished product 03 04 05 06 When materials run out during the printing process the user may use the Cartridg...

Page 10: ...ng The Option screen will be displayed Select the Add or Remove icons to add or remove files respectively from your USB Insert your USB drive USB will be shown in the Main Screen Ensure that the USB i...

Page 11: ...cted select Done at the top right corner to transfer the file to the machine Repeat Steps 1 to 6 of section 2 1 to print the files Use the USB cable to connect the printer to the PC for detailed setti...

Page 12: ...begin printing Press the Settings icon on the Main Screen to enter the printer settings screen Press Print after adjusting the parameters Select Print to initiate printing Before printing please check...

Page 13: ...ges to choose from Press the Sound function in the settings screen to change the sound when pressing the button 0 means that no sound will be played Press the Display function in the settings screen t...

Page 14: ...s current status including Status Model Serial Number OS Version Application Version Firm ware Version and Legal Informa tion Click Restore to let the system clear user stored data in the printer and...

Page 15: ...m the inlet end of the ingredient tube and make sure that the material is extruded from the nozzle 2 5 Cartridge loading demonstration play doh 04 05 Prepare the Ingredient tube and the materials to b...

Page 16: ...packinginstruc tions providedontheQuickGuidefortheselocations User requirements Emergency handling Donotplaceintheprinterinanoverlyhumidarea Keepthecoverclosedbeforeandafteruse The maximumloadoftheing...

Page 17: ...stoppedduringtheprintingprocess pleaseshutdowntheprinter waitforseveral seconds beforerestartingtheprinterandreprintyourproject The materialplateisconstructedusingplastics Pleaseavoid exposingtheplate...

Reviews: