background image

2-2

3510T/3510KP/3512T/3512KP System Manual

Perform the following steps before starting the system tests:
1.


Place the CPU board jumpers and switches to the factory set positions. Refer to

your CPU manual for these settings.

2.


Plug the female end of the AC power cable into the side of the unit and the male

end into a properly grounded outlet.

3.


Connect the serial loopback connector(s) and the printer cable to the appropriate

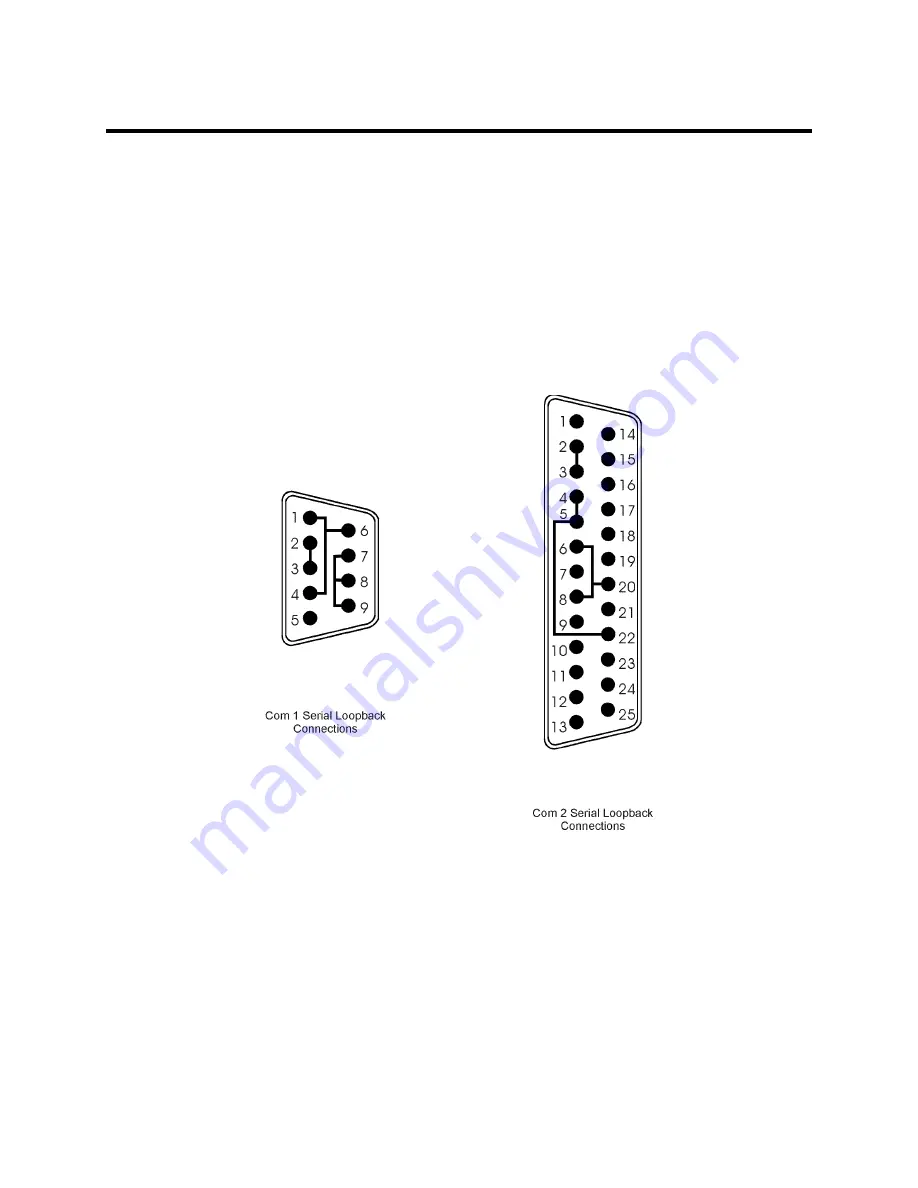
connectors and connect a PC/AT or PS/2 keyboard. Figure 2-1, Serial Loopback

Connections, illustrates the wiring necessary for the loopback connection.

4.


Default the CMOS setup to the factory settings.

Figure 2- 1. Serial Loopback Connections

Summary of Contents for 3510T

Page 1: ...3510T 3510KP 3512T 3512KP Flat Panel Industrial PCs P N 350003A 1999 XYCOM AUTOMATION AUTOMATION INC Printed in the United States of America...

Page 2: ...of non shielded equipment interface cables to this equipment will invalidate FCC EMI and European Union EMC compliance and may result in electromagnetic interference and or susceptibility levels which...

Page 3: ...ory Modules SIMMs 3 8 PC AT and PCI Boards 3 9 Installing External Hardware Options 3 9 External Floppy 3 9 Front Connector Access 3 12 Custom Logo 3 12 Customized Keypad Inserts 3510KP 3512KP only 3...

Page 4: ...les Menu 4 3 Macros Keypad Type Menu 4 3 Macros Edit Menu 4 4 Upload Menu 4 6 Download Menu 4 7 Utilities Menu 4 7 Codes 4 77 Chapter 5 Maintenance 5 1 Preventive Maintenancs 5 1 Fuse Replacement 5 1...

Page 5: ...een versions 3510T 3512T Keypad version 3510KP 3512KP Keypad and touchscreen units 3510KPT 3512KPT Hard disk drive facilities The front panels of the units are sealed to NEMA 4 4X 12 and IP65 3510 351...

Page 6: ...deo RAM PCI local bus IDE controller Two 168 pin SDRAM DIMMs that support 32 64 128 and 256 MB options Two USB ports 100MHz front side bus with Pentium II processors Standard Features Both Units Flash...

Page 7: ...azardous locations not available on units with fieldbus or control option boards installed Optional Features All Units Following are optional features available for the units Processor speed options T...

Page 8: ...reply card If you ordered the system with a touchscreen installed you will also receive a touchscreen driver diskette and manual Quick Start up This section gives you the steps to get the systems up a...

Page 9: ...Chapter 1 Introduction 1 5 4 Turn on the power to the unit The system will boot up into the operating system 5 Install application software via the external floppy the network or the IR port...

Page 10: ...ailures may occur Make sure the BIOS setup menus are configured properly factory set configuration To enter the BIOS setup menus Press F2 after the POST RAM test has completed Make the necessary chang...

Page 11: ...he female end of the AC power cable into the side of the unit and the male end into a properly grounded outlet 3 Connect the serial loopback connector s and the printer cable to the appropriate connec...

Page 12: ...ocessor Test J Video Adjustments Test K Video Interface Test L Speaker Port Test M LPT1 Printer Port Test N LPT2 Printer Port Test O C Hard Drive Interface Test P D Hard Drive Interface Test Q A Flopp...

Page 13: ...anel The panel protects the system s interior when the system is properly panel mounted 3510 12 Front Panel Figure 3 1 3510 3512 Front Panel Feature Description Display The 3510 comes with a 10 4 inch...

Page 14: ...oad special software not included to use this feature The infrared IR link is designed to operate at a distance of 0 to 1 meter Enable the interface through the BIOS setup menu Note When the IR port i...

Page 15: ...one of the serial ports including communication between the computer module and the touchscreen if on COM2 or a serial mouse Input Lit when the unit has a touchscreen the LED gets brighter when a touc...

Page 16: ...r determines whether a second pointing device will function correctly If you are using a mouse with a touchscreen please review the Touchscreen Driver Installation instructions I O Panel COM 2 RS 232...
Page 17: ...S 2 stacked mini din that allows you to attach a mouse at the side of the unit If you receive a unit with a touchscreen this port may be covered with a label stating that the port is not functional as...

Page 18: ...ur flush captive screws located across the top and bottom of the back panel Loosen these screws using a Phillip head screwdriver to remove the front panel Note If your system has a touchscreen disconn...

Page 19: ...requirements then mount the unit according to the following instructions 1 Locate a position that meets the required specifications 2 Do a panel cutout The dimensions are given in this chapter 3 Inst...

Page 20: ...installation of expansion boards may void safety and or EMC compliance Remove the lid to install internal hardware options DRAM and Additional DRAM Single In line Memory Modules SIMMs You can order y...

Page 21: ...les on the back of the unit for the floppy mounting A fifth screw hole is on the back for the cable clamp screw See the figures of the back panel and the bottom panel Figure 3 4 and Figure 3 5 Front m...

Page 22: ...the floppy drive access door to the rack filler plate or the panel using the four mounting nuts as shown in Figure 3 7 Torque the nuts to 35 in lb 3 95 NM Figure 3 7 Floppy Drive Front Mounting Option...

Page 23: ...3 11 Figure 3 8 Floppy Drive Front Mounting Option top view Front Connector Access If you wish to access the keyboard and external floppy connectors from the front of the computer module you must ins...

Page 24: ...panel as shown The cutout dimensions are given in Figure 3 9 Figure 3 10 Front Floppy and Keyboard Access Option Custom Logo You have the option to place a custom label on the unit Refer to the follo...

Page 25: ...7 0 176 thick polyester with 3M 468 adhesive on far side 0 06 1 52 4 Places Figure 3 11 Logo Label Dimensions Customized Keypad Inserts 3510KP 3512KP only You can customize your keypad with keypad ins...

Page 26: ...3510 3510KP 3512 3512KP System Manual 3 14 Figure 3 13 3510KP 3512KP Insert with Dimensions F1 F20 Figure 3 14 3510KP 3512KP Keypad Insert Position...

Page 27: ...ion describes how to install the drivers associated with the system Ethernet Drivers If Windows 95 or Windows NT 4 0 is pre installed on your system and you ordered the Ethernet card option Ethernet d...

Page 28: ...T550 WINNT C VGA C T DOS UTILITIES Video Expansion This section deals with the hardware expansion capability of the video controller chip in DOS applications Note It is not necessary to read this sect...

Page 29: ...or EXP_DEF EXE Text Vert Hor Expansion Default Graphics Off EXP_OFF EXE Text Vert Hor Expansion Off Graphics Off Definitions Vert Vertical only expansion is invoked Vert Hor Vertical and Horizontal ex...

Page 30: ...ndows 95 touchscreen driver is available in a COM2 and a mouse port version Windows NT touchscreen driver is only available in a version for COM2 Note If you order Windows NT pre loaded on a system th...

Page 31: ...r Mouse driver emulates a Microsoft mouse Note If MS DOS or Windows 95 is installed on your system the touchscreen is configured for the mouse port and the mouse port is unavailable If Windows NT is i...

Page 32: ...ng a mouse No The Setup program loads a cursor display driver MTSMOUSE DRV as well as the Windows touchscreen driver Calibrating the Touchscreen If you need to recalibrate the touchscreen refer to the...

Page 33: ...s If using a fan make sure that outside air is not brought inside the enclosure unless a fabric or other reliable filter is used This filtration prevents conductive particles or other harmful contamin...

Page 34: ...ply All electrical racks or chassis and machine elements should be Earth Grounded in installations where high levels of electrical noise can be expected The rack chassis should be grounded with a grou...

Page 35: ...Line Voltage Variation The unit s power supply is built to operate with output voltage ranges of 90 132 VAC and 180 264 VAC or 20 36 VDC whichever applies and still allow the system to function withi...

Page 36: ...able into the block plug be sure there is no exposed wire Trim the wire ends of the cable or cut a new cable if necessary 4 Insert the three wire ends of the power cable into the three holes of the bl...

Page 37: ...m the following steps to create the DC power cable 1 Cut the wire cable to the desired length 2 Strip 0 25 inch 6 mm of insulation from the end of the conductor wire No bare wire should be exposed whe...

Page 38: ...g Completely loosen the two securing screws on the plug when disconnecting the power cord from the unit Installation is complete once the power and other optional interface cables are installed Mounti...

Page 39: ...s provided on the bottom panel of the unit see Figure 3 5 7 Tighten the 12 10 nuts to 25 lbs inch 2 8 Newton meters 28Kgf cm System Cutout Dimensions 3510 3512 1 315 33 40 315 8 00 2 150 54 61 6 150 1...

Page 40: ...hout the system s temperature range The expansion power is limited as shown in the following table Available Expansion Current Voltage Available Current AHIP4 5x86 processors a AHIP6 Celeron and Penti...

Page 41: ...o ensure that the product is properly rated for the location If the intended location does not presently have a Class Division and Group rating then users should consult the appropriate authorities ha...

Page 42: ...re ce materiel inacceptable pour les emplamements de classe I II Division 2 Warning Explosion Hazard Do not disconnect equipment unless the power has been switched off or the area is known to be non h...

Page 43: ...are met Class I Locations Class I locations are those in which flammable gases or vapors are or may be present in the air in quantities sufficient to produce explosive or ignitable mixtures Class II L...

Page 44: ...ignitable mixtures Dust accumulations are normally insufficient to interfere with normal operation of electrical equipment or other apparatus Combustible dust may be in suspension in the air as a res...

Page 45: ...hose requirements are beyond the scope of this document and it is the responsibility of the customer to ensure that their installation is compliant with codes and regulations that apply to their speci...

Page 46: ...e communication cables while power is applied at either end of the cable This may result in an incendiary spark Permanent damage to the workstation communication components may occur Operation and Mai...

Page 47: ...is known to be non hazardous This includes the installation or removal of power cables communication cables or removal of the rear cover of the unit 4 Only technically qualified service personnel sho...

Page 48: ...3510 3510KP 3512 3512KP System Manual 3 36...

Page 49: ...subdirectory Enter the subdirectory and type KPUTIL Using the Keypad Utility The Keypad utility uses a menu bar and pull down menu system All menu bars are displayed across the top of the screen Xyco...

Page 50: ...pad utility and then used to reprogram other units from a batch file The command Keypad filename runs the Keypad utility batch mode Filename is the file containing the new keypad macros You must inclu...

Page 51: ...y is overwritten Once loaded the macro set is available to edit view teach and or download to the keyboard controller Close Clears the macro set from memory and closes the file from which they came Sa...

Page 52: ...t represents on the full stroke keyboard Special labels are used for certain keys e g Spc for space bar UAr for up arrow and bk for the break code prefix The code line is displayed in either Hex or de...

Page 53: ...her hex or decimal format and is the line in which the actual editing takes place The bottom line the ASCII line displays the macro in ASCII format and is not user configurable This line helps keep tr...

Page 54: ...ss F1 Select Paste and then press ENTER Codes Displays a table of keys and their scan codes in Hex See the Codes section later in this chapter for a complete code listing Hex Decimal Toggles between d...

Page 55: ...the new macros which become the new key definitions for the keypad Utilities Menu When Utilities is selected a menu bar displays four choices Func Lock ON Func Lock OFF Clear EEPROM and Exit Func Lock...

Page 56: ...F3 04 F0 04 I 43 F0 43 F4 J F4 0C F0 0C J 3B F0 3B F5 K F5 03 F0 03 K 42 F0 42 F6 L F6 0B F0 0B L 4B F0 4B F7 M F7 83 F0 83 M 3A F0 3A F8 N F8 0A F0 0A N 31 F0 31 F9 O F9 01 F0 01 O 44 F0 44 F10 P F1...

Page 57: ...75 E0 F0 75 E0 F0 12 PREV PgUp E0 12 E0 7D E0 F0 7D E0 F0 12 PgUp E0 12 E0 7D E0 F0 7D E0 F0 12 left arr left arr E0 12 E0 6B E0 F0 6B E0 F0 12 Contrast Down E0 12 E0 6B E0 F0 6B E0 F0 12 HOME E0 12 E...

Page 58: ...lity Program 3510KP 3512KP 4 1 Loading the KEYPAD Utility 4 1 Using the Programmable Keypad Utility 4 1 Utility Batch Mode 4 2 Main Menu 4 2 Exit 4 2 Files Menu 4 3 Macros Keypad Type Menu 4 3 Macros...

Page 59: ...r often to determine if it needs to be changed ahead of schedule Remove dust and dirt from PC components If dust builds up on heat sinks and circuitry an obstruction of heat dissipation could cause th...

Page 60: ...fuse Return the unit to Xycom Automation for fuse replacement Fan Filter Replacement To change the fan filter remove the grill and filter as illustrated in Figure 5 1 Clean or replace the filter and...

Page 61: ...ed temperatures result in etching and attack evidenced by decomposition Alkalis Generally compatible at low concentration and room temperature Higher concentrations and elevated temperatures result in...

Page 62: ...rning Midland MI 48640 800 248 2345 Harmony 68 Security 68 Gulf Oil Petroleum Prod Dept Pittsburgh PA 15230 412 655 6247 Lubriplate Aero Fisher Bros Refinery 129 Lockwood Street Newark NJ 07105 Martem...

Page 63: ...nd Cleaners Mild Soap and Water Solution VM P Naphtha Fantastik Windex Joy Top Job Mr Clean Formula 409 The above aliphatics alcohols and halogenated hydrocarbons should be used only for wiping or sho...

Page 64: ...134613 001 133128 001 134639 001 117319 001 134613 001 133128 001 134639 001 DRAM AHIP4 1M x 32 4 Mbytes 2M x 32 8 Mbytes 4M x 32 16 Mbytes 8M x 32 32 Mbytes 16M x 32 64 Mbytes AHIP6 8M x 32 32 Mbyte...

Page 65: ...or Xycom Automation Inc at 1 800 289 9266 or 734 429 4971 Please have the following information Company name shipping and billing address Type of service desired product repair or product exchange Pr...

Page 66: ...watts AHIP4 200watts AHIP6 Available Power With AHIP4 CPU board 5 V 6 17A 12 V 1 88A 12V 0 71A Caution Total expansion power not to exceed 46 watts With AHIP6 CPU board 3 3 V 9A 5 V 6A 12 V 1 5A 12 V...

Page 67: ...80 RH noncondensing Altitude Operating Non operating Sea level to 10 000 feet 3048 m Sea level to 40 000 feet 12192 m Vibration Operating Non operating 5 to 2000 Hz 0 006 0 15mm peak to peak displace...

Page 68: ...B 1 Appendix B Block Diagram Figure B 1 3510 3512 System Block Diagram...

Page 69: ...INVERTER ASM INTERFACE BOARD LCD FLAT PANEL B U LB B U L B LA M P1 F P N L1 LA M P2 D C 10 4 TFT DISPLAY KIT 12 1 TFT DISPLAY KIT AC INPUT AC IN HARD DRIVE D C H D D IR KEYBOARD FAN POWER SUPPLY AC IN...

Page 70: ...GND 4A 5VFUSE 5A KB_CLK 6A NC Aux Port Connector This PS 2 mini DIN connector allows you to attach a serial device Pin Signal 1B AUX_DATA 2B NC 3B GND 4B 5VFUSE 5B AUX_CLK 6B NC Note You cannot use t...

Page 71: ...supported on the AHIP4 and the AHIP6 boards Only one connector can be used at a time All termination is done outside the unit COM1 RS 232 RS 485 Pin Signal Pin Signal 1A DCD1 1B TXD 2A RXD1 2B TXD 3A...

Page 72: ...ort can be used only one at a time for the touchscreen controller IrDA interface or RS 232 connector The BIOS setup determines whether COM2 is used for either the connector or the IrDA interface Jumpe...

Page 73: ...f the unit is ordered without the internal floppy since the floppy interface supports only one floppy option Pin Signal Pin Signal 1 5V 14 FSTEP 2 IDX 15 NC 3 FDS1 16 FWD 4 5V 17 GND 5 NC 18 FWE 6 DCH...

Page 74: ...ps head screwdriver loosen the two protruding captive screws at the top back of the unit and remove the lid 3 If a touch screen is installed disconnect the touch screen cable TCH1 at the top of the sy...

Page 75: ...which the old assembly was removed Note Xycom Automation recommends replacing both bulbs at the same time 13 Repeat steps 10 through 12 to replace the bulb assembly on the right outside edge of the fl...

Page 76: ...f the front panel and set it aside 7 Unscrew the four screws that attach the flat panel display to the standoffs 8 Disconnect the bulb connector from the inverter card 9 Gently lift the right side of...

Page 77: ...Lift the rear display panel section to expose the full bulb assembly Note how the wiring on the bulb assembly is routed 17 Pop the wires out of the wire guides and remove the bulb assembly 18 Insert t...

Page 78: ...anel down and loosen the four captive screws holding the front panel to the display adapter plate 6 While securely holding the front panel flip the unit over 7 Lift off the front panel and set it asid...

Page 79: ...Bulb Assembly 13 Insert the new bulb assembly and push in until the tab locks in place Note Xycom Automation recommends replacing both bulbs at the same time 14 Repeat steps 12 and 13 for the second...

Page 80: ...floppy 3 9 front mounted connectors 3 9 D definitions class and division 3 30 display 3510KP 3512KP 3 4 Division 1 Locations 3 31 Division 2 Locations 3 31 Documentation kit 1 4 Download Menu 4 7 DRAM...

Page 81: ...ector C 1 mouse port C 1 parallel port C 1 VGA connector C 5 pointing device 3 20 Ports COM 3 5 IR 3 2 keyboard 3 6 C 1 parallel 3 5 printer 3 5 serial 3 5 video 3 7 power connector 3 9 power supply 3...

Reviews: