background image

XPRT-6kVA, XPRT-10kVA USER’S MANUAL  


UNINTERRUPTIBLE POWER SUPPLY (UPS) 


Xtreme Power Conversion® (XPC) Corporation   


Page 47 


Maintenance Bypass 

It is possible to bypass the UPS for maintenance purposes using the Maintenance Bypass Switch on the 

6kVA PDU or use the standard bypass built into the 10kVA model. If required, proceed with the 

following steps: 

1.


Switch the UPS on BYPASS by 

a.


For 6kVA  

i.


Press the keypad UPS OFF button on the front panel for 1 second. 

ii.


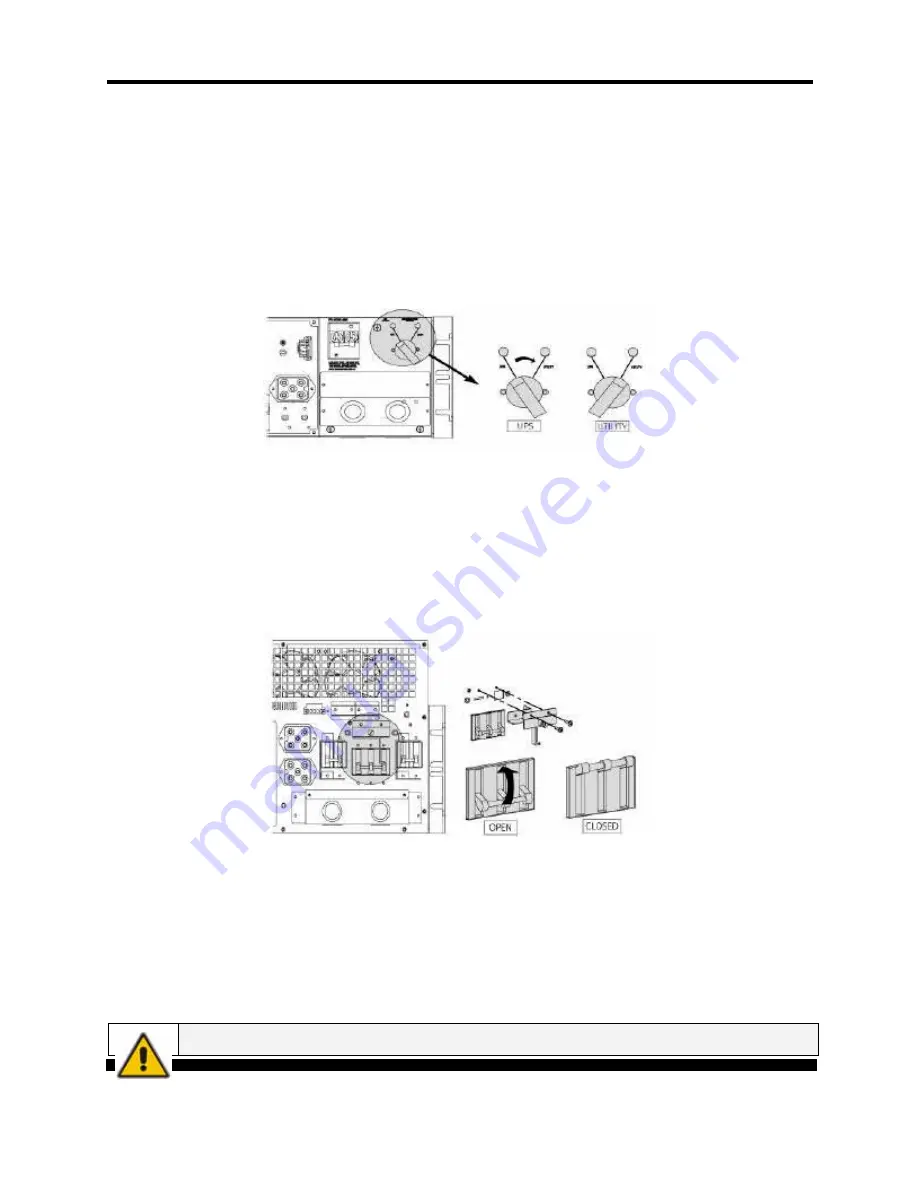
Switch the Maintenance Bypass Switch to BYPASS (FIG 55). 


FIG 55 – 6KVA MAINTENANCE BYPASS SWITCH TO UTILITY 

iii.


Switch the UPS off by pressing the keypad UPS OFF button on the front panel for 

1 second. 

iv.


Open the OUTPUT CIRCUIT BREAKER. 

v.


Open the INPUT CIRCUIT BREAKER. 

b.


For 10kVA  

i.


Remove the BYPASS PROTECTION COVER (FIG 56). 


FIG 56 – 10KVA MAINTENANCE BYPASS SWITCH TO UTILITY


ii.


Remove the BYPASS LOCK PLATE before switching to BYPASS (FIG 61). 

iii.


Press the keypad UPS OFF button on the front panel for 1 second. 

iv.


Switch the Maintenance Bypass Switch to BYPASS (FIG 61). 

v.


Open the OUTPUT CIRCUIT BREAKER. 

vi.


Open the INPUT CIRCUIT BREAKER. 

2.


The UPS is now operating in UTILITY BYPASS MODE and maintenance can be performed. 


NOTE 

Summary of Contents for XPRT-6kVA

Page 1: ...Xtreme Power Conversion Corporation Xtreme Performance Rack Tower Series XPRT 6kVA 10kVA User s Installation Manual...

Page 2: ...nversion On Line Technology 11 Efficiency Optimizer Function 12 Free Run Mode 12 Diagnostic Tests 12 System Configuration 12 HARDWARE INSTALLATION GUIDE 19 Safety Information 20 Installation Procedure...

Page 3: ...the UPS OFF 45 Maintenance Bypass 47 10KVA PARALLEL INSTALLATION AND OPERATION 48 Installation of a parallel system 49 Installing the parallel connection 51 Startup 10kVA UPS Parallel System 52 Normal...

Page 4: ...NTENANCE 63 Safety 63 General 63 Recycling the UPS at the End of Service Life 63 Batteries 64 Internal Battery Replacement 6kVA Model 64 Internal Battery Replacement 10kVA Model 66 Power Unit Maintena...

Page 5: ...on in this manual to correct the problem If the problem is not corrected please collect information so that the Technical Support personnel can more effectively assist you EMC Statements FCC Part 15 N...

Page 6: ...ase of non observance unauthorized alterations or improper use of the delivered UPS While every care has been taken to ensure the completeness and accuracy of this manual XPC accepts no responsibility...

Page 7: ...TE Warns the user about important operations or procedures described in this manual Safety Symbols CAUTION The product may be in danger when procedures or operations are not correctly performed damage...

Page 8: ...floor and elevator loading capacity Move the UPS and the battery pack in its original package to the final destination room Do not stack other package on top WARNING Pay attention to the HEAVY WEIGHT...

Page 9: ...y be extremely toxic If exposed to electrolyte wash immediately with plenty of water The batteries must be disconnected during maintenance or service work When replacing the batteries use only the sam...

Page 10: ...s of the UPS units are described herein and installation must be carried out in accordance with this manual Electrical installation must also carefully follow local legislation and regulations Only qu...

Page 11: ...backup time the UPS will shut down avoiding battery damage When the input AC voltage returns the UPS will automatically return online to recharge the batteries As shown in fig 1 block diagram An input...

Page 12: ...When starting the UPS the frequency regulation detected is 50 or 60 Hz 0 25Hz Diagnostic Tests When the UPS is started a diagnostic test is automatically executed checking the electronics and batterie...

Page 13: ...SNMP2 90000031 o 4 Post Mounting Rail Kit XPRT RR2 90000032 o 10kVA Power Distribution Unit e w 8 5 20R 2 L5 20R 2 L6 30R XPRT PDU3 90000035 o Power Distribution Units for additional receptacles XPD1...

Page 14: ...XPRT 6kVA XPRT 10kVA USER S MANUAL UNINTERRUPTIBLE POWER SUPPLY UPS Xtreme Power Conversion XPC Corporation Page 14 FIG 3 10kVA FRONT VIEW...

Page 15: ...R SUPPLY UPS Xtreme Power Conversion XPC Corporation Page 15 FIG 4 XPRT 6000HB 90000036 BUNDLE REAR VIEW WITH UPS INTERNAL BATTERY HARDWIRE PDU FIG 4 XPRT 6000B 90000013 BUNDLE REAR VIEW WITH UPS INTE...

Page 16: ...SER S MANUAL UNINTERRUPTIBLE POWER SUPPLY UPS Xtreme Power Conversion XPC Corporation Page 16 FIG 4 XPRT 10000B 90000014 REAR VIEW STANDARD HARDWIRE INTERNAL BATTERIES FIG 4 XPRT 10000 90000016 XPRT P...

Page 17: ...RT 6kVA XPRT 10kVA USER S MANUAL UNINTERRUPTIBLE POWER SUPPLY UPS Xtreme Power Conversion XPC Corporation Page 17 W PDU 4 5 20R 2 L5 20R 2 L6 30R FIG 5 FRONT PANEL HORIZONTAL FIG 6 FRONT PANEL VERTICA...

Page 18: ...ks if available supply the power until either the batteries are depleted or the utility input power returns Green Operation LED This LED will be on when the output is supplied by the UPS not on bypass...

Page 19: ...100 Yellow Remote Emergency Power Off EPO Port A customer supplied switch located remotely can be used to open the EPO connection and allows the UPS output receptacles to be switched off Since the EP...

Page 20: ...t is important that the unit has adequate ventilation Maintain air movement around and through the unit Do not block the air vents The ambient temperature should not exceed 40 C 104 F Optimal battery...

Page 21: ...nal batteries All required items are included in the delivery except rails available as rail kit option NOTE The UPS output receptacles and or terminals are live as soon as the UPS is connected to inp...

Page 22: ...y for further connection proceed with internal battery connection Rack Mount Installation 1 Place the UPS cabinet horizontally on a flat surface 2 Install the mounting brackets that came with the unit...

Page 23: ...VA RACK MOUNT ASSEMBLY NOTE Please consider the weight of the UPS prior to installation to ensure the rack and floor is capable of supporting the weight For rack installation we recommend that the UPS...

Page 24: ...as to be mounted inside the unit before the UPS installation Please proceed with the following steps 1 Unpack the battery pack from its container 2 Place the battery pack in front of the battery compa...

Page 25: ...T 6kVA XPRT 10kVA USER S MANUAL UNINTERRUPTIBLE POWER SUPPLY UPS Xtreme Power Conversion XPC Corporation Page 25 FIG 13 XPRT 6KVA SLIDE BATTERY PACK INTO UPS FIG 14 XPRT 6KVA ATTACH BATTERY COVER ON U...

Page 26: ...installation Please proceed with the following steps 1 Unpack the two battery packs from its container 2 Place the battery packs in front of the battery compartment aligning the rear connector to the...

Page 27: ...6kVA XPRT 10kVA USER S MANUAL UNINTERRUPTIBLE POWER SUPPLY UPS Xtreme Power Conversion XPC Corporation Page 27 FIG 16 XPRT 10KVA SLIDE BATTERY PACKs INTO UPS FIG 17 XPRT 10KVA ATTACH BATTERY COVER ON...

Page 28: ...additional external battery pack connects to the UPS in the same way whether the UPS is being used in tower or rack mount format When used in tower format the UPS and additional battery packs can be...

Page 29: ...XPRT 6kVA XPRT 10kVA USER S MANUAL UNINTERRUPTIBLE POWER SUPPLY UPS Xtreme Power Conversion XPC Corporation Page 29 FIG 19 XPRT 6KVA UPS BATTERY PACK FIG 20 XPRT 6KVA UPS BATTERY PACK CABLE CONNECTION...

Page 30: ...arest socket connection on the existing battery cabinet see FIG 21 FIG 21 XPRT 6KVA UPS MULTIPLE BATTERY PACK CABLE CONNECTION NOTE When the UPS is connected to the input utility and the battery pack...

Page 31: ...ted inside the battery pack after the battery pack is set in position 1 Unpack the 2 battery trays from their container 2 Place the battery trays side by side in the battery compartment see FIG 22 3 F...

Page 32: ...ack connects to the UPS in the same way whether the UPS is being used in tower or rack mount format When used in tower format the UPS and additional battery packs can be mounted together in one set of...

Page 33: ...rporation Page 33 FIG 24 XPRT 10KVA UPS BP5 TOWER INSTALLATION FIG 25 XPRT 10KVA UPS BP CABLE INSTALLATION NOTE If further battery packs are used they connect via the previous battery pack Thus the ca...

Page 34: ...on port and an SNMP card slot Prepare the serial communication cable for DB9 communication port connection or the network cable for SNMP communication connection as follows 1 Choose from the 2 provide...

Page 35: ...BLE INSTALL 1 Battery Low open collector 2 TxD serial communication 3 RxD serial communication 4 Remote shutdown only on battery 5 Communication ground 6 7 Battery Low open emitter 8 Utility failure o...

Page 36: ...E Ensure that the UPS is isolated prior to installation no live input source may be connected to the UPS during the installation procedure Open all the input output switches breakers on the power dist...

Page 37: ...UPPLY UPS Xtreme Power Conversion XPC Corporation Page 37 FIG 30 HARDWIRE INSTALL 6KVA UPS FIG 31 HARDWIRE INSTALL 10KVA UPS 3 Punch out the appropriate holes in the terminal cover Secure the input ou...

Page 38: ...ut utility wires to the terminals L1 L2 Line and N Neutral and the ground wire to GRD Ground connection is essential see FIG 33 or FIG 34 FIG 33 HARDWIRE WIRE CONNECTIONS 6KVA UPS FIG 34 HARDWIRE WIRE...

Page 39: ...shown in FIG 20 or 25 8 Connect utility power to the UPS 9 Proceed to the Quick Start section of these instructions If parallel operating units will be installed please reference that section of thes...

Page 40: ...it To replace the Power Distribution Unit on the 6kVA or to place the optional Power Distribution Unit on the 10kva proceed as follows 1 Ensure the UPS is completely shutdown with all breakers opened...

Page 41: ...it FIG 39 PDU COVER REMOVAL 10KVA UPS 6 Remove the PDU from the UPS The UPS is now ready for the new PDU assembly 7 On the 6kVA model align terminals on the backside of the PDU with the ones on the UP...

Page 42: ...ALL 10KVA UPS The UPS is now ready to be started STARTUP Startup 6kVA UPS 1 Ensure that all breakers on the UPS are off 2 In case external battery packs are used switch on the battery pack circuit bre...

Page 43: ...N LED will be illuminated and BYPASS LED will be extinguished 8 Close the OUTPUT CIRCUIT BREKAER on the rear side of the UPS FIG 45 FIG 45 6KVA OUTPUT CIRCUIT BREAKER 9 The UPS is now in operation equ...

Page 44: ...REEN UTILITY INPUT LED will be illuminated FIG 48 10KVA INPUT CIRCUIT BREAKER 6 Wait 45 seconds to allow the output voltage to stabilize 7 Press the keypad UPS ON for 1 second Within a few seconds OPE...

Page 45: ...city of the UPS 4 The OPERATING TEMPERATURE is below alarm level Switching the UPS OFF 1 Make sure that the load has been shut down in an orderly manner 2 Press the keypad FIG 50 for 1 second to switc...

Page 46: ...NPUT BREAKER FIG 54 10KVA INPUT BREAKER 6 In case EXTERNAL BATTERY PACKS are connected switch the BATTERY PACK CIRCUIT BREAKER to the OFF position and disconnect battery cabling at the rear of the UPS...

Page 47: ...witch to BYPASS FIG 55 FIG 55 6KVA MAINTENANCE BYPASS SWITCH TO UTILITY iii Switch the UPS off by pressing the keypad UPS OFF button on the front panel for 1 second iv Open the OUTPUT CIRCUIT BREAKER...

Page 48: ...LED will be illuminated and BYPASS LED will be extinguished 4 Switch the UPS to BYPASS by pressing the keypad UPS OFF on the front panel for 1 second 5 Close the OUTPUT CIRCUIT BREAKER 6 For the 6kVA...

Page 49: ...parallel system 1 All inputs of the UPS must be supplied from the same source Be sure that L1 L2 N correspond on all the units of the parallel system All inputs must be individually protected with fus...

Page 50: ...n table 2 and table 3 4 The length of all input cables from the input junction FIG 59 to the UPS inputs should be equal The same applies to the cables from the outputs to the output junction FIG 59 Th...

Page 51: ...ion and ensure no one is able to close them during this installation step 1 Locate the parallel port on the rear side of the UPS and remove the parallel communications cover FIG 60 FIG 60 10KVA UPS RE...

Page 52: ...INPUT CIRCUIT BREAKER placed on the rear side of the UPS to ON position in sequence FIG 53 The GREEN UTILITY INPUT LED will be illuminated 6 Wait 45 seconds to allow the output voltage to stabilize 7...

Page 53: ...ER to OFF position FIG 65 3 Press the keypad FIG 64 for 1 second to switch the UPS to BYPASS FIG 64 TO TURN THE UPS OFF Press the keypad FIG 64 for a second time for 1 second to switch the UPS OFF 4 T...

Page 54: ...ch the BATTERY PACK CIRCUIT BREAKER to the OFF position and disconnect battery cabling at the rear of the UPS 7 Open all switches and breakers upstream to the UPS 8 Remove internal and external batter...

Page 55: ...5 0 4 L OVERLOAD WARNING 1 5 1 0 5 SEC H BATTERY NOT CONNECTED 0 4 H REPLACE BATTERY 0 4 1 60 SEC L BYPASS OUT OF LIMITS 1 5 0 4 O ON BYPASS 1 5 0 4 1 120 SEC O ON BATTERY 1 5 0 4 H BATTERY LOW 1 0 4...

Page 56: ...es to supply the load The runtime capacity LED bar will show the remaining time The UPS will shutdown After the batteries have been discharged automatic restart if enabled or If keypad UPS OFF is pres...

Page 57: ...assuming that the conditions for a transfer to bypass are fulfilled If an overload condition between 110 150 persists the UPS will also switch to bypass operation In both conditions the overload alar...

Page 58: ...d 1 0 5 secs Overload 1 4 secs General Alarm 1 60 secs Battery test failed 1 120 secs On bypass Fault Mode The UPS may be in FAULT MODE if the following failure occurred FAULT SITUATION INDICATORS ON...

Page 59: ...t changes to the UPS settings are only possible in bypass or standby mode Remote Emergency Power Off REPO REPO may be created using either normally open or normally closed switch The unit is shipped w...

Page 60: ...ng Software is required BATTERY MANAGEMENT Maximum battery life and reliability are obtained by the following features Battery Connection Test At startup the UPS performs an automatic test to check th...

Page 61: ...is a plug in interface port which enables advanced communication between the UPS and a computer via a serial cable FIG 68 and UPS Monitoring Software The interface port is already operational in stan...

Page 62: ...ed about the new total battery capacity to allow a reliable recalculation of the available runtime via UPS Monitoring Software Depending of the charge condition of the new batteries the new runtime ca...

Page 63: ...er environmental requirements as shown in the Specification and keep the air inlets outlets free of dust NOTE Except for battery replacement refer maintenance and service work to qualified and skilled...

Page 64: ...rn When working with batteries remove watches rings or other metal objects and only use insulated tools Avoid charging batteries in a sealed container Proper disposal of batteries is required Refer to...

Page 65: ...ation and consider the weight of the battery FIG 70 BATTERY TRAY REMOVAL 4 Unpack the new battery tray from its box 5 Place the battery tray in front of the battery compartment aligning the rear conne...

Page 66: ...ilure please proceed with the following steps NOTE During battery replacement the UPS will not be able to support the load if an input utility failure occurs It is recommended to switch off the load b...

Page 67: ...with the screws to hold the battery trays in the UPS cabinet 8 Fix the battery grille by tightening screws 9 Re install the two front covers NOTE To avoid battery malfunction in case of additional ba...

Page 68: ...minal cover screws on the back side of the PDU slide the cover over the terminals and re affix the screws FIG 74 FIG 74 6KVA PDU TERMINAL COVER 4 The Power Module can now be replaced If internal batte...

Page 69: ...UNIT REINSTALL 8 Reposition the power module cover and re affix with the 5 screws FIG 75 9 Re affix the 3 front covers FIG 75 10 Switch the UPS back to normal operation TROUBLESHOOTING Whenever a malf...

Page 70: ...ker tripped Replace fuse or reset breaker Alarm LED illuminated continuous acoustic alarm UPS failure Contact UPS dealer or go to www xpcc com UPS over temperature Allow UPS to cool down Overload at U...

Page 71: ...oad Efficiency AC DC AC Greater than 86 Auto Restart Yes Start on Battery Yes Overload Capacity 110 for 300 sec 130 for 30 sec 200 for 5 sec Crest Factor 3 1 at full load BATTERY Battery Type 12 8AH 1...

Page 72: ...ower Conversion XPC Corporation Page 72 MODEL XPRT 6kVA XPRT 10kVA ENVIRONMENT Operating Temperature 0 40 C 32 104 F Audible Noise 55dba Altitude 11500 ft 3500 m above sea level WARRANTY Warranty Thre...

Page 73: ...POWER SUPPLY UPS Xtreme Power Conversion XPC Corporation Page 73 SHIPPING LIST 1 1 UPS 2 1 User s and Installation Manual 3 1 6 ft USB DB9 adaptor cable 4 1 UPS Monitoring Software CD 5 2 sets of towe...

Page 74: ...bers if possible A technician will ask you for the above information and if possible help solve your problem over the phone In the event that the unit requires factory service the technician will issu...

Page 75: ...anty shall be void if a the equipment is repaired or modified by anyone other than XPC Corporation or a XPC Corporation approved third party b the equipment is damaged by the customer is improperly us...

Page 76: ...by XPC during the period limits and up to the dollar limits stated as follows Product Dollar limit Period of Coverage XVT 25 000 Term of XPC Limited Warranty NXRT XPRT 6 kva 50 000 Term of XPC Limited...

Page 77: ...cy must be made within 10 days of the date of alleged damage to the Connected Equipment 2 Call the XPC technical support department at 1 800 582 4524 and obtain a Load Protection Policy Returned Mater...

Page 78: ...ications between the parties relating to the subject matter of this agreement No employee of XPC or any other party is authorized to make any representations beyond those made in this agreement concer...

Page 79: ...TRANSMIT ACTIVE UPS FAIL OFF OK NO FAULT ON NO UPS CONNECTION ACTIVE OFF FAULT OF DEVICE BLINK DEVICE OK NO FAULT Features Each SNMP Web Card provides the following features 10 100 Mpbs connection sp...

Page 80: ...XPRT 6kVA XPRT 10kVA USER S MANUAL UNINTERRUPTIBLE POWER SUPPLY UPS Xtreme Power Conversion XPC Corporation Page 80 Architecture FIG 78 COMMUNICATIONS ARCHITECTURE...

Page 81: ...ing the equipment If any problems are encountered with the installation procedure please contact the support xppc com before proceeding Switch off the UPS and wait for approximately 2 minutes or place...

Page 82: ...tion Configuration via serial connection Connect the SNMP Web Card to a computer using a standard 1 1 serial communications cable Run a terminal simulator e g HyperTerminal on a PC running Windows Con...

Page 83: ...network TELNET Launch a telnet client e g on a PC running Windows select Run from the Start menu and type telnet IP The default username login and password are ge and ge A command line configuration...

Page 84: ...NUAL UNINTERRUPTIBLE POWER SUPPLY UPS Xtreme Power Conversion XPC Corporation Page 84 The card can be configured to obtain these settings automatically using DHCP or BOOTP protocols or to use static a...

Page 85: ...ome effective only after a reboot The card can be rebooted by Manually pressing the reset button on the front of the card Using the console interface either serial connection or telnet by injecting th...

Page 86: ...XPRT 6kVA XPRT 10kVA USER S MANUAL UNINTERRUPTIBLE POWER SUPPLY UPS Xtreme Power Conversion XPC Corporation Page 86...

Reviews: