background image

4

5.

Guide on Trouble-shooting............................................................................................................................ 19

5.1 Power Supply................................................

...................................................................................... 19

5.2

Printing................................................................................................................................................... 19

5.3

Paper Feed.............................................................................................................................................. 20

5.4

Cash drawer ........................................................................................................................................... 20

5.5

Indicator/Buzzer...................................................................................................................................... 21

5.6

Communication...................................................................................................................................... 21

5.7

Paper Cutting.......................................................................................................................................... 22

6.

Dismantlement and Assembly of Main Parts .................................................................................................. 23

6.1

Dismantlement of the Printer.................................................................................................................. 23

6.1.1 Dismantlement of the base of the printer........................................................................................ 23
6.1.2 Dismantlement of front cover of the printer................................................................................... 24

6.1.3

Dismantlement of flip cover of the printer..................................................................................... 26

6.1.4

Dismantlement of the main-board and interface board of the printer............................................ 27

6.2

Assembly of the Printer.......................................................................................................................... 29

7.Cleaning of the Printer..................................................................................................................................... 30

7.1 Cleaning of Printing Head

................................................................................................................... 30

7.2

Cleaning of Sensor, Rubber Roller and Paper Path .............................................................................. 30

Appendix: Exploded View of the Printer.......................................................................................................... 31

1.

List of Parts of the Printer.......................................................................................................................... 31

2.

Exploded View of the Whole Unit of the Printer....................................................................................... 34

3.

Exploded View of the Cartridge of the Printer........................................................................................... 35

Summary of Contents for R330H

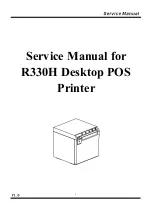
Page 1: ...1 Service Manual for R330H Desktop POS Printer ...

Page 2: ...2 Record of Changes Version Date Content of Change Made by Reviewed by Approved by ...

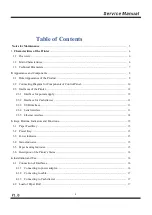
Page 3: ...ce for power supply 12 2 3 2 Interface for Cash drawer 12 2 3 3 USB interface 13 2 3 4 Serial interface 13 2 3 5 Ethernet interface 14 3 Keys Buttons Indicators and Functions 15 3 1 Paper Feed Key 15 3 2 Power Key 15 3 3 Power Indicator 15 3 4 Status Indicator 15 3 5 Paper Lacking Indicator 15 3 6 Description of the Printer s Status 16 4 Installation and Use 16 4 1 Connection of Interfaces 16 4 1 ...

Page 4: ...6 1 2 Dismantlement of front cover of the printer 24 6 1 3 Dismantlement of flip cover of the printer 26 6 1 4 Dismantlement of the main board and interface board of the printer 27 6 2 Assembly of the Printer 29 7 Cleaning of the Printer 30 7 1 Cleaning of Printing Head 30 7 2 Cleaning of Sensor Rubber Roller and Paper Path 30 Appendix Exploded View of the Printer 31 1 List of Parts of the Printer...

Page 5: ...e communication cable change of the printing head and maintenance of the printer is prohibited with power on before the printer and the computer is turned off 3 Take care to prevent from static electricity in processing the printing head or other electronic parts and elements 4 The time interval between power on and power off of the printer shall not be less than 20 seconds 5 The printer shall not...

Page 6: ...et Bluetooth and WIFI interfaces and the drivers for Windows XP Windows 7 Windows 8 Windows 10 Linux are provided for it 1 2 Main Characteristics Automatic paper cutting Low noise and high speed printing Design of easy drop in paper load structure is adopted Over heated protection of the printing head is supported Printing of marking paper and continuous paper is supported Compatible for paper of ...

Page 7: ...nd Compatible with ESC POS command Type of interface USB network port USB serial port USB serial port Bluetooth optional USB serial port WIFI optional Size of character ANK character Font A 1 5mm 3 0mm 12 24 dots Font B 1 1mm 2 1mm 9 17 dots Simplified traditional 3 0mm 3 0mm 24 24 dots Graph Mono color BMP image files and so on can be downloaded to FLASH Type of bar code UPC A UPC E JAN13 EAN13 J...

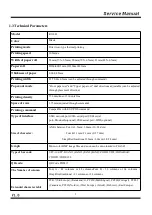
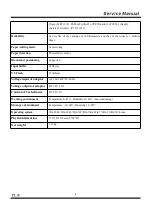
Page 8: ...ensor Black label positioning Supported Input buffer 64Kbytes NV Flash 256Kbytes Voltage input of adaptor AC 100 240V 50 60Hz Voltage output of adaptor DC 24V 2 5A Control of Cash drawer DC 24V 1A Working environment Temperature 0 45 Humidity 10 80 non condensing Storage environment Temperature 10 60 Humidity 10 90 Operating system Win 2000 Win 2003 Win XP Win Vista Win 7 Win 8 Win 10 Linux Physic...

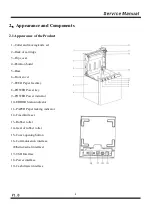
Page 9: ...5 Base 6 Front cover 7 FEED Paper feed key 8 POWER Power key 9 POWER Power indicator 10 ERROR Status indicator 11 PAPER Paper lacking indicator 12 Fixed knife set 13 Rubber roller 14 Gear of rubber roller 15 Cover opening button 16 Communication interface Ethernet serial interface 17 USB Interface 18 Power interface 19 Cash drawer interface ...

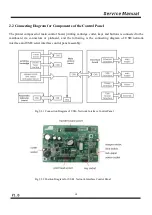
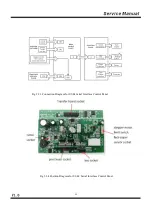
Page 10: ...ter keys and buttons is connected to the mainboard via connectors or pinboard and the following is the connecting diagram of USB network interface and USB serial interface control panel assembly Fig 2 2 1 Connection Diagram of USB Network Interface Control Panel Fig 2 2 2 Position Diagram for USB Network Interface Control Panel ...

Page 11: ...11 Fig 2 2 3 Connection Diagram for USB Serial Interface Control Panel Fig 2 2 4 Position Diagram for USB Serial Interface Control Panel ...

Page 12: ...face 2 3 2 Interface of Cash drawer Cashier box control 6 line RJ 11 socket output DC 24V 1A power signals to drive actions of Cash drawer PIN SIGNAL NAME 1 24V 2 GND 3 N C SHELL F G PIN SIGNAL NAME 1 FGND 2 Drawer 1 3 SW 4 CASH 5 Drawer 2 6 GND 654321 ...

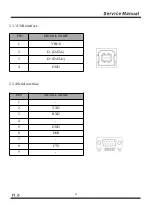
Page 13: ...13 2 3 3 USB interface 2 3 4 Serial interface PIN SIGNAL NAME 1 VBUS 2 D DATA 3 D DATA 4 GND PIN SIGNAL NAME 1 2 TXD 3 RXD 4 5 GND 6 DSR 7 8 CTS 9 ...

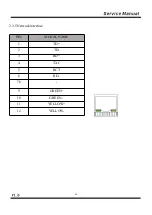
Page 14: ...14 2 3 5 Network interface PIN SIGNAL NAME 1 TD 2 TD 3 RD 4 TXC 5 RCT 6 RD 7 8 9 GREEN 10 GREEN 11 YELLOW 12 YELLOW ...

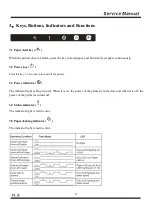
Page 15: ...sly 3 2 Power key Press this key 1 2 seconds to turn on off the printer 3 3 Power indicator The indicator light is blue in color When it is on the power of the printer is turned on and when it is off the power of the printer is turned off 3 4 Status indicator The indicator light is red in color 3 5 Paper lacking indicator The indicator light is red in color ...

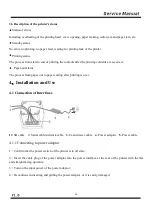
Page 16: ...tus The process from paper out to paper cutting after printing is over 4 Installation and Use 4 1 Connection of Interfaces 1 USB cable 2 Serial cable network cable 3 Cash drawer cable 4 Power adaptor 5 Power cable 4 1 1 Connecting to power adaptor 1 Confirm that the power switch of the printer is in off state 2 Insert the cable plug of the power adaptor into the power interface at the rear of the ...

Page 17: ...power switch of the printer is in off state 2 Insert the interface cable into a matching interface and fix it with the screw or snap spring on the plug 3 Connect the other end of the interface cable to the main engine 4 1 3 Connecting to Cash drawer 1 Confirm that the power switch of the printer is in off state 2 Insert the connecting cable of the Cash drawer into the interface for the Cash drawer...

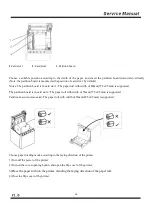
Page 18: ... 79 5 0 5mm is supported The partition board is in card slot 2 The paper roll with width of 58mm 57 5 0 5mm is supported Partition board is not mounted The paper roll with width of 83mm 82 5 0 5mm is supported Choose paper loading mode according to the laying direction of the printer 1 Turn off the power of the printer 2 Turn on the cover opening button and open the flip cover of the printer 3 Pla...

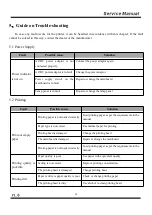
Page 19: ...mp panel Fault Possible cause Solution Print out empty paper Printing paper is not loaded correctly Load printing paper as per the requirements in the manual Paper type is not correct Use thermal paper for printing Printing head is damaged Change the printing head The mainboard is damaged Repair or change the mainboard Printing paper is not loaded correctly Load printing paper as per the requireme...

Page 20: ...ainboard Motor of the printing head is in fault Change the printing head Foreign matter in the gear Clean the gear Fault Possible cause Solution Cash drawer cannot be opened Cable for Cash drawer does not meet the specification Replace cable with corresponding specification Driving cable for the Cash drawer is damaged Change the cable Driving circuit of the Cash drawer is damaged Repair or change ...

Page 21: ... Change or repair the mainboard The setting is not correct Set as per the requirements in the user manual Fault Possible cause Solution Status of the printer is normal but it does not print Connection between communication cable and the printer is not reliable Connect to the communication cable again The communication cable used does not meet the specification Use the communication cable matching ...

Page 22: ...mulated Clean the scraps on transmission parts Paper is jammed Plate of driving head is over heated Lower heating power of the driving head Paper feed position is not correct Align edge of paper with the paper slot and put the paper between the rubber roller and TPH Paper is not cut off Blade is damaged or worn Change the cutter Paper is too thick Change standard paper ...

Page 23: ...cartridge and electronic elements taking anti static measures 4 Do not let parts such as screws keep inside the printer in the dismantlement process 5 Prevent from doing harm to the printing cartridge in dismantlement and assembly Maintenance tools Phillips screwdriver and combination pliers Auxiliary materials Lubricant alcohol absorbent ball and high temperature adhesive tape 6 1 Dismantlement o...

Page 24: ...ver of the printer A Take off L shaped foot pads B Dismantle the two H3 6mm screws for fixing the base with a cross screwdriver and then take off the base in the same direction Picture Illustration Dismantle the two H3 6mm screws for fixing the front cover with a cross screwdriver 2 3 1 ...

Page 25: ... direction indicated with the arrow Caution do not pull out the front cover directly Take off the front cover gently Dismantle the two CA2 2 3 5mm screws for fixing the blade with a small cross screwdriver and then take off the blade 2 3 4 ...

Page 26: ...screwdriver and then take off the cover opening button First press the cover opening button and open the flip cover then move the flip cover for 12mm along the direction indicated with the arrow Caution Do not pull out the flip cover directly Dismantle the two PB3 6mm screws for fixing the lamp panel with a cross screwdriver and then take off the lamp panel 1 2 ...

Page 27: ...lement of the Mainboard and Pinboard of the Printer Take off the flip cover gently Picture Illustration Dismantle the two H3 6mm screws for fixing the mainboard with a cross screwdriver and then take off the mainboard 3 ...

Page 28: ...28 2 Dismantle the two H3 6mm fixing the interface board with a cross driver Take off the interface board Dismantle the two H3 6mm screws for locking left right racks with the cross driver 3 4 ...

Page 29: ...29 6 2 Assembly of the Printer Assembly is just the reverse sequence of dismantlement ...

Page 30: ...ck 3 Moisten the cotton cloth or cotton stick with medical alcohol and wipe off sticky foreign matters or other dirt with it 4 After cleaning parts do not use the printer immediately till alcohol has been evaporated completely 1 2 minutes and use the printer after it is completely dry When printing quality or paper checking performance is lowered clean parts Cautions 1 Make sure to turn off the po...

Page 31: ...er 1 List of Parts of the Printer SN Name of material 1 Label for keys 2 Front cover 3 Blade 4 Key 5 Lamp panel 6 Mainboard 7 Interface board 8 Left rack 9 Right rack 10 Printing head 11 Cover opening pull rod 12 Flip cover 13 Bottom cover ...

Page 32: ...er block 18 Partition board 19 Paper compartment 20 Left supporting board 21 Stationary knife 22 Thermal slice 23 Cover closing board 24 Bottom board 25 Right supporting board 26 Detection switch 27 Decelerating gear 28 Motor 29 Upper cover for paper compartment ...

Page 33: ...33 30 Rubber roller 31 Moving knife 32 Cover opening board 33 Spindle ...

Page 34: ...34 2 Explode View of the Printer ...

Page 35: ...35 3 Explode View of Cartridge of the Printer ...

Reviews: