background image

7

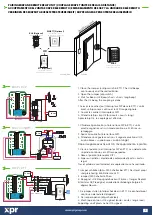
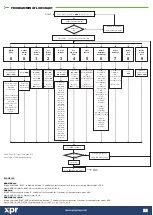
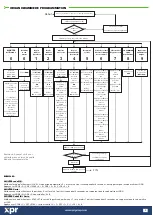
Start

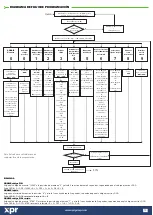
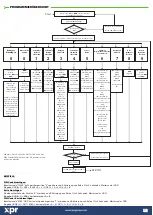
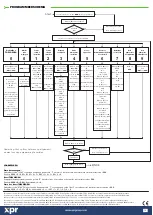
Enter “Master Code” OR “

000

”(if  irst time in use)

Validate by pressing (

B

)

1 small beep + 1 long beep + Yellow LED is ON

NO

YES

Validation

OK?

Enter Memory

Position from

(

001 

to 

999

)

Enter Memory

Position from

(

001 

to 

999

)

Press 

A

 to validate

Press

999

Memory

position from

(

001

 to 

999

)

Press(

1

) for I/O

board (RB0408)

OR

Press(

2

) for 

RTT/DINRTT/RU2

or none

Default: 

RTT/DINRTT/RU2

Press(

0

) for

NONE

OR

Press(

1

) for EM

OR

Press(

2

) for HID

Default: EM

Press(

0

) for

Buzzer OFF

OR

Press(

1

) for

Buzzer ON

Press(

2

) for

Backlight OFF

OR

Press(

3

) for

Backlight ON

OR

Press(

4

) for

backlight on key

press

Press(

5

) for

dimmed

backlight

Press(

6

) for

reader’s

read range 

press(

9

) for +1KHz

press(

7

) for -1KHz

Default:

Buzzer ON

Default:

Dimmed

Backlight

Enter new code

(1 to 8 digits)

OR/AND

Present Card

If the user has both 

pin and card then 

for access he must 

enter PIN

and present the

Card.

New User will be

assigned to

Relay1

Press(1) for 

Relay 1

OR/AND

Press(2) for

Relay 2

OR/AND

Press(3) for

Relay3

OR/AND

Press(4) for

Relay 4

OR/AND

Press(5) for

Relay 5

OR/AND

Press(6) for

Relay 6

OR/AND

Press(7) for

Relay 7

OR/AND

Press(8) for

Relay 8

OR/AND

Press(9) for

Relay 9

OR/AND

Press(0) for

Relay 10

Enter (

000

)

Enter new

Master code

(1 to 8 digits)

Press (from

01

 to 

99

)

for time in

seconds

If press 

00

toggle mode

Default:

03

 seconds

Press (from

01

 to 

99

)

for time in

seconds

or press 

00

toggle mode

Default:


03

 seconds

Press (from

01

 to

 99

)

for time in

seconds

If press 

00

toggle mode

Default:

03

 seconds

ADD
User

Change

Master

Code

Set

Relay 2

Timer

Assign

Output

Set

I/O board

Timer

Slave

Device

Buzzer

Backlight

Read Range

Select

Card Type

Delete

All

Users

Delete

Single

User

Set

Relay 1

Timer

Multiple small beeps

+

Yellow LED blinks rapidly

Validation

OK?

Two Beeps

Press 

B

 (Yellow LED is OFF)

Multiple small beeps

+

Yellow LED blinks rapidly

NO

YES

9

8

7

6

5

4

3

2

1

0

0

END

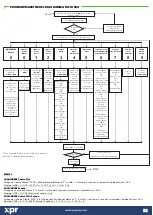
EXAMPLES:

ADD PIN Code:

Assign User Code “12345” at Memory Position “5” and Relay 2 that activates for 4 seconds, assuming Master Code = 000.
Press 000B + 0 + 005 + 12345 + A + 3 + 005 + 2 + A + 2 + 04 + A + B.

ADD Card:

Assign an User card at position “6” and Relay 1 that activates for 3 seconds, assuming Master Code = 000.
Press 000B + 0 + 006 + Present Card + A + B.

ADD PIN Code + Card:

Assign User Code “6789” AND Card at Memory Position “7” and Relay 1 that activates for 5 seconds, assuming Master Code = 000.
Press 000B + 0 + 007 + 6789 + Present Card + A + 3 + 007 + 1 + A + 1 + 05 + A + B.

PROGRAMMING FLOWCHART

Note: Press B to exit the menu in 
any stage of the programming.

Summary of Contents for EX6P

Page 1: ...RB0408 I O Codice PIN Scheda Codice PIN o e Scheda EM 4002 4100 e HID 125kHz fino a 5 cm 1 8 Cifre 2 2 verde e rosso 12 24 VAC DC max 150 mA S dalle impostazioni del menu S S per collegare schede I O...

Page 2: ...A 103B 103G 1 2 3 4 30mm 6 0 Cable 5 6 7 3 4 x 30mm CSK RB0408 Additional 8 relay board RU2 Additional 2 relay board DINRTT Push button and additional 2 relay board RTT Push button and additional 1 re...

Page 3: ...ER PUSH BUTTONS GREEN LED NC2 NO2 COM2 A B GND RED LED AC Power Supply V V NC NO C 470 nF R 10K W C 470 nF R 10K W C R C R PB GND Electro Magnetic Lock AC powered Electric Door Strike AC powered Exit...

Page 4: ...stanze maggiori utilizzare un cavo doppio intrecciato qualificato per RS485 Per utilizzare la scheda I O abilitarla dal menu EX6P Premere 000 B premere 5 1 A B per confermare Nota La scheda I O funzio...

Page 5: ...M2 A B GND RED LED 1 De jumper sluiten of dip schakelaar in RTT De eenheid piept continu en de rode led knippert 2 De jumper openen dip schakelaar 3 Wacht op een toon OK signaal korte korte lange toon...

Page 6: ...cken orange LED erlischt RS485 TAMP RELAY 1 RELAY 2 TAMP2 TAMP1 12V 24V AC DC PB1 PB2 GND NO1 NC1 COM1 POWER PUSH BUTTONS GREEN LED NC2 NO2 COM2 A B GND RED LED 1 3 1 De stroomtoevoer uitschakelen en...

Page 7: ...s 9 for Relay 9 OR AND Press 0 for Relay 10 Enter 000 Enter new Master code 1 to 8 digits Press from 01 to 99 for time in seconds If press 00 toggle mode Default 03 seconds Press from 01 to 99 for tim...

Page 8: ...Saisissez le nouveau code ma tre 1 8 chi res Appuyez sur de 01 99 pour a icher le temps en secondes Si vous appuyez sur 00 mode basculement d faut 03 secondes Appuyez sur de 01 99 pour a icher le temp...

Page 9: ...l rel 10 Immettere 000 Immettere un nuovo codice Master da 1 a 8 cifre Premere da 01 a 99 per il tempo in secondi Se si preme 00 si alterna la modalit Prede inito 03 secondi Premere da 01 a 99 per il...

Page 10: ...vo de 1 a 8 d gitos Pulse de 01 a 99 para el tiempo en segundos Si pulsa 00 se activa el modo de conmutaci n Predeterminad o 03 segundos Pulse de 01 a 99 para el tiempo en segundos o pulse 00 para el...

Page 11: ...s 10 000 eingeben Neuen Mastercode eingeben 1 bis 8 Zi ern Eingabe zwischen 01 und 99 f r die Zeit in Sekunden Eingabe 00 f r Schaltmodus Voreinstellung 03 Sekunden Eingabe zwischen 01 und 99 f r die...

Page 12: ...relais 2 instellen Uitgang toewijzen Timer I O paneel instellen Slave apparaat Zoemer Achtergrondverlichting Leesbereik Kaarttype selecteren Alle gebruikers verwijderen Een gebruiker verwijderen Time...

Reviews: