background image

VCU1287 IBERT Getting Started Guide

20

UG1203 (v2016.4) December 15. 2016

www.xilinx.com

Chapter 1:

VCU1287 IBERT Getting Started Guide

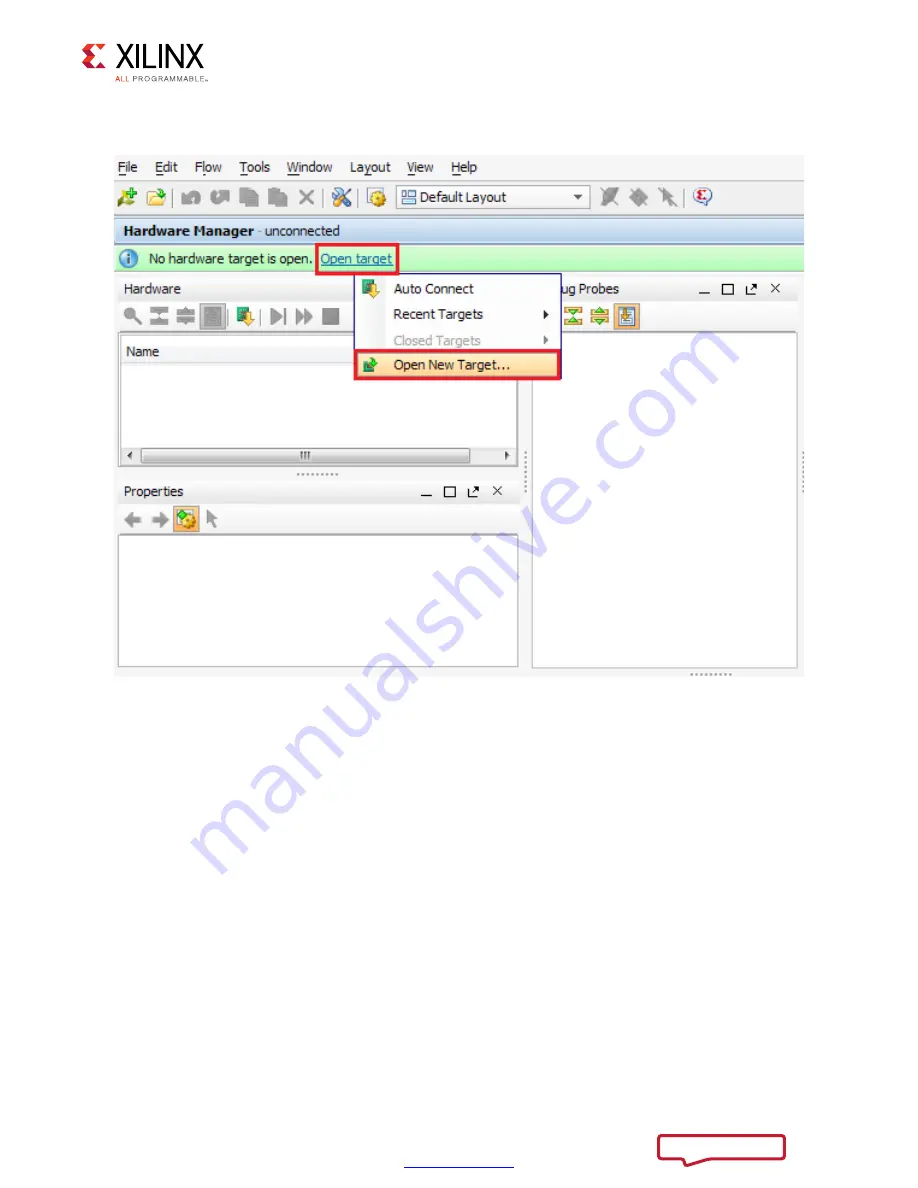
3. In the Hardware Manager window (

Figure 1-15

), click 

Open New Target

.

4. An Open Hardware Target wizard opens. Click 

Next

 in the first window.

5. In the Hardware Server Settings window, select 

Local server (target is on local 

machine)

. Click 

Next

.

X-Ref Target - Figure 1-15

Figure 1-15:

Open a New Hardware Manager

X15554-121416

Send Feedback

Summary of Contents for Virtex UltraScale FPGA VCU1287

Page 1: ...Virtex UltraScale FPGA VCU1287 Characterization Kit IBERT Getting Started Guide Vivado Design Suite UG1203 v2016 4 December 15 2016...

Page 2: ...uite 2016 3 Design file changed to rdf0368 vcu1287 ibert 2016 3 zip Updated Figure 1 14 Figure 1 23 Figure 2 1 Figure 2 4 Figure 2 9 Figure 2 15 and Figure 2 20 06 08 2016 2016 2 Updated for Vivado De...

Page 3: ...87 Board 6 Extracting the Project Files 7 Running the GTH IBERT Demonstration 8 Running the GTY IBERT Demonstration 26 Chapter 2 Creating the IBERT Cores Creating the GTH IBERT Core 38 Creating the GT...

Page 4: ...87 board is described in detail in the VCU1287 Board User Guide UG1120 Ref 1 The IBERT demonstrations in this guide operate one GTH Quad and one GTY QUAD The procedure consists of 1 Setting Up the VCU...

Page 5: ...lls Eye cable Eight SMA female to female F F adapters Six 50 SMA terminators UltraScale transceiver power supply module installed onboard SuperClock 2 module Rev 1 0 installed onboard Active BGA heat...

Page 6: ...onstrations 1 Move all jumpers and switches to their default positions The default jumper and switch positions are listed in the VCU1287 Characterization Board User Guide UG1121 Ref 1 2 Install the Ul...

Page 7: ...ns these BIT files vcu1287_ibert_q124_125 bit vcu1287_ibert_q125_125 bit vcu1287_ibert_q126_125 bit vcu1287_ibert_q127_125 bit vcu1287_ibert_q128_125 bit vcu1287_ibert_q129_125 bit vcu1287_ibert_q130_...

Page 8: ...224 The remaining GTH Quads can be tested following a similar series of steps Connecting the GTH Transceivers and Reference Clocks Figure 1 1 shows the locations for GTH and GTY transceiver Quads on t...

Page 9: ...the clock module which can be connected to the reference clock cables The four SMA pairs labeled CLKOUT provide LVDS clock outputs from the Si5368 clock multiplier jitter attenuator device on the cloc...

Page 10: ...ed see Figure 1 4 Note Figure 1 4 is for reference only and might not reflect the current version of the connector Attach the Samtec Bulls Eye connector to GTH Quad 224 Figure 1 5 aligning the two ind...

Page 11: ...CLKOUT1_P and CLKOUT1_N are used here as an example MGT TX RX Loopback Connections See Figure 1 2 to identify the P and N coax cables that are connected to the four receivers RX0 RX1 RX2 and RX3 and t...

Page 12: ...d Guide Figure 1 8 shows the VCU1287 board with the cable connections required for the Quad 224 GTH IBERT demonstration X Ref Target Figure 1 7 Figure 1 7 TX to RX Loopback Connection Example X15546 1...

Page 13: ...d through a serial communication terminal connection using the enhanced communication port of the Silicon Labs USB to Dual UART Bridge Figure 1 9 Additional information about the Silicon Labs USB to U...

Page 14: ...by placing SW1 in the ON position 4 Open a serial communication terminal application on the host computer for example HyperTerminal and connect to the port number associated with the enhanced COM por...

Page 15: ...nine Card FMC Settings 5 Get GPIO Data 6 Get EEPROM Data 7 Configure UltraScale FPGA Select an option 6 Use the Programmable Clocks menu option 2 to set the output clock frequencies of the Si5368 cloc...

Page 16: ...o Design Suite using the bit files available on the SD card and online as collection rdf0368 vcu1287 ibert 2016 4 zip at the Virtex UltraScale FPGA VCU1287 Characterization Kit documentation website R...

Page 17: ...e FPGA from SD Card 0 Return to Main Menu Select an option The IBERT design demonstrations included with the SD cards can be selected using one of the set numbers listed in Table 1 1 Table 1 1 IBERT E...

Page 18: ...t8 config def opened Info Clock divider is set to 2 Info Configuration clock frequency is 25MHz Info Bitfile rev_1 set8 vu95Q224 bit opened 10 20 30 40 50 60 70 80 90 100 Configuration completed succe...

Page 19: ...inx com Chapter 1 VCU1287 IBERT Getting Started Guide 2 Start the Vivado Design Suite on the host computer and click Flow Open Hardware Manager highlighted in Figure 1 14 X Ref Target Figure 1 14 Figu...

Page 20: ...e 3 In the Hardware Manager window Figure 1 15 click Open New Target 4 An Open Hardware Target wizard opens Click Next in the first window 5 In the Hardware Server Settings window select Local server...

Page 21: ...ck Frequency at the default value 15 MHz Click Next 7 In the Open Hardware Target Summary window click Finish The wizard closes and the Vivado Design Suite opens the hardware target 8 A dialog to auto...

Page 22: ...Layout Serial I O Analyzer From the top of the Hardware Manager window select Auto Detect Links to display all available links automatically Links can also be created manually in the Links window by...

Page 23: ...links select the TX GT and RX GT from the two lists then click the Add button For this project connect the following links Figure 1 19 MGT_X0Y0 TX xcvu095_0 Quad_224 to MGT_X0Y0 RX xcvu095_0 Quad_224...

Page 24: ...atus in Figure 1 20 Verify that the there are no bit errors In Case of RX Bit Errors If there are initial bit errors after linking or as a result of changing the TX or RX pattern click the respective...

Page 25: ...found in Vivado Design Suite User Guide Programming and Debugging UG908 Ref 5 and in LogiCORE IP Integrated Bit Error Ratio Tester IBERT for 7 Series GTX Transceivers Product Guide for Vivado Design S...

Page 26: ...om the FPGA to a connector pad that interfaces with Samtec Bulls Eye connectors Review Figure 1 2 for the pinout of the MGT Bulls Eye connector pad Attach the GTY Quad Connector Before connecting the...

Page 27: ...source the GTY reference clock CLKOUT1_P and CLKOUT1_N are used here as an example GTY TX RX Loopback Connections Refer to Figure 1 2 to identify the P and N coax cables that are connected to the fou...

Page 28: ...the SuperClock 2 Module The SuperClock 2 module provides LVDS clock outputs for the GTH and GTY transceivers reference clock in the IBERT demonstration For both of the GTH and GTY IBERT demonstrations...

Page 29: ...raScale Architecture Configuration User Guide UG570 Ref 4 for additional information about the UltraScale device configuration 1 Insert the SD card provided with the VCU1287 board into the SD card con...

Page 30: ...sign Press Enter and review the terminal for configuration progress Enter a Bitstream number 0 15 0 Info xilinx sys opened Info Opening rev_1 set0 config def Info Configuration definition file rev_1 s...

Page 31: ...dard A plug to micro B plug USB cable The standard A plug connects to a USB port on the host computer and the micro B plug connects to J165 the Digilent USB JTAG configuration port on the VCU1287 boar...

Page 32: ...e 3 In the Hardware Manager window Figure 1 24 click Open New Target 4 An Open Hardware Target wizard opens Click Next in the first window 5 In the Hardware Server Settings window select Local server...

Page 33: ...lock Frequency at the default value 15 MHz click Next 7 In the Open Hardware Target Summary window click Finish The wizard closes and the Vivado Design Suite opens the hardware target 8 A dialog to au...

Page 34: ...ct Links to display all available links automatically Links can also be created manually in the Links window by right clicking and selecting Create Links or by clicking the Create Links button Figure...

Page 35: ...oject connect the following links Figure 1 28 MGT_X0Y0 TX xcvu095_0 Quad_124 to MGT_X0Y0 RX xcvu095_0 Quad_124 MGT_X0Y1 TX xcvu095_0 Quad_124 to MGT_X0Y1 RX xcvu095_0 Quad_124 MGT_X0Y2 TX xcvu095_0 Qu...

Page 36: ...Link Status in Figure 1 29 Verify that the there are no bit errors In Case of RX Bit Errors If there are initial bit errors after linking or as a result of changing the TX or RX pattern click the resp...

Page 37: ...found in Vivado Design Suite User Guide Programming and Debugging UG908 Ref 5 and in LogiCORE IP Integrated Bit Error Ratio Tester IBERT for 7 Series GTX Transceivers Product Guide for Vivado Design S...

Page 38: ...e to create a single Quad GTH IBERT core The procedure assumes Quad 224 at 12 5 Gb s line rate but cores for any of the GTH Quads with any supported line rate can be created following the same series...

Page 39: ...w IP Location 3 A Create a New Customized IP Location dialog window opens not shown Click Next 4 In the Manage IP Settings window select a part by clicking the button next to the Part field A Select D...

Page 40: ...Manage IP Catalog window select Verilog for Target language Vivado Simulator for Target simulator Mixed for Simulator language and a directory to save the customized IP Figure 2 3 Click Finish Note M...

Page 41: ...2016 www xilinx com Chapter 2 Creating the IBERT Cores 6 In the IP Catalog window expand the Debug Verification folder expand the Debug folder and double click IBERT UltraScale GTH Figure 2 4 X Ref Ta...

Page 42: ...hapter 2 Creating the IBERT Cores 7 A Customize IP window opens In the Protocol Definition tab set the LineRate Gbps to 12 5 Change Refclk MHz to 125 Keep defaults for other fields Figure 2 5 X Ref Ta...

Page 43: ...w xilinx com Chapter 2 Creating the IBERT Cores 8 In the Protocol Selection tab use the Protocol Selected drop down menu next to QUAD_224 to select Custom 1 12 5 Gb s Figure 2 6 X Ref Target Figure 2...

Page 44: ...ERT Cores 9 In the Clock Settings tab select DIFF SSTL15 for the I O Standard enter AW14 for the P Package Pin the FPGA pins to which the system clock is connected and make sure the Frequency MHz is s...

Page 45: ...16 4 December 15 2016 www xilinx com Chapter 2 Creating the IBERT Cores 10 Click OK Click Generate in the next window to generate the output products Figure 2 8 X Ref Target Figure 2 8 Figure 2 8 Gene...

Page 46: ...11 Back on the Manage IP Catalog window in the Sources window right click the IBERT IP and select Open IP Example Design Figure 2 9 Specify a location to save the design click OK and the design opens...

Page 47: ...December 15 2016 www xilinx com Chapter 2 Creating the IBERT Cores 12 In the Sources window Design Sources should now show the IBERT design example Figure 2 10 X Ref Target Figure 2 10 Figure 2 10 Des...

Page 48: ...203 v2016 4 December 15 2016 www xilinx com Chapter 2 Creating the IBERT Cores 13 Click Run Synthesis from the Flow Navigator to synthesize the design Figure 2 11 X Ref Target Figure 2 11 Figure 2 11...

Page 49: ...Completed window opens Select Run Implementation and click OK Figure 2 12 15 When the implementation is done an Implementation Completed window opens Select Generate Bitstream and click OK Figure 2 1...

Page 50: ...6 When the Bitstream Generation Completed dialog window appears click Cancel Figure 2 14 17 Navigate to the ibert_ultrascale_gth_0_example ibert_ultrascale_gth_0_exampl e runs impl_1 directory to loca...

Page 51: ...ing and Debugging UG908 Ref 5 1 Start the Vivado Design Suite 2 In the Vivado Design Suite window click Manage IP highlighted in Figure 2 1 and select New IP Location 3 A Create a New Customized IP Lo...

Page 52: ...016 www xilinx com Chapter 2 Creating the IBERT Cores 6 In the IP Catalog window expand the Debug Verification folder expand the Debug folder and double click IBERT UltraScale GTY Figure 2 15 X Ref Ta...

Page 53: ...er 2 Creating the IBERT Cores 7 A Customize IP window opens In the Protocol Definition tab set the LineRate Gb s to 28 00 Change Refclk MHz to 125 Keep defaults for the other fields Figure 2 16 X Ref...

Page 54: ...xilinx com Chapter 2 Creating the IBERT Cores 8 In the Protocol Selection tab use the Protocol Selected drop down menu next to QUAD_124 to select Custom 1 28 00 Gbps Figure 2 17 X Ref Target Figure 2...

Page 55: ...ERT Cores 9 In the Clock Settings tab select DIFF SSTL15 for the I O Standard enter AW14 for the P Package Pin the FPGA pins where the system clock is connected and make sure the Frequency MHz is set...

Page 56: ...6 4 December 15 2016 www xilinx com Chapter 2 Creating the IBERT Cores 10 Click OK Click Generate in the next window to generate the output products Figure 2 19 X Ref Target Figure 2 19 Figure 2 19 Ge...

Page 57: ...Back on the Manage IP Catalog window in the Sources window right click the IBERT IP and select Open IP Example Design Figure 2 20 Specify a location to save the design click OK and the design opens i...

Page 58: ...nthesis Completed window opens Select Run Implementation and click OK Figure 2 12 15 When the implementation is done an Implementation Completed window opens Select Generate Bitstream and click OK Fig...

Page 59: ...glect or default of Customer For any breach by Xilinx of this limited warranty the exclusive remedy of Customer and the sole liability of Xilinx shall be at the option of Xilinx to replace or repair t...

Page 60: ...e VCU1287 kit and its documentation is available on these websites Virtex UltraScale FPGA VCU1287 Characterization Kit Virtex UltraScale FPGA VCU1287 Characterization Kit documentation Virtex UltraSca...

Page 61: ...r loss was reasonably foreseeable or Xilinx had been advised of the possibility of the same Xilinx assumes no obligation to correct any errors contained in the Materials or to notify you of updates to...

Reviews: