background image

2

Important Safety Information

1. READ THESE INSTRUCTIONS

All the safety and operating instructions should be read before the product is operated.

2. KEEP THESE INSTRUCTIONS

The safety and operating instructions should be retained for future reference.

3. HEED ALL WARNINGS

All warnings on the product and in the operating instructions should be adhered to.

4. FOLLOW ALL INSTRUCTIONS

All operating and use of instructions should be followed.

5. DO NOT USE THIS APPARATUS IN WATER.

Do not use the product near water. For example, near a bathtub, wash bowl, kitchen sink, or laundry tub, in a wet basement, or near a swimming pool, and the 
like.

6. CLEAN ONLY WITH DRY CLOTH.

Unplug the unit from the wall outlet before cleaning.

7. DO NOT BLOCK ANY VENTILATION OPENINGS

Slots and openings in the cabinet back or bottom are provided for ventilation, to ensure reliable operation of the limit and to protect it from overheating. 
These openings must not be blocked or covered. The openings should never be blocked by placing the product on a bed, sofa, rug, or similar surface. 
This product should never be placed near or over a radiator or heat source. This product should not be placed in a built-in installation such as a 
bookcase or rack unless proper ventilation is provided or the manufacturer’s instructions have been adhered to.

8. DO NOT INSTALL NEAR ANY HEAT SOURCES

This product should be situated away from heat sources such as radiators, stoves or other products (including amplifiers) that produces heat. 

9. DO NOT DEFEAT THE SAFETY PURPOSE OF THE POLARIZED OR GROUNDING-TYPE PLUG

A polarized plug has two blades with one wider than the other. A grounding-type plug has two blades and a third grounding prong. The wide blade or the 
third prongs are provided for your safety. If the provided plug does not fit into your outlet, consult an electrician for replacement of the obsolete outlet. 

10. PROTECT THE POWER CORD FROM BEING WALKED ON OR PINCHED PARTICULARLY AT PLUGS, CONVENIENCE RECEPTACLES, AND THE 
POINT WHERE THEY EXIT FROM THE APPARATUS. 

11. ONLY USE ATTACHMENTS/ACCESSORIES SPECIFIED BY THE MANUFACTURER.

12. USE ONLY WITH CART, STAND, TRIPOD, BRACKET, OR TABLE SPECIFIED BY THE MANUFACTURER, OR SOLD WITH THE APPARATUS. WHEN A 
CART IS USED, USE WITH CAUTION WHEN MOVING THE CART/APPARATUS TO AVOID INJURY FROM TIP-OVER.

Do not place this unit on an unstable cart, stand, tripod, bracket, or table. The unit may fall, causing serious injury to someone, and serious damage to 
the appliance. A unit and cart combination should be moved with care. Quick stops, excessive force, and uneven surfaces may cause the product and 
cart combination to overturn.

13. UNPLUG THIS APPARATUS DURING LIGHTNING STORMS OR WHEN UNUSED FOR LONG PERIODS OF TIME.

For added protection for this unit during a lightning storm, or when it is left unattended and unused for long periods of time, unplug it from the wall 
outlet and disconnect the antenna or cable system. This will prevent damage to the unit due to lightning and power surges.

14. REFER ALL SERVICING TO QUALIFIED PERSONNEL. SERVICING IS REQUIRED WHEN THE APPARATUS HAS BEEN DAMAGED IN ANY WAY. SUCH 
AS, WHEN THE POWER SUPPLY CORD OR PLUG IS DAMAGED, LIQUID HAS BEEN SPILLED, OR OBJECTS HAVE FALLEN INTO THE APPARATUS, THE 
APPARATUS HAS BEEN EXPOSED TO RAIN OR MOISTURE, DOES NOT OPERATE NORMALLY, OR HAS BEEN DROPPED.

15. WARNING: TO REDUCE THE RISK OF FIRE OR ELECTRIC SHOCK, DO NOT EXPOSE THIS APPARATUS TO RAIN OR MOISTURE.

16. APPARATUS SHALL NOT BE EXPOSED TO DRIPPING OR SPLASHING AND NO OBJECTS FILLED WITH LIQUIDS, SUCH AS VASES, SHALL BE 
PLACED ON THE APPARATUS.

Summary of Contents for XD-8080M

Page 1: ...1 XD User Manual...

Page 2: ...ding prong The wide blade or the third prongs are provided for your safety If the provided plug does not fit into your outlet consult an electrician for replacement of the obsolete outlet 10 PROTECT T...

Page 3: ...3 Table of Contents What s in the box 4 Hardware descriptions and functions 5 6 XConsole PC software 7 Power On device 8 Front panel a Channel menu 9 b System menu 14 Quick reference 20...

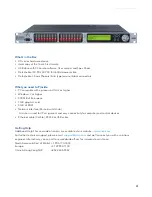
Page 4: ...of RAM Network interface Router switch hub A router is used for IP assignment and easy connectivity to computer and control devices Ethernet cable Cat5 6 RS232 or USB cable Getting Help Additional He...

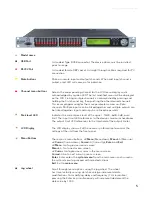
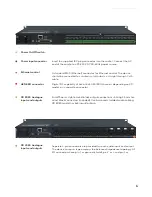
Page 5: ...es the current peak level of the signal 12dB 6dB 3dB over limit The input Limit LED references to the device s maximum headroom The output Limit LED references to the threshold of the output limiter L...

Page 6: ...ility of 4x8 or 8x8 AES EBU channels depending on XD model on a separate connector XD 8080 Analogue inputs and outputs Euro Phoenix style terminal block output connections utilizing 3 5mm ter minal bl...

Page 7: ...es is shipped with Xilica s XConsole software XConsole gives the user an option to control the unit from a remote PC The GUI application makes it much easier to control and monitor the device from one...

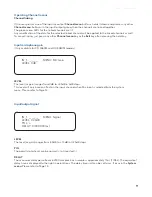
Page 8: ...XD will display the following The screen displays the current program number and program name assigned to the unit If the program number ends with it means that no program is assigned the last data be...

Page 9: ...e for XD 4080M and XD 8080M models Input output signal LEVEL The level or gain ranges from 40dB to 15dB in 0 25dB steps POL The polarity or phase can be normal or inverted DELAY The maximum delay perm...

Page 10: ...value For first degree all pass AP 1 filter the bandwidth will set the phase shift at the centre frequency The phase shift is gradually changed from 180 degrees above the centre frequency to the spec...

Page 11: ...es for the high frequency crossover point low pass are Butterworth Linkwitz Riley or Bessel FRQH The filter cut off frequency for the high frequency crossover point low pass ranges from 20Hz to 30kHz...

Page 12: ...m 1 1 to 1 40 Input output channel name NAME A six character name can be assigned to each channel Output limiter THRESH A limiter threshold ranges from 20dBu to 20dBu in 0 5dB steps ATTACK The limiter...

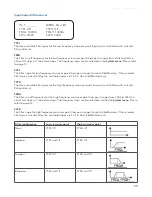
Page 13: ...point high pass Ranges from 20Hz to 30kHz in either 1Hz steps or 1 36 octave steps The frequency steps and FIR Taps can be selected in the System menu Please refer to page 14 TYLH The only available...

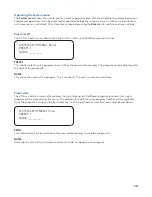
Page 14: ...is displayed to the right of the program NAME This shows the name of the program This is read only The user has no access to them Preset store The XD has a built in non volatile memory that can store...

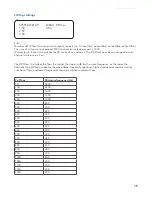
Page 15: ...igher the Taps the higher the slope in dB for the same frequency or the lower the frequency the FIR can handle for the same slope Generally speaking higher frequencies require smaller number of Taps a...

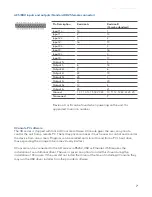
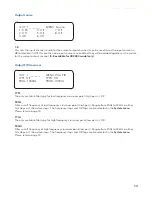
Page 16: ...Phantom power as well Phantom power The option microphone pre amp also comes with Phantom power which can also be enabled or disabled from this menu 1 8 A 48V DC voltage can be supplied to external mi...

Page 17: ...ied When the Source or the Target is an input while the other is an output only the Level Polarity Delay EQ Crossover and Channel name are copied SOURCE This is the channel to be copied from TARGET Th...

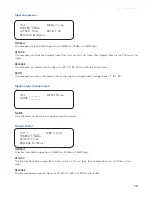
Page 18: ...from 0 to 60000 to the unit The ID is used for future network expansion only Please leave this at 0 Security lock and unlock PASSWORD The password is four characters in length The factory default of a...

Page 19: ...evels it can be switched to bypass mode INFO This menu displays the device name firmware version and security code When no password is set the factory default code is 11110000 When another combination...

Page 20: ...R SLPL 6 48 6 dB octave XOver IIR high type XOver IIR FTRH Off Butterworth Linkwitz Riley Bessel XOver IIR high freq XOver IIR FRQH 20 30 000 1 Hz XOver IIR high slope XOver IIR SLPH 6 48 6 dB octave...

Page 21: ...support xilica com and we ll connect you with a solutions engineer Alterna tively if you d like to speak to someone you can call the following numbers for immediate assistance North America Rest of wo...

Reviews: