


NETWORK CONFIGURATION
(CONT.)
sysTEm CONFIGURATION
sysTEm CONFIGURATION
(CONT.)
QUICK-sTART INsTAllATION GUIdE
OmNIA.11 sTEREO Fm AUdIO PROCEssOR
Items you need to supply:
• Rack with four available EIA rack spaces for mounting
• Professional line-level analog or AES/EBU digital audio
sources on standard XLR connectors
• Configured Ethernet switch
REQUIRED EQUIPMENT, CABLES, AND ACCESSORIES:
There are a few additional items required for a successful installation. Check the list below and make sure
you have what you need.
Included items:
• Omnia.11 Audio Processor
• AC Power cable
• Ethernet cable
• 4 rack screws
We have made this Omnia System easy to set up and configure. This quick-start guide will take you through the
basic steps to configure your new Omnia.11 to start delivering cleaner, clearer, louder, and more consistent sound.
Before we get started, let’s make sure you have what you need.
ThANK yOU FOR PURChAsING ThE OmNIA.11 sTEREO Fm
AUdIO PROCEssOR
CONTINUE TO sysTEm CONFIGURATION
Network configuration is complete. Your system is
ready for system configuration. Continue to the “System
Configuration” instructions.
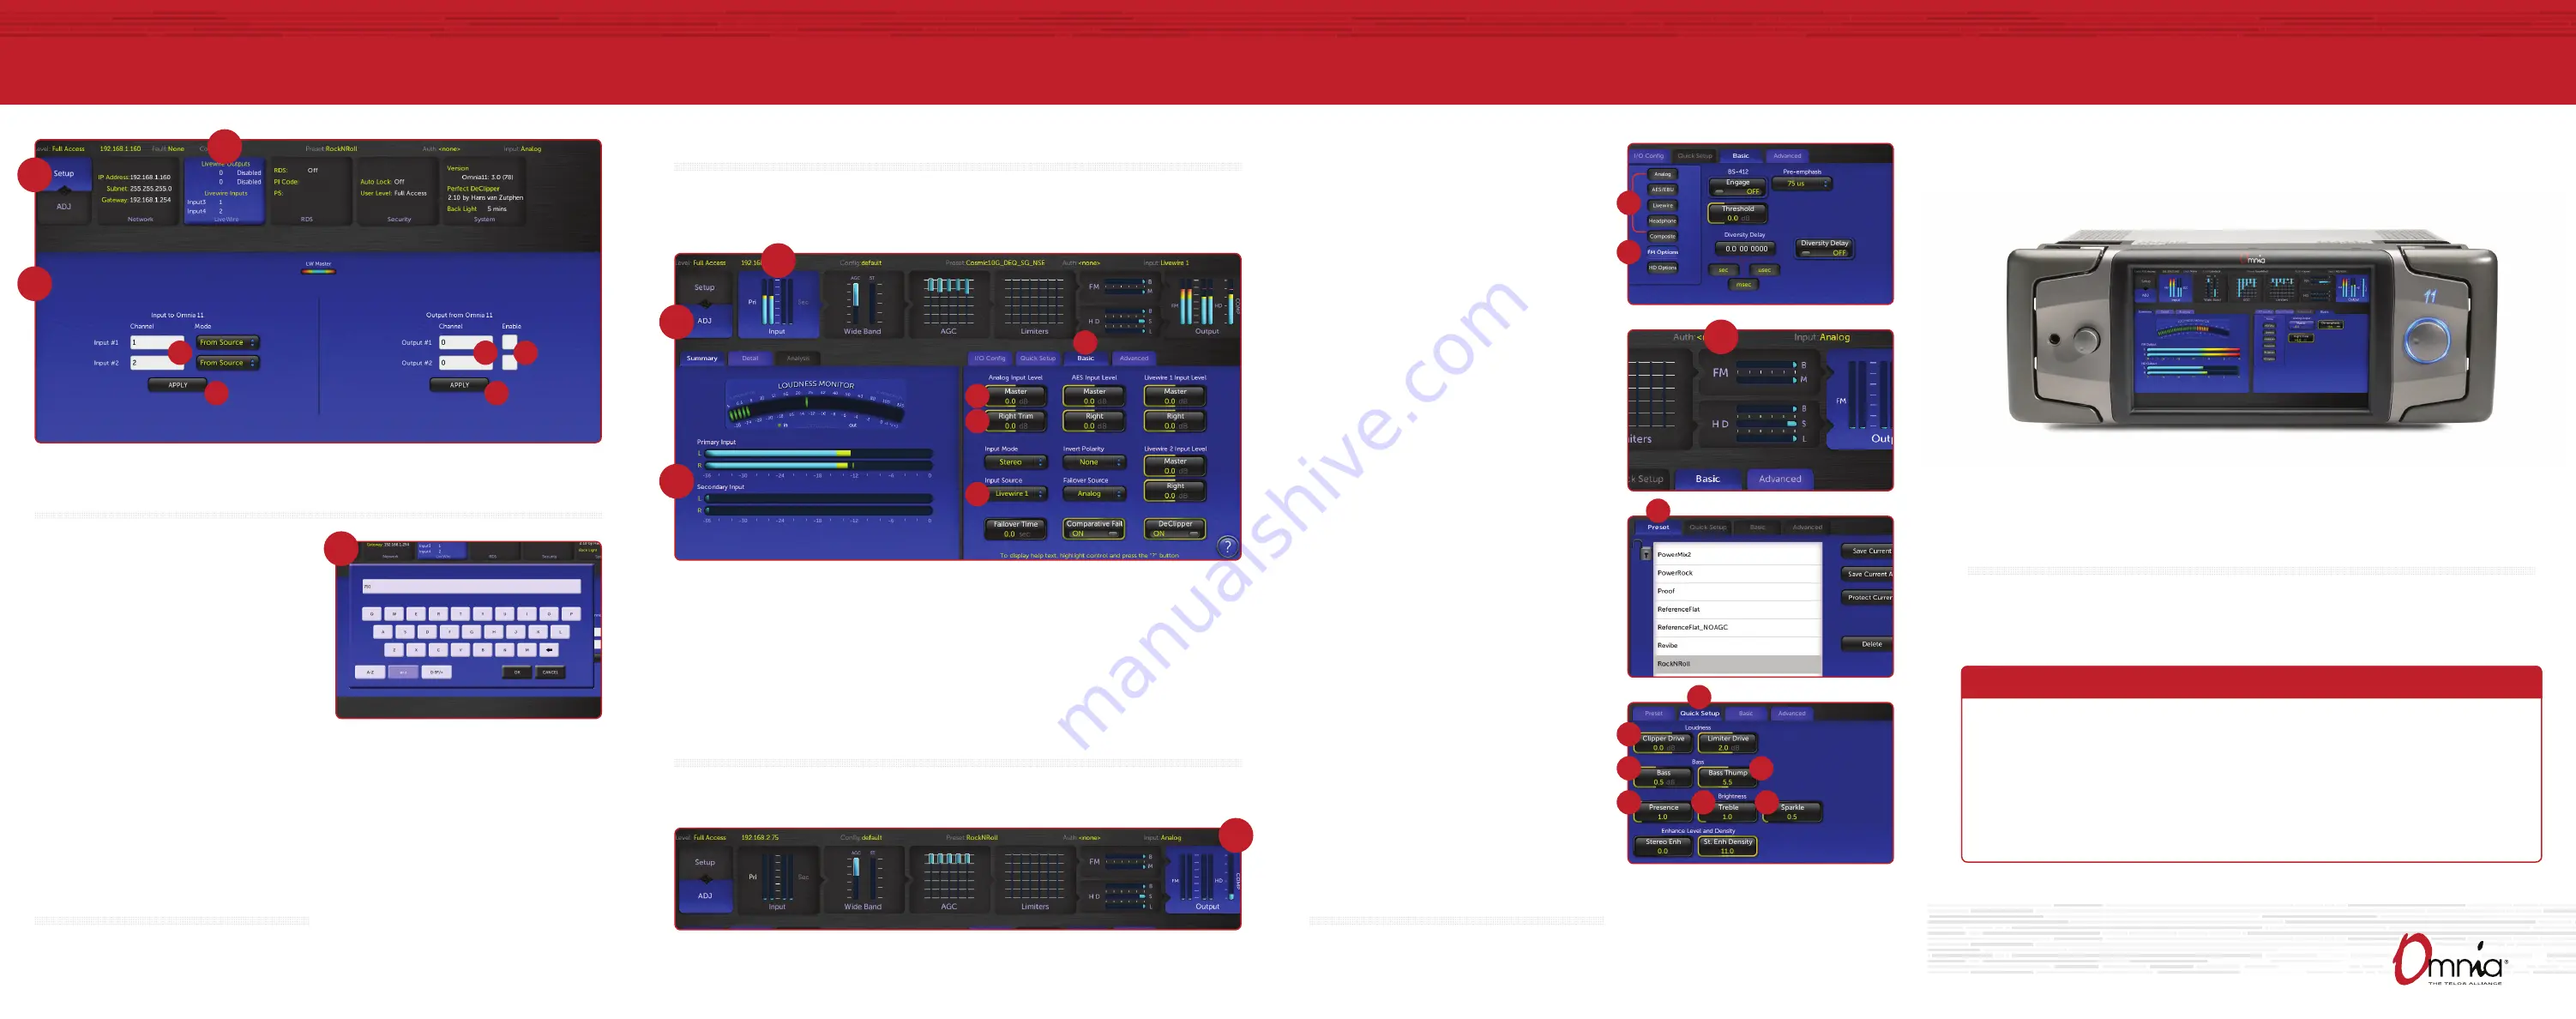
1. Once the system has rebooted, touch the “Setup”
button (S).
2. Touch the Livewire button (T). The Livewire
configuration screen will be displayed (U).
3. If you do not have a Livewire system, make sure
the 2 Livewire output channels are disabled. The
2 "Enable" buttons (V) will be white if Livewire
is disabled and green when enabled. To disable
Livewire, touch each of the two green "Enable"
buttons (V) to turn them white.
4. If you do have a Livewire system, enable Livewire
by touching each of the two "Enable" buttons (V) to
turn them green.
5. If you have a Livewire system, touch the white fields
(W) next to the Output #1 and #2 and enter the
appropriate channel value via the pop-up keyboard (X).
6. Touch the “APPLY” button (Y) under the Outputs.
7. Touch the white fields (Z) next to the Input #1 and #2
to enter the appropriate channel value via the pop-
up keyboard (X).
8. Touch the “APPLY” button under the Inputs (AA).
lIVEWIRE CONFIGURATION
OUTPUT CONFIGURATION
1. Touch the “Output” icon (II). The Output Configuration screen will be displayed. If the “Basic” tab is not
active, touch to select it.
INPUT CONFIGURATION
1. Touch the “ADJ” icon (BB) to return to the initial System screen.
2. Touch the “Input” icon (CC). The Input Configuration screen will be displayed. If the “Basic” tab (DD)
is not active, touch to select it.
3. From the “Input Source” drop-down (EE), select the Analog, AES/EBU or Livewire input as appropriate
for your installation. If your audio source is providing an audio feed you should see meter activity on
the bargraph meters (FF).
4. While driving the inputs with typical program material at normal operating level, adjust the
appropriate “Master” Input Gain control (GG) for your installation until the peak-reading input bar
graph meters are reading just “into the yellow” (about –15 to –12 dBFS or so). If the left/right audio
levels coming into the Omnia.11 are somewhat unbalanced, you can adjust the “Right Trim” control
(HH) to change the level of the right channel alone over a limited range.
©2016 TLS Corp., All Rights Reserved.
1490-00099-001 — QUICK START GUIDE: OMNIA.11 C16/15035
yOUR sETUP Is COmPlETE!
That’s it! You are now ready to experience the Omnia.11
for sound like never before.
1. Touch the “FM Options” button (JJ) on the left side of the
Menu Area and ensure that the Pre-Emphasis, Diversity
Delay (if present) and BS-412 settings are correct for
your system and your location.
2. Touch the appropriate button (KK) above the “FM
Options” button to select the group of output controls
for the output you will be using. All outputs are active
simultaneously. Note: If you are using a conventional
AES/EBU L/R digital output to feed an FM exciter or
linear STL, touch the “AES/EBU” button and be sure the
“Output Selection” is set to “FM” and the “De-emphasis”
is turned “OFF” for the output being used. For access to
the composite MPX stereo generator output level and
stereo pilot controls, touch the “Composite” button.
Note that these controls simultaneously adjust the
Omnia Direct output levels as well. Finally, adjust the
appropriate control so that the peak output/modulation
level is correct for the equipment that follows the
Omnia.11.
3. Touch the “FM” icon button (LL) at the top of the screen
and then touch the “Preset” tab (MM) to display the list
of factory processing presets. If the preset list is locked
(grayed-out), touch the “padlock” icon to unlock it. Once
unlocked, simply touch the desired preset name in the
list and it will be put directly “on the air". We recommend
listening to all factory presets to get a feel for their
differences and then select one to start with.
4. Touch the “Quick Setup” tab (NN) and adjust the
following controls to set the basic loudness, bass and
brightness sound desired.
5. Adjust the “Clipper Drive” control (OO) as low as
possible for the loudness needed. This controls the
primary loudness vs. distortion tradeoff. Turning it up
makes the sound louder (but more distorted) while
turning it down makes the sound cleaner but not as
loud. It should always be set as low as possible for the
level of loudness required.
6. Set the overall amount of bass using the “Bass” control
(PP). At higher settings of the “Bass Thump” (QQ)
control, the “kick” or “Thump” action of bass material
is emphasized.
7. Set the basic brightness of a preset by using the
“Presence” (RR), “Treble” (SS) and “Sparkle” (TT)
controls. Note that these three controls only boost the
brightness. A setting of “0.0” is “flat” or the minimum
amount of boost for the particular preset that is
currently selected. Reducing brightness can be done,
for one example, by reducing the higher bands of the
AGC or Limiter mixers.
T
S
U
Z
AA
V
W
Y
X
II
KK
JJ
LL
MM
BB
CC
DD
GG
HH
EE
FF
NN
OO
PP
RR
SS
TT


