background image

Maintenance 


Xerox

®

 WorkCentre

®

 EC7836/EC7856 Color Multifunction Printer  215 


User Guide 


8.


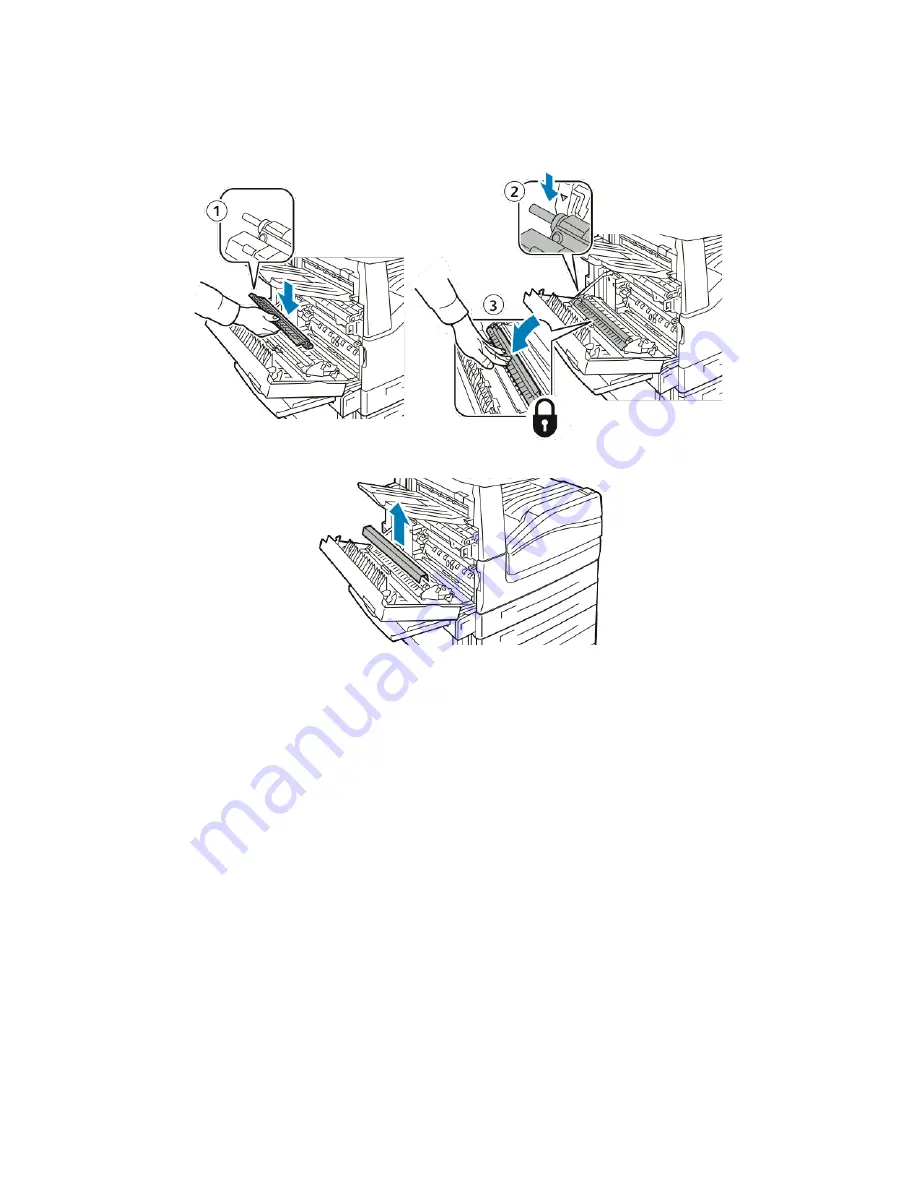
Place the new transfer roller in the printer as shown. Press down until the transfer roller clicks into 

place. 


9.


Remove the protective cover from the transfer roller. 


10.


Close cover A. 


Resetting Supply Life Counters 

You must reset the supply life counters when you replace some supplies. 
1.


Press the 

Log In/Out

 button, enter the system administrator login information, then press 

Enter

. For 

details, see the 

System Administrator Guide 

at 

www.xerox.com/office/EC78XXdocs

. 

2.


On the control panel, press 

Machine Status

3.


Touch the 

Tools

 tab, then touch 

Troubleshooting

4.


Touch 

Resets

5.


Touch 

Supply Counter Reset

.   

6.


Touch the desired supply item, then touch 

Reset Counter

7.


On the confirmation screen, touch 

Reset

8.


Touch 

Close

9.


Press the 

Log In/Out

 button, then touch 

Logout


Summary of Contents for WorkCentre EC 7856

Page 1: ...Xerox WorkCentre EC7836 EC7856 Color Multifunction Printer Xerox ConnectKey 2 0i Technology User Guide...

Page 2: ...alk TrueType iPad iPhone iPod iPod touch Mac and Mac OS are trademarks of Apple Inc registered in the U S and other countries HP GL HP UX and PCL are trademarks of Hewlett Packard Corporation in the U...

Page 3: ...ter Symbols 19 Environmental Health and Safety Contact Information 20 2 Features 21 Parts of the Printer 22 Left Front View 22 Left Rear View 23 Internal Components 23 Document Feeder 24 Control Panel...

Page 4: ...ties for UNIX and Linux 45 Other Drivers 46 4 Paper and Media 47 Supported Paper 48 Recommended Media 48 Ordering Paper 48 General Paper Loading Guidelines 48 Paper That Can Damage Your Printer 49 Pap...

Page 5: ...ides of the Paper 82 Selecting Paper Options for Printing 83 Printing Multiple Pages to a Single Sheet 83 Printing Booklets 84 Using Image Options 85 Using Special Pages 86 Scaling 88 Printing Waterma...

Page 6: ...Scanning to a Private Folder 135 Creating a Private Folder 135 Retrieving Scan Files 136 Scanning to Network File Repositories 137 Scanning to a Predefined Network File Repository 137 Adding a Scan De...

Page 7: ...s 160 Selecting Fax Options 164 Sending a Server Fax 172 Basic Server Fax Settings 173 Selecting Server Fax Options 175 Sending an Internet Fax 178 Basic Internet Fax Settings 179 Selecting Internet F...

Page 8: ...Emptying the Hole Punch Waste Container 220 Billing and Usage Information 222 Ordering Supplies 223 Locating the Serial Number 223 Consumables 223 Routine Maintenance Items 223 Other Supplies 224 Whe...

Page 9: ...sing the Integrated Troubleshooting Tools 273 More Information 277 A Specifications 279 Printer Configurations and Options 280 Standard Features 280 Available Configurations 281 Options and Upgrades 2...

Page 10: ...sumption and Activation Time 291 Environmental Choice Certified to Office Machines CCD 035 292 Regulatory Information for 2 4 GHz Wireless Network Adapter 292 Ozone Release 292 Copy Regulations 293 Un...

Page 11: ...13 Operational Safety 16 Maintenance Safety 18 Printer Symbols 19 Environmental Health and Safety Contact Information 20 Your printer and the recommended supplies have been designed and tested to meet...

Page 12: ...sted to meet strict safety requirements These include safety agency evaluation and certification and compliance with electromagnetic regulations and established environmental standards The safety and...

Page 13: ...connection of external devices can affect the product certification For more information contact your Xerox representative General Guidelines WARNINGS Do not push objects into slots or openings on the...

Page 14: ...not know if an outlet is grounded ask an electrician to check the outlet Do not use a ground adapter plug to connect the printer to an electrical outlet that does not have a ground connection termina...

Page 15: ...rox service representative to correct the problem if The equipment emits unusual odors or makes unusual noises The power cable is damaged or frayed A wall panel circuit breaker fuse or other safety de...

Page 16: ...o connecting an interface cable Ozone Release This printer produces ozone during normal operation The amount of ozone produced is dependent on copy volume Ozone is heavier than air and is not produced...

Page 17: ...hrow toner toner cartridges drum cartridges or waste cartridges into an open flame When handling cartridges for example toner and such avoid skin or eye contact Eye contact can cause irritation and in...

Page 18: ...Do not burn any consumables or routine maintenance items For information on Xerox supplies recycling programs go to www xerox com gwa WARNING Do not use aerosol cleaners Aerosol cleaners can be explo...

Page 19: ...en death Ignoring this caution could cause injury or damage to property Hot surface on or in the printer Use caution to avoid personal injury Do not burn the waste toner container Do not expose the dr...

Page 20: ...Contact Information For more information on Environment Health and Safety in relation to this Xerox product and supplies contact the following customer help line United States and Canada 1 800 ASK XER...

Page 21: ...entre EC7836 EC7856 Color Multifunction Printer 21 User Guide This chapter includes Parts of the Printer 22 Information Pages 27 Administration Features 28 Xerox ConnectKey Apps 32 More Information 33...

Page 22: ...Rear View 23 Internal Components 23 Document Feeder 24 Control Panel 24 Office Finisher LX 26 Wireless Network Adapter 26 Left Front View 1 Leveler Foot 2 Tray 5 3 Left Tray 4 USB Port 5 Document Cove...

Page 23: ...erface 11 Fax Connections optional 12 Door D Release Lever 13 Door A Release Lever 14 Door B Release Lever 15 Door C Release Lever Notes The side 2 scan cable is present only on specific printer model...

Page 24: ...Panel The control panel consists of the touch screen USB port and buttons you press to control the functions available on the printer The control panel Displays the current operating status of the pri...

Page 25: ...protected features 8 Help displays information about the current selection on the touch screen 9 Language changes the touch screen language and keyboard settings 10 Energy Saver enters and exits the l...

Page 26: ...it optional 12 Staple Cartridge 13 Finisher Front Cover 14 Office Finisher LX Wireless Network Adapter The wireless network adapter is a USB device that transfers data between the printer and a wirele...

Page 27: ...1 At the printer control panel press the Machine Status button 2 On the Machine Information tab touch Information Pages then touch the desired information page 3 Touch Print Note Information pages ca...

Page 28: ...ion the printer compares the information that you provide to another source of information such as an LDAP directory The information can be a user name and password or the information stored on a magn...

Page 29: ...LDAP directory The system administrator sets authorization permissions To set or edit user permissions for access to printer features you must log in as the administrator Accounting Accounting monitor...

Page 30: ...the System Administrator at the Control Panel 1 At the control panel press Log In Out 2 Type admin then touch Next 3 Type your password then touch Done Note The system administrator user name is admi...

Page 31: ...nformation Pages Configuration Report Print 3 Touch Close after the report prints Automatic Data Collection This printer automatically collects data and transmits it to a secure offsite location Xerox...

Page 32: ...he QR Code App to access information about related Xerox Mobile Apps Xerox PrintByXerox You can use this App to print documents to ConnectKey enabled devices using email submission from any location X...

Page 33: ...n Information Pages To print from Xerox CentreWare Internet Services click Status Information Pages Xerox CentreWare Internet Services documentation In Xerox CentreWare Internet Services click Help Or...

Page 34: ...owing space _________________________________ If you need additional help using your printer 1 Refer to this user guide 2 Contact the system administrator 3 Visit the Xerox website at www xerox com of...

Page 35: ...er Guide This chapter includes Installation and Setup Overview 36 Modifying General Settings 40 Installing the Software 42 See also Installation Guide packaged with your printer System Administrator G...

Page 36: ...Physically Connecting the Printer to the Network Use a Category 5 or better Ethernet cable to connect the printer to the network An Ethernet network is used for one or more computers and supports man...

Page 37: ...tware controlled shutdown The preferred method to turn on and off the printer is to use the secondary power switch To operate the printer turn on both switches First turn on the main power switch then...

Page 38: ...obs in the queue 2 Turn off the secondary power switch then wait 10 seconds after the touch screen goes dark before proceeding Note When the optional Office Finisher LX is installed the secondary powe...

Page 39: ...tray 1 Optimizing Printer Performance Several factors influence printer performance including temperature humidity air pressure and the chemical characteristics of the paper and coatings The printer...

Page 40: ...the printer transitions to a lower power level To configure Energy Saver settings 1 At the printer control panel press the Machine Status button then touch the Tools tab 2 Touch Device Settings Genera...

Page 41: ...list then touch your region Use the Up or Down arrows to navigate and select your Time Zone Note The date and time are set automatically through Network Time Protocol NTP To modify these settings go...

Page 42: ...nstall driver software verify that the printer is plugged in turned on connected correctly and has a valid IP address If you cannot find the IP address see Finding the IP Address of Your Printer on pa...

Page 43: ...ters and you know the IP address a Click the Network Printer icon at the top of the window b Enter the IP address or the DNS name of the printer c Click Search d From the list of discovered printers s...

Page 44: ...ck Install 8 Enter your password then click OK 9 From the list of discovered printers select your printer then click Next If your printer does not appear in the list of discovered printers a Click the...

Page 45: ...office EC78XXdrivers and select your printer model b From the Operating System menu select UNIX then click Go c Select the Xerox Services for UNIX Systems package for the correct operating system This...

Page 46: ...n your network including those printers made by other manufacturers It configures itself for your individual printer upon installation The Xerox Mobile Express Driver works with any printer available...

Page 47: ...Xerox WorkCentre EC7836 EC7856 Color Multifunction Printer 47 User Guide This chapter includes Supported Paper 48 Loading Paper 53 Printing on Special Paper 65 4 Paper and Media...

Page 48: ...and media recommended for your printer Recommended Media A list of paper and media recommended for your printer is available at www xerox com rmlna Recommended Media List United States Ordering Paper...

Page 49: ...resentative for details Paper Storage Guidelines Storing your paper and other media properly contributes to optimum print quality Store paper in dark cool relatively dry locations Most paper is suscep...

Page 50: ...rdstock and Lightweight Cardstock Reloaded 106 169 g m Cardstock and Cardstock Reloaded 170 256 g m Lightweight Glossy Cardstock and Lightweight Glossy Card Reloaded 106 169 g m Glossy Cardstock and G...

Page 51: ...in Executive 7 25 x 10 5 in Letter 8 5 x 11 in 8 5 x 13 in Legal 8 5 x 14 in Tabloid 11 x 17 in 12 x 18 in Trays 3 and 4 of the High Capacity Tandem Tray Module Tray 6 of the High Capacity Feeder Exec...

Page 52: ...ze paper within the following ranges for 2 sided printing Minimum size 128 x 140 mm 5 x 5 5 in Maximum size 320 x 483 mm 12 x 19 in Paper weights from 75 g m through 256 g m can be used for automatic...

Page 53: ...in the High Capacity Feeder 63 Changing Paper Size Type and Color 64 Changing Paper Size Type and Color 64 Loading Paper in Trays 1 and 2 1 Pull out the tray until it stops 2 Ensure that the guide loc...

Page 54: ...p with the top edge toward the front of the tray For clear or non stripe transparencies load face up For striped transparencies load with the stripe down on the right trailing edge For long edge feed...

Page 55: ...elect a new paper type touch Type To select a new paper color touch Color When finished touch Confirm To change the paper size type or color when the tray is set to Dedicated mode press the Machine St...

Page 56: ...ported standard paper settings In the custom position the guides move in 1 mm 0 04 in increments To move the guide locks from the standard to the custom paper size position 1 Pull out the tray until i...

Page 57: ...ns It contains three trays Tray 2 holds paper sizes up to SRA3 12 x 18 in Trays 3 and 4 hold A4 letter size paper only Note Do not load custom size paper into tray 3 or tray 4 of the tandem tray modul...

Page 58: ...de 3 Stack the paper against the left rear corner of the tray as shown 4 Adjust the guides so that they touch the edges of the stack 5 Close the tray 6 Verify the size type and color of the paper Chan...

Page 59: ...remove any paper that is a different size or type 2 Move the width guides to the edges of the tray 3 Flex the sheets back and forth and fan them then align the edges of the stack on a level surface Th...

Page 60: ...ng edge leading into the printer For striped transparencies load face up with the non stripe edge leading into the printer For short edge feed insert letterhead and pre printed paper face up with the...

Page 61: ...re stuck together and reduces the possibility of paper jams Note To avoid paper jams and misfeeds do not remove paper from its packaging until necessary 4 Load the paper against the right side of the...

Page 62: ...Color Multifunction Printer User Guide 5 Slide the guides so they touch the edges of the paper 6 Close the tray 7 Verify the size type and color of the paper Change the selection for any incorrect se...

Page 63: ...the paper size to the Tray 6 configuration If the paper size matches no adjustment is needed 1 Remove the screw that holds the spacer plate at the back of the tray 2 Lift the spacer plate to remove it...

Page 64: ...er Size Type and Color You can set paper trays to Adjustable or Dedicated mode When trays are set to Adjustable mode you can change paper settings each time that you load the tray When a paper tray is...

Page 65: ...pes Try another envelope brand if you do not get desired results Maintain constant temperatures and relative humidity Store unused envelopes in their packaging to avoid excess moisture and dryness whi...

Page 66: ...envelopes in the tray with the flaps closed flaps up and flaps on the leading edge toward the right 3 Center the stack then slide the guides until they lightly touch the edges of the stack 4 Verify th...

Page 67: ...he original packaging until ready to use Return any unused sheets of labels to the original packaging and reseal it Do not store labels in extremely dry or humid conditions or extremely hot or cold co...

Page 68: ...are loading For details see Setting the Guide Locks in the 500 Sheet Adjustable Trays on page 56 Note Trays 1 4 accept labels 106 169 g m For long edge feed load labels face up with the top edge towar...

Page 69: ...function Printer 69 User Guide Loading Labels in Tray 5 1 Open tray 5 then pull out the extension tray for larger sizes If the extension tray is already opened remove any paper that is a different siz...

Page 70: ...the maximum fill line Overfilling the tray can cause the printer to jam Do not print on label media once a label has been removed from a sheet To avoid jams and misfeeds do not remove paper from its...

Page 71: ...eme conditions can cause gloss paper to curl and jam in the printer In the print driver software select the desired gloss paper type or select the tray loaded with the desired paper Loading Gloss Pape...

Page 72: ...ansparencies Overloading the tray can cause the printer to jam Load Clear or non strip transparencies face down into Tray 5 bypass tray and face up into trays 1 4 Do not fan transparencies After you l...

Page 73: ...6 Color Multifunction Printer 73 User Guide This chapter includes Printing Overview 74 Selecting Printing Options 75 Managing Jobs 79 Printing Features 82 Printing Special Job Types 92 Held Print Jobs...

Page 74: ...anel specify the size color and type 3 Access the print settings in your software application For most software applications press CTRL P for Windows or CMD P for Macintosh 4 Select your printer 5 Acc...

Page 75: ...s that are set from within the software application are temporary The application and the computer do not save the settings after the application is closed Print Driver Help Xerox print driver softwar...

Page 76: ...on for your printer and click Printing Preferences 3 In the Printing Preferences window click a tab select the options then click OK to save Note For more information about Windows print driver option...

Page 77: ...lly Select determines the output destination by the number of sets and the stapling option selected Multiple sets or stapled sets are sent to the finisher output tray Top Tray selects the output tray...

Page 78: ...ng field then select an option 3 To select the output tray click the arrow to the right of the Output Destination field then select an option Automatically Select determines the output destination by...

Page 79: ...the best place to pause the spooled print job 2 To resume printing press the Interrupt button again To pause the print job with the option to delete it 1 At the control panel press the Interrupt butto...

Page 80: ...passcode at the control panel To view a list of secure print jobs 1 At the printer control panel press the Job Status button 2 Touch Held Print Jobs or Secure Print Jobs then select a folder For detai...

Page 81: ...naging Jobs in Xerox CentreWare Internet Services You can view a list of active jobs and delete print jobs from the Active Jobs list in Xerox CentreWare Internet Services You can also print copy move...

Page 82: ...0 Selecting Job Completion Notification for Windows 91 Printing on Both Sides of the Paper Paper Types for Automatic 2 Sided Printing The printer can print a 2 sided document automatically on supporte...

Page 83: ...ape 2 Sided Print Flip on Short Edge Selecting Paper Options for Printing There are two ways to select the paper for your print job You can let the printer select which paper to use based on the docum...

Page 84: ...he pages are printed in the correct order so that you can fold and staple the pages to create the booklet When you print booklets using the Windows PostScript or Macintosh driver you can specify the g...

Page 85: ...d Color To match the color output to another output device select a custom Color Correction To apply different Color Corrections to Text and Graphics and Images select Custom Automatic Color This feat...

Page 86: ...ont and back cover pages from different trays After making a selection for printing the cover pages you can select the paper for the front and back covers by size color or type You can also use blank...

Page 87: ...parate individual pages or page ranges with commas Specify pages within a range with a hyphen For example to specify pages 1 6 9 10 and 11 type 1 6 9 11 Paper Displays the default size color and type...

Page 88: ...Options to the right of the Paper field click the arrow then select Other Size Advanced Paper Size 2 Select an option No Scaling You can use this option to retain the original image size Automaticall...

Page 89: ...u can do the following Create a watermark or edit an existing watermark using the Watermark Editor A Text Watermark uses the characters typed in the Text field as the watermark You can create a text w...

Page 90: ...cument Print on All Pages This option prints the watermark on all pages of your document 5 Click OK Printing Mirror Images If the PostScript driver is installed you can print pages as a mirror image I...

Page 91: ...of the new custom size 6 Click Print Margins then select the printer from the list Or set the top bottom right and left margins 7 To save the settings click OK Selecting Job Completion Notification f...

Page 92: ...nt driver from the Printing Options tab Secure Print Secure print allows you to associate a 4 10 digit passcode with a print job when sending it to the printer The job is held at the printer until you...

Page 93: ...t job click Paper Select By Tray 6 Select an option for 2 sided printing 7 If your printer has a finisher installed click the arrow to the right of Finishing then select a stapling option The image ne...

Page 94: ...e next to Stapling shows the staple position 5 Select a print quality mode 6 Select an output destination 7 Select another tab or click OK 8 To send the job to the printer in the Print window select t...

Page 95: ...ptions and click OK 5 Click OK or Print Note To print the job after you send it but before the scheduled time release the job at the printer control panel Saved Job Saved Job or Store File in Folder s...

Page 96: ...click OK or Print A sample copy prints immediately The sample copy is not counted as part of the print job After the job is saved you can print it as needed For details see Printing from Saved Jobs S...

Page 97: ...ode 7 In the Confirm Passcode field type the passcode again 8 Click OK 9 Verify that the paper is the correct size type and weight If not change the paper settings 10 Select options for the print job...

Page 98: ...ease them If the system administrator has configured the Hold All Jobs feature any job sent to the printer is held until you release it Releasing Held Print Jobs 1 At the control panel press the Job S...

Page 99: ...roll through the list and locate the printable file next to the list use the arrows If the print file is in a folder to open the folder touch the name 3 Touch the name of the printable file 4 Select t...

Page 100: ...to the list of documents in the mailbox touch Browse To return to the list of folders touch Back Printing from Xerox CentreWare Internet Services You can print pdf ps pcl and xps files directly from...

Page 101: ...Xerox WorkCentre EC7836 EC7856 Color Multifunction Printer 101 User Guide This chapter includes Basic Copying 102 Selecting Copy Settings 104 6 Copying...

Page 102: ...ppears in the upper right corner of the touch screen Note To correct the number of copies entered using the alphanumeric keypad press the C button then re enter the number 5 Change the copy settings a...

Page 103: ...ment feeder automatically detects standard paper sizes WorkCentre EC7836 EC7856 Multifunction Printer The document feeder accepts paper weights 38 128 g m for 1 sided pages and 50 128 g m for 2 sided...

Page 104: ...7836 EC7856 Color Multifunction Printer User Guide Selecting Copy Settings This section includes Basic Settings 105 Image Quality Settings 110 Layout Settings 113 Output Format Settings 116 ID Card Co...

Page 105: ...ol panel alphanumeric keypad 1 Press the Services Home button then touch Copy 2 Use the alphanumeric keypad on the control panel to enter the number of copies The number of copies appears in the upper...

Page 106: ...e original document If the original is a color document the printer makes copies in full color If the original is a black and white document the printer makes copies in black only Black White Produces...

Page 107: ...cted paper size Note If Paper Supply is set to Auto Paper Select the Paper Conflict screen appears Select the desired paper tray then touch OK To center the image on the page select the Auto Center ch...

Page 108: ...d produces 1 sided copies 1 2 Sided scans only one side of the originals and produces 2 sided copies To rotate the second sides touch Rotate Side 2 2 2 Sided scans both sides of the originals and prod...

Page 109: ...hing touch Advanced Touch Uncollated 3 Touch OK Stapling Copies If your printer has a finisher it can staple your copies To select stapling 1 Press the Services Home button then touch Copy 2 For Finis...

Page 110: ...was created To specify the original type 1 Press the Services Home button then touch Copy 2 Touch the Image Quality tab then touch Original Type 3 On the Original Type screen select the appropriate s...

Page 111: ...ground colors To change this setting 1 Press the Services Home button then touch Copy 2 Touch the Image Quality tab then touch Image Enhancement 3 Under Background Suppression touch Auto Suppression 4...

Page 112: ...Color Balance If you have a color original you can adjust the balance of the printing colors between cyan magenta yellow and black before printing your copy To adjust the color balance 1 Press the Ser...

Page 113: ...mages refer to the direction the originals are loaded in the document feeder Note If you are using the document glass the orientation of the original document is as seen before turning it over 4 Touch...

Page 114: ...25 4 mm 1 in Right Page Only to copy only the right page of an open book on a single sheet of paper If Binding Edge Erase is required touch the arrows to erase up to 25 4 mm 1 in 4 Touch OK Shifting t...

Page 115: ...rom each edge touch Side 1 then touch the Left Right Top and Bottom arrows To specify the amount to erase from each edge touch Side 2 then touch the Left Right Top and Bottom arrows or touch Mirror Si...

Page 116: ...n fold and staple the pages manually or automatically using the appropriate finisher Note In this mode the printer scans all of the originals before it prints the copies To create a booklet 1 Press th...

Page 117: ...cludes front and back covers from the same tray Front Back Different This option includes a front and a back cover from different trays Front Only This option includes a front cover only Back Only Thi...

Page 118: ...Special Pages Chapter Starts Note If Paper Supply is set to Auto Paper Select the Paper Conflict screen appears Select the desired paper tray then touch OK 4 On the Chapter Starts screen touch Page Nu...

Page 119: ...ut Format tab then touch Special Pages Inserts If Paper Supply is set to Auto Paper Select the Paper Conflict screen appears Select the desired paper tray then touch OK 4 To specify the number of shee...

Page 120: ...is set to Auto Paper Select the Paper Conflict screen appears Select the desired paper tray then touch OK 4 On the Exceptions screen touch the beginning Page Number field To enter the starting number...

Page 121: ...e page shows the location of the page number e Touch OK f To change the text formatting touch Format Style choose the desired settings then touch OK 4 To insert a comment a Touch Comment On b Touch Ap...

Page 122: ...ransparency Separators You can add blank sheets of paper between each printed transparency The size and orientation of the separators must be the same as the transparencies Notes If Booklet Creation i...

Page 123: ...age Layout Pages per Side Note If Paper Supply is set to Auto Paper Select the Paper Conflict screen appears Select the desired paper tray then touch OK 3 Touch the number of original pages for each s...

Page 124: ...pears Select the desired paper tray then touch OK 3 Specify how many times the image repeats on the page To repeat the image 2 Times 4 Times or 6 Times on the page select a preset option Specify Rows...

Page 125: ...by side on the paper To copy an ID card 1 Press the Services Home button then touch ID Card Copy 2 To enter the number of copies use the keypad on the touch screen or the control panel 3 For Common Fe...

Page 126: ...original is a black and white document the printer makes copies in black only Black White Produces copies in black and white only Colors in the original are converted to shades of gray 4 Touch OK Red...

Page 127: ...ed tray 4 If the desired tray is not listed touch More 5 Touch the desired tray then touch OK Specifying the Original Type You can use the Original Type option to specify the type of images to scan Th...

Page 128: ...printed on one side of the paper can be seen on the other side Use the Auto Suppression setting to reduce the sensitivity of the printer to variations in light background colors To change Background S...

Page 129: ...d options c Touch the Job Assembly tab then touch Build Job On d Touch Options e Select or clear the Display summary window between segments check box f Select or clear the Turn Build Job Off after Jo...

Page 130: ...delete the job To release and print the remaining copies of the job touch Print If the sample copy is unsatisfactory touch Delete Saving Copy Settings To use a particular combination of copy settings...

Page 131: ...to a Destination 152 The system administrator must set up this feature before you can use it For details see the System Administrator Guide at www xerox com office EC78XXdocs If the system administrat...

Page 132: ...N and WIA To scan an image 1 On the control panel press the yellow Clear All button to clear previous settings 2 Load your original documents Use the document glass for single pages or paper that cann...

Page 133: ...ace up with page one on top The confirmation indicator illuminates when you load the originals correctly Adjust the paper guides so they fit against the originals The document feeder automatically det...

Page 134: ...CentreWare Internet Services Scanning to the Public Folder The printer provides a public folder to store scanned images You do not need a password to scan images to the public folder or to retrieve t...

Page 135: ...dministrator can create a private folder at any time For details see the System Administrator Guide for your printer model To create a private folder with a password 1 At your computer open a Web brow...

Page 136: ...section select Mailboxes 4 In the Scan to Mailbox section click the folder containing the scan Your scan file appears in the Folder Contents window Notes For a password protected private folder click...

Page 137: ...your own scan destinations to templates Scanning to a Predefined Network File Repository To scan an image and send it to a predefined network file repository 1 Load the original on the document glass...

Page 138: ...6 Click the Friendly Name field then create a name for the template 7 Under Protocol select an option 8 Configure the destination IP Address Port number or Host Name Port number 9 Enter the name of th...

Page 139: ...g In on page 29 To scan an image to your home directory 1 Load the original on the document glass or in the document feeder 2 Press the Services Home button then touch Workflow Scanning 3 Touch Change...

Page 140: ...an option 1 Sided This option scans only one side of the original image and produces 1 sided output files 2 Sided This option scans both sides of the original image 2 Sided Rotate Side 2 This option s...

Page 141: ...t advanced settings 1 Press the Services Home button then touch Workflow Scanning 2 Touch the Advanced Settings tab 3 To specify the output color a Touch Output Color then select an option Auto Detect...

Page 142: ...lly To increase or decrease the contrast move the Manual Contrast slider up or down The middle position on the slider does not change the contrast c Touch OK 7 To adjust brightness and sharpness a Tou...

Page 143: ...o specify the amount to erase from each edge use the arrows c Touch OK 4 To scan the correct area of the original image a Touch Original Size b On the Original Size screen select an option Auto Detect...

Page 144: ...ck a Workflow screen select a workflow 5 To define additional network locations as destinations for scanned documents a Touch Add File Destinations b On the Add File Destinations screen touch the desi...

Page 145: ...scan the first segment a Load the originals for the first segment b Press the green Start button on the control panel Note If a password is required contact the system administrator 5 Program and scan...

Page 146: ...USB 5 Insert your USB Flash drive in the USB port on the printer control panel Note If the USB Flash drive is already in the USB memory port press Services Home then touch Workflow Scanning The USB w...

Page 147: ...olor Multifunction Printer 147 User Guide Scanning to an Email Address This section includes Sending a Scanned Image to an Email Address 148 Setting Email Options 149 When using this feature the image...

Page 148: ...dd e To organize the recipients touch one of the recipients on the list then from the menu select To Cc or Bcc 5 To enter an email address from favorites a Press the Services Home button then touch Em...

Page 149: ...the attachment format options 1 Touch Attachment 2 Touch the file format menu select Custom 3 On the File Format screen under Format select an option 4 Under File Options for PDF PDF Archival XPS or T...

Page 150: ...e touch screen keyboard to type part of the name d Touch Search e Select the desired name from the list then touch Add 6 Touch OK Changing the Reply To Address To change the Reply To address 1 Touch t...

Page 151: ...ch Quality File Size 3 To select a setting use the slider The settings range from Highest Compression Smallest File Size to Lowest Compression Largest File Size 4 Touch OK Setting Encryption Encryptio...

Page 152: ...lor Multifunction Printer User Guide Scanning to a Destination This section includes Sending a Scanned Image to a Destination 152 Use Scan to Destination to send scanned images to a remote destination...

Page 153: ...touch screen To scan an image and send it to a destination 1 Load the original on the document glass or in the document feeder 2 Press the Services Home button then touch Scan To 3 To select a destina...

Page 154: ...h the Filing Options tab b Touch If File Already Exists Select an option c Touch OK 7 To set the quality and file size a Touch the Filing Options tab b Touch Quality File Size c To select a setting us...

Page 155: ...Basic Faxing 157 Sending an Embedded Fax 159 Sending a Server Fax 172 Sending an Internet Fax 178 Building a Fax Job 187 Sending a LAN Fax 188 Using the Address Book 190 The system administrator must...

Page 156: ...t compatible with your local connection and regulations The Fax Settings include optional features you can use to configure the printer for faxing Note Not all options listed are supported on all prin...

Page 157: ...e Sending a Server Fax on page 172 Internet Fax This option scans the document then emails it to a recipient For details see Sending an Internet Fax on page 178 LAN Fax This option sends the current p...

Page 158: ...you load the originals correctly Adjust the paper guides so they fit against the originals The document feeder automatically detects standard paper sizes The automatic document feeder accommodates the...

Page 159: ...n be required between the access number for an outside line and the fax number When inserted the dial pauses appear as commas in the fax number Touch Device Address Book Touch the down arrow then from...

Page 160: ...n touch Fax 2 To enter recipient details touch an option or touch Skip 3 Touch 2 Sided Scanning 4 Touch an option 1 Sided This option scans only one side of the original image and produces 1 sided out...

Page 161: ...iner text drawings and lower resolution images 5 Touch OK Specifying the Size of the Original To ensure that you are scanning the correct area of the documents specify the original size To specify the...

Page 162: ...ce between light and dark areas in an image To adjust the contrast 1 Press the Services Home button then touch Fax 2 To enter recipient details touch an option or touch Skip 3 Touch the Image Quality...

Page 163: ...fit on smaller paper Split Across Pages This option continues a single image across several pages 5 Touch OK Setting Up Book Faxing You can determine the method used for scanning images in a book To...

Page 164: ...ng Local Mailbox Documents 169 Storing a Fax for Polling 169 Printing Faxes Stored for Polling 170 Deleting Faxes Stored for Polling 171 Building a Fax Job 171 Printing a Confirmation Report You can p...

Page 165: ...ning of your fax You can add a short comment to the cover sheet as well as To and From details To include a cover sheet 1 Press the Services Home button then touch Fax 2 To enter recipient details tou...

Page 166: ...ing a Delayed Fax You can set a time in the future for the printer to send your fax job The delay can range from 15 minutes through 24 hours Note Before you use this feature set the printer to the cur...

Page 167: ...t field then touch Remove or Edit 9 Select additional options as needed 10 Touch Start The originals are scanned and stored in the mailbox Storing a Fax in a Remote Mailbox To store a fax in a remote...

Page 168: ...Print The documents in the mailbox print 8 To delete the contents of the mailbox after the device finishes printing touch Empty Mailbox To confirm touch Empty Mailbox 9 Touch Close Printing Remote Ma...

Page 169: ...other fax machines To use this feature both the polling printer and the remote printer must have the Fax Polling feature You can store faxes for polling as Non Secure or Secure When you select Secure...

Page 170: ...ling Device 4 To print faxes that are stored for polling on the local device a Touch Local Fax Polling b Touch Print c To delete stored faxes after they print touch Empty Fax Polling To confirm touch...

Page 171: ...ored for polling 1 Press the Services Home button then touch Fax 2 Touch Polling Note If the Fax tab is selected touch Add Recipients then touch Polling 3 Touch Store Polling Files 4 Touch an option 5...

Page 172: ...ertion during number entry touch the desired character Touch Add To add additional recipients touch Add Recipient then Enter Recipient To enter the number use the alphanumeric keypad then touch Add No...

Page 173: ...both sides of the original image 2 Sided Rotate Side 2 This option scans both sides of the original image rotating the second side 5 Touch OK Specifying the Orientation of the Original You can use the...

Page 174: ...To ensure that you are scanning the correct area of the documents specify the original size To specify the original size 1 Press the Services Home button then touch Server Fax 2 To enter recipient det...

Page 175: ...an option or touch Skip 3 Touch the Image Quality tab then touch Lighten Darken 4 Adjust the Lighten Darken slider as needed 5 Touch OK Automatically Suppressing Background Variation When scanning ori...

Page 176: ...Enhancement screen select an option Manual Contrast This option allows you to adjust the contrast manually Auto Contrast This option enables the printer to set the contrast automatically 5 Touch OK Sp...

Page 177: ...send your fax 1 Press the Services Home button then touch Server Fax 2 To enter recipient details touch an option or touch Skip 3 Touch the Fax Options tab then touch Delay Send 4 Touch Delay Send To...

Page 178: ...Recipient To enter an email address use the touchscreen keyboard then touch Add To organize recipients touch one of the recipients in the list then from the menu select To or Cc Touch Device Address...

Page 179: ...the original image 2 Sided Rotate Side 2 This option scans both sides of the original image rotating the second side 5 Touch OK Specifying the Orientation of the Original You can use the Original Orie...

Page 180: ...cify the attachment format 1 Press the Services Home button then touch Internet Fax 2 To enter recipient details touch an option or touch Skip 3 Touch Attachment 4 On the Attachment screen touch the d...

Page 181: ...86 Building a Fax Job 186 Selecting Color or Black and White Output If the original document contains color you can create output in full color grayscale or in black and white To select the output col...

Page 182: ...ges printed on one side of the paper can be seen on the other side Use the Auto Suppression setting to reduce the sensitivity of the printer to variations in light background colors To select Auto Sup...

Page 183: ...Advanced Settings tab then touch Image Options 4 On the Image Options screen adjust the sliders as needed Lighten Darken Lightens or darkens the image Sharpness Sharpens or softens the image 5 Touch O...

Page 184: ...ze This setting is the default 300 dpi This option produces high image quality and large file size 400 dpi This option produces higher image quality and larger file size 600 dpi This option the highes...

Page 185: ...you want to send To add a message 1 Press the Services Home button then touch Internet Fax 2 To enter recipient details touch an option or touch Skip 3 Touch the Internet Fax Options tab then touch M...

Page 186: ...m each recipient then prints the report Note The report could be delayed depending on the response time of the recipients To print an acknowledgment report 1 Press the Services Home button then touch...

Page 187: ...m to your recipients list 3 Touch the Job Assembly tab then touch Build Job On 4 Touch Options a Select or clear the Display Summary window between segments check box b Select or clear the Turn Build...

Page 188: ...t or to search for a recipient type a name then click the search icon To add a name to the Fax Recipients list select the name then click the down arrow to move it to the bottom list When you are fini...

Page 189: ...n an area where the phone lines do not support high speed fax data transmission select a lower transmission rate A lower transmission rate reduces the chance of transmission errors Fax Resolution Fax...

Page 190: ...add a recipient to the Device Address Book 1 Press the Services Home button then touch Email Fax or Internet Fax 2 Touch Device Address Book 3 Touch Create New Contact 4 Touch each of the fields requ...

Page 191: ...evice Address Book 3 Touch the contact name 4 Touch Details 5 Touch the field that requires then to edit the entry use the touch screen keyboard Touch OK 6 To change the display name for the contact t...

Page 192: ...Press the Services Home button then touch Email Fax or Internet Fax 2 Touch Device Address Book 3 Touch the desired entry using the scroll arrows as needed 4 Touch Details 5 To mark any entered contac...

Page 193: ...Color Multifunction Printer 193 User Guide This chapter includes General Precautions 194 Cleaning the Printer 195 Routine Maintenance 202 Billing and Usage Information 222 Ordering Supplies 223 Moving...

Page 194: ...osion WARNING Do not remove the covers or guards that are fastened with screws You cannot maintain or service any parts that are behind these covers and guards Do not attempt any maintenance procedure...

Page 195: ...ior 200 Cleaning the Document Glass and Document Cover To ensure optimum print quality clean the document glass regularly Cleaning helps avoid output with streaks smears and other marks that transfer...

Page 196: ...llers can cause paper jams or deteriorate print quality For best performance clean the document feed rollers once a month 1 Lift the lever and open the top cover of the document feeder 2 While turning...

Page 197: ...t is located along the left side of the document cover The assembly consists of the mirrored glass strip a metal strip a white plastic strip and rollers To ensure the best image quality when scanning...

Page 198: ...dirt is difficult to remove moisten a soft cloth with a small amount of neutral detergent Then wipe them dry with a soft cloth CAUTION To prevent damage to the film around the glass do not press heav...

Page 199: ...To clean the printer exterior 1 To avoid activating buttons and menus press the Energy Saver button 2 To remove fingerprints and smudges clean the touch screen and control panel with a soft lint free...

Page 200: ...The printer is constructed with four printhead lenses Clean all lenses as described in the following procedure CAUTION Do not perform this procedure when the printer is copying or printing 1 Open the...

Page 201: ...leaner out until the three dots are visible Note The LED printhead cleaner does not detach from the printer 5 Slowly push the LED printhead cleaner back into the printhead until it stops 6 Repeat Step...

Page 202: ...n includes Replacing the Toner Cartridges 203 Replacing the Waste Toner Container 205 Replacing the Drum Cartridges 207 Replacing the Transfer Belt Cleaner 210 Replacing the Second Bias Transfer Rolle...

Page 203: ...es A message appears on the control panel when a toner cartridge must be replaced CAUTION Do not perform this procedure when the printer is copying or printing 1 Open the front cover of the printer 2...

Page 204: ...ew toner cartridge from the packaging Tilt the cartridge up and down then left and right 10 times 4 Hold the new toner cartridge with the arrow facing up then push the cartridge in slowly until it sto...

Page 205: ...t cloth Never use a vacuum cleaner to remove spilled toner Sparks inside the vacuum cleaner can cause a fire or explosion WARNING If you accidentally get toner on your clothes lightly dust them off as...

Page 206: ...r other hand 4 Place the used waste toner container in the plastic bag then seal it firmly using the zipper 5 Place the used waste toner container in the empty box 6 Hold the left side of the new wast...

Page 207: ...lacement a message appears on the control panel CAUTION Do not expose the drum cartridge to direct sunlight or strong indoor fluorescent lighting Do not touch or scratch the surface of the drum 1 Open...

Page 208: ...new supplies If the instructions or shipping label are not available for more information go to www xerox com gwa for more information 5 Remove the packing material from the end of the new drum cartr...

Page 209: ...ndle until it stops 11 Carefully remove the protective shield 12 Push the drum cartridge until it stops 13 Close the drum cartridge cover 14 To return the belt tension lever to the locked position tur...

Page 210: ...message appears on the control panel when the transfer belt cleaner must be replaced CAUTION Do not perform this procedure when the printer is copying or printing 1 Open the front cover of the printe...

Page 211: ...the transfer belt cleaner Do not tilt the transfer belt cleaner or toner could spill 5 Remove the new transfer belt cleaner from the packaging Retain the packaging 6 Place the used transfer belt clean...

Page 212: ...er Guide 8 Support the new transfer belt cleaner with your left hand and slide it straight into the opening until it stops 9 Push the orange knob in then turn it clockwise until snug 10 Turn the orang...

Page 213: ...Remove paper from the left tray then fold up the tray 2 Open tray 5 bypass as shown 1 3 While lifting up the release lever 2 open the top left cover A as shown 3 WARNING The area around the fuser can...

Page 214: ...e 4 Remove the new transfer roller from the packaging Retain the packaging 5 Push the orange lever in the direction shown 6 Lift the used transfer roller out of the printer Note Do not touch any toner...

Page 215: ...ly life counters when you replace some supplies 1 Press the Log In Out button enter the system administrator login information then press Enter For details see the System Administrator Guide at www xe...

Page 216: ...218 A message appears on the control panel when a staple cartridge is empty Replacing Staples in the Main Stapler of the Office Finisher LX WARNING Do not perform this procedure while the printer is...

Page 217: ...6 Pinch both sides of the staple case 1 and remove the staple case from the cartridge 2 7 Insert the front side of the new staple case into the staple cartridge 1 then push the rear side into the car...

Page 218: ...r LX WARNING Do not perform this procedure while the printer is copying or printing 1 Open the finisher side cover 2 If the staple cartridges are not visible grip the vertical panels at the left and r...

Page 219: ...al position in the finisher Note If you have trouble inserting the cartridge make sure the staples are positioned correctly in the cartridge Note The booklet maker uses two staple cartridges Booklet s...

Page 220: ...the control panel when the hole punch waste container is full Emptying the Hole Punch Waste Container in the Office Finisher LX WARNING Do not perform this procedure while the printer is copying or pr...

Page 221: ...e Xerox WorkCentre EC7836 EC7856 Color Multifunction Printer 221 User Guide 4 Insert the container and slide it all the way into the finisher 5 Close the finisher front transport cover then close the...

Page 222: ...the printer control panel press the Machine Status button 2 To view basic impression counts touch the Billing Information tab Black Impressions Total number of pages printed with no color specified Co...

Page 223: ...n touch the Machine Information tab Consumables Consumables are printer supplies that get depleted during the operation of the printer Consumable supplies for this printer are the Genuine Xerox Toner...

Page 224: ...have replacements on hand It is important to order these items when the messages first appear to avoid interruptions to your printing An error message appears on the control panel when supplies must...

Page 225: ...ring touch Cyan Magenta Yellow or Black 3 To return to the Supplies tab touch Close 4 To view more details touch Other Supplies Scroll through the list then select an option 5 To print the Supplies Us...

Page 226: ...Keep the printer level to avoid spilling toner Note When moving the printer over a long distance remove the drum cartridges and toner cartridges to prevent toner from spilling Pack the printer inside...

Page 227: ...836 EC7856 Color Multifunction Printer 227 User Guide This chapter includes General Troubleshooting 228 Jams 234 Print Quality Problems 259 Copy and Scan Problems 267 Fax Problems 268 Getting Help 272...

Page 228: ...re Incorrect 233 Scanner Errors 233 This section contains procedures to help you locate and resolve problems Resolve some problems by simply restarting the printer Printer Has Two Power Switches This...

Page 229: ...nter Does Not Turn On Probable Causes Solutions The power cord is not correctly plugged into the outlet Turn off the printer then plug the power cord securely into the outlet Something is wrong with t...

Page 230: ...trol panel fault history For details see Viewing Fault and Alert Messages on the Control Panel on page 273 Printing Takes Too Long Probable Causes Solutions The printer is set to print on a paper type...

Page 231: ...h the print job then touch Details 5 Note the Tray number listed under Resources and the status of the selected tray 6 Load the correct paper type or color in the tray or select another tray Incorrect...

Page 232: ...on the printer Printer is Making Unusual Noises Probable Causes Solutions One of the trays is not installed correctly Open and close the tray from which you are printing There is an obstruction or de...

Page 233: ...ces For details see the System Administrator Guide at www xerox com office EC78XXdocs The time zone date or time is set incorrectly Set the time zone date and time manually For details see Setting the...

Page 234: ...56 Color Multifunction Printer User Guide Jams This section includes Clearing Paper Jams 235 Clearing Jams in the Office Finisher LX 248 Minimizing Paper Jams 250 Troubleshooting Paper Jams 252 Cleari...

Page 235: ...it normally moves through the printer Even a small piece of paper left in the printer can cause a jam Do not reload paper that has jammed Note Do not touch the printed side of the paper when removing...

Page 236: ...inter first 2 Pull the tray out toward you until it stops 3 Remove the paper from the tray 4 If the paper is torn remove the tray completely and check inside the printer for torn pieces of paper 5 Rel...

Page 237: ...torn check inside the printer for torn pieces of paper 3 Fan the paper you removed and ensure that all four corners are neatly aligned 4 Insert the paper into tray 5 with the printing side face down T...

Page 238: ...up the tray 2 Open tray 5 as shown 1 3 While lifting the release lever 2 open door A as shown 3 WARNING The area around the fuser can be hot Use caution to avoid injury CAUTION Do not touch the trans...

Page 239: ...tion Printer 239 User Guide 4 Remove the jammed paper 5 If paper is jammed at the exit to the output tray remove the paper by carefully pulling it straight out in the direction shown Note Toner can ad...

Page 240: ...Printer User Guide 6 If paper is jammed in the fuser pull green lever A1 to open the fuser exit gate 7 Remove the paper as shown Note If the paper is torn remove all torn pieces from the printer If t...

Page 241: ...Troubleshooting Xerox WorkCentre EC7836 EC7856 Color Multifunction Printer 241 User Guide 8 Return the green lever A1 to its normal position 9 Close door A then close tray 5...

Page 242: ...tion Printer User Guide Clearing Jams at Door B 1 Open tray 5 as shown 1 2 While lifting the release lever 2 open door B as shown 3 3 Remove the jammed paper as shown Note If the paper is torn remove...

Page 243: ...or C 2 Remove the jammed paper as shown Note If the paper is torn remove all torn pieces from the printer 3 For paper jammed in the upper position look inside the printer to remove it Note If the pape...

Page 244: ...tray 2 Open tray 5 as shown 1 3 While lifting the release lever 2 open the top left cover A as shown 3 WARNING The area around the fuser can be hot Use caution to avoid injury CAUTION Do not touch th...

Page 245: ...Multifunction Printer 245 User Guide 4 Open the left tray as shown 5 Lift the lever up to open door D 6 Remove the jammed paper as shown Note If the paper is torn remove all torn pieces from the prin...

Page 246: ...wn 2 If the original is not caught in the entry to the document feeder pull it straight out in the direction shown 3 If the message on the control panel instructs you to turn the green wheel turn it i...

Page 247: ...inal 8 If the original is not visible when the document cover is opened lift up the document feeder tray then remove the paper 9 Lower the document feeder tray 10 If the original is not wrinkled or to...

Page 248: ...ring Jams in the Office Finisher LX Clearing Jams Under the Finisher Top Cover 1 Pull up the lever on the top cover 2 Open the top cover by rotating it to the left 3 Remove the jammed paper Note If th...

Page 249: ...inter 249 User Guide Clearing Jams in the Office Finisher LX Transport 1 Lift the handle of the center tray straight up to open the transport cover 2 Remove the jammed paper Note If the paper is torn...

Page 250: ...paper Avoid paper that is curled torn moist creased or folded To separate the sheets before loading into the tray fan the paper Observe the paper tray fill line never overfill the tray Remove transpa...

Page 251: ...oting Xerox WorkCentre EC7836 EC7856 Color Multifunction Printer 251 User Guide Refer to the control panel Paper and Media Information Pages for information on supported paper or see Supported Paper o...

Page 252: ...tatic electricity is present Try a new ream of paper Do not fan transparencies before loading in tray Using unsupported paper Use only Xerox approved paper For details see Supported Paper on page 48 H...

Page 253: ...e paper is moist from humidity Remove the moist paper and replace it with new dry paper Using paper of the wrong size thickness or type Use only Xerox approved paper For details see Supported Paper on...

Page 254: ...atic 2 Sided Printing Probable Causes Solutions Using paper of the wrong size thickness or type Use paper of the correct size thickness or type For details see Supported Paper Sizes and Weights for Au...

Page 255: ...Jams in the Office Finisher LX 257 Clearing Staple Jams in Office Finisher LX WARNING Do not perform this procedure while the printer is copying or printing 1 Open the finisher door as shown 2 Reach i...

Page 256: ...p firmly in the direction shown to open it 7 Remove the jammed staples 1 then push the clamp in the direction shown until it snaps into the locked position 2 WARNING The points of the jammed staples a...

Page 257: ...oth staple cartridges be free of jammed staples WARNING Do not perform this procedure while the printer is copying or printing 1 Open the finisher side cover 2 If the staple cartridges are not visible...

Page 258: ...et maker uses two staple cartridges Booklet stapling requires that both staple cartridges contain staples 6 Starting at Step 2 repeat the procedure for the other staple cartridge 7 Close the side cove...

Page 259: ...rox Warranty Service Agreement or Xerox Total Satisfaction Guarantee does not cover damage caused by using unsupported paper or specialty media The Xerox Total Satisfaction Guarantee is available in t...

Page 260: ...avoid jams Use only Xerox approved paper For details see Supported Paper on page 48 Use only dry undamaged paper CAUTION Some paper and other media types can cause poor output quality increased paper...

Page 261: ...ported paper For instructions on setting the Color Correction see Using Color Corrections Follow these guidelines to control the Color Corrections and Color Adjustments For best results on most paper...

Page 262: ...reas Please contact your local representative for details Note To enhance the print quality toner print drum cartridges for many models of equipment are designed to cease functioning at a predetermine...

Page 263: ...control panel but you still have print quality problems the application print driver or print server could be the cause To isolate the problem 1 Print a similar document from another application and...

Page 264: ...Printing the Troubleshooting Print Quality Pages on page 262 2 If the prints are too light to see print details verify the following The printer is loaded with undamaged dry supported paper The toner...

Page 265: ...lor only replace the corresponding imaging unit If the defect occurs in all colors and is visible on all the test pages replace the fuser Repeating Spots or Lines Spot or lines appear at regular inter...

Page 266: ...xt then follow the onscreen instructions Vertical White Lines or Streaks One Color Lines or streaks appear in one color of your output 1 Print the test pages to identify the affected color 2 To clean...

Page 267: ...opies taken from the document glass There is debris on the document glass When scanning the debris creates a spot on the image Clean all glass surfaces with a lint free cloth The reverse side of the o...

Page 268: ...s 270 Printing Fax Reports 271 Note If you cannot send and receive faxes ensure that you are connected to an approved analog telephone line The fax cannot send or receive when connected directly to a...

Page 269: ...ctly have the recipient verify that their fax machine is operating correctly The fax received by the recipient is blank The document was loaded incorrectly If using the document feeder place the origi...

Page 270: ...does not match the document size sent Confirm the original size of the documents then load the appropriate paper size in the printer Faxes are not received automatically The printer is set to receive...

Page 271: ...Report Options Report Pending Jobs Report To print a fax report 1 At the printer control panel press the Machine Status button then touch the Tools tab 2 Touch Service Settings Fax Service 3 Touch Pr...

Page 272: ...tion and troubleshooting help When a fault or alert condition occurs the control panel displays a message informing you of the problem In many cases the control panel also displays an animated graphic...

Page 273: ...rts or Faults Alerts 4 To view details touch a fault or alert Viewing the Fault History on the Control Panel When faults occur they are logged in to a fault history file by date time and fault code Us...

Page 274: ...Rights to Access the Configuration Report and Information Pages 1 At the printer control panel press the Machine Status button then touch the Tools tab 2 Touch Device Settings Configuration Informati...

Page 275: ...w detailed usage information touch Usage Counters Locating the Serial Number on the Control Panel 1 At the printer control panel press the Machine Status button 2 To see the model serial number and so...

Page 276: ...in the printer It allows you to configure and administer the printer from a Web browser Xerox CentreWare Internet Services requires A TCP IP connection between the printer and the network in Windows...

Page 277: ...ation Information Pages To print from Xerox CentreWare Internet Services click Status Information Pages Xerox CentreWare Internet Services documentation In Xerox CentreWare Internet Services click Hel...

Page 278: ......

Page 279: ...er Guide This appendix includes Printer Configurations and Options 280 Physical Specifications 282 Environmental Specifications 284 Electrical Specifications 285 Performance Specifications 286 Environ...

Page 280: ...to SRA3 12 x 18 in Automatic 2 sided printing Duplex automatic document feeder with 110 sheet capacity Color touch screen control panel High Capacity Tandem Tray with standard SRA3 12 x 18 in support...

Page 281: ...d Upgrades Office Finisher LX Hole punch for Office Finisher LX Booklet maker for Office Finisher LX 2000 Sheet high capacity feeder Standard work surface One line and dual line fax kits Embedded PDL...

Page 282: ...cal Specifications Base Configuration Width 640 mm 25 2 in Depth 699 mm 27 5 in Height 1149 mm 45 2 in Weight 131 7 Kg 290 3 lb with tandem tray module Configuration with Office Finisher LX and Bookle...

Page 283: ...WorkCentre EC7836 EC7856 Color Multifunction Printer 283 User Guide Clearance Requirements Clearance Requirements for Base Configuration Clearance Requirements for Configuration with Office Finisher...

Page 284: ...tion Printer User Guide Environmental Specifications Temperature Operating 10 32 C 50 90 F Optimum print quality 15 28 C 59 82 F Relative Humidity Operating 15 to 85 non condensing Elevation For optim...

Page 285: ...ly Voltage Frequency Current Required 110 127 VAC 10 50 Hz 3 Hz 60 Hz 3 Hz 12 A Recycling Supplies If you want to return used supplies for recycling follow the instructions included with the new suppl...

Page 286: ...WorkCentre EC7856 Multifunction Printer 50 ppm 55 ppm Several factors affect print speed Paper orientation For faster print speeds load paper long edge feed Loading paper short edge feed reduces print...

Page 287: ...ety Contact Information For more information on Environment Health and Safety in relation to this Xerox product and supplies contact the following customer help lines United States and Canada 1 800 AS...

Page 288: ......

Page 289: ...36 EC7856 Color Multifunction Printer 289 User Guide This appendix includes Basic Regulations 290 Copy Regulations 293 Fax Regulations 296 Safety Certification 299 Material Safety Data Sheets 300 B Re...

Page 290: ...it may cause harmful interference to radio communications Operation of this equipment in a residential area is likely to cause harmful interference in which case the user will be required to correct t...

Page 291: ...s device is designed and configured to enable you to reduce your electricity usage Power Saver modes are enabled on your device to reduce energy consumption After the last print the device transitions...

Page 292: ...tary multi attribute and lifecycle based environmental certification This certification indicates that a product has undergone rigorous scientific testing exhaustive auditing or both to prove its comp...

Page 293: ...ary to reproduce a legal document on which there is a canceled revenue stamp this may be done provided the reproduction of the document is performed for lawful purposes Postage Stamps canceled or unca...

Page 294: ...n United States military discharge certificates may be photographed 9 Badges Identification Cards Passes or Insignia carried by military personnel or by members of the various Federal Departments such...

Page 295: ...ernment of a state other than Canada Impressed or adhesive stamps used for the purpose of revenue by the Government of Canada or of a province or by the government of a state other than Canada Documen...

Page 296: ...ormation a product identifier in the format US AAAEQ TXXXX If requested this number must be provided to the Telephone Company A plug and jack used to connect this equipment to the premises wiring and...

Page 297: ...changes something that affects the operation of the equipment they should notify you in order for you to make necessary modifications to maintain uninterrupted service If you experience trouble with t...

Page 298: ...electrical ground connections of the power utility telephone lines and internal metallic water pipe systems if present must be connected together This precaution could be vital in rural areas WARNING...

Page 299: ...ltifunction Printer 299 User Guide Safety Certification This device is certified by the following Agencies using the following safety standards Agency Standard CSA Canadian Standards Association UL 60...

Page 300: ...56 Color Multifunction Printer User Guide Material Safety Data Sheets For Material Safety Data information regarding your printer go to North America www xerox com msds For the Customer Support Center...

Page 301: ...Xerox WorkCentre EC7836 EC7856 Color Multifunction Printer 301 User Guide This appendix includes All Countries 302 North America 303 Other Countries 304 C Recycling and Disposal...

Page 302: ...may be regulated due to environmental considerations The presence of these materials is fully consistent with global regulations applicable at the time that the product was placed on the market For re...

Page 303: ...tes an equipment take back and reuse recycle program Contact your Xerox representative 1 800 ASK XEROX to determine if this Xerox product is part of the program For more information about Xerox enviro...

Page 304: ...Recycling and Disposal 304 Xerox WorkCentre EC7836 EC7856 Color Multifunction Printer User Guide Other Countries Please contact your local waste management authority to request disposal guidance...

Reviews: