


Replacing the Battery Backup
196
3
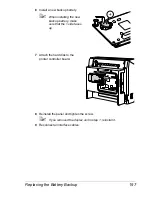
Remove the rear panel.
"
Since there are two
hooks on the right side of
the panel, remove the
rear panel by slightly
pulling the left side of the
panel toward you, then
sliding the panel off to the
left.
4
While holding the tab on the
hard drive mounting pin slid to
the left, remove the hard drive.
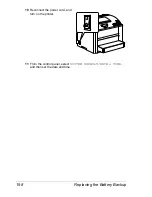
5
Remove the backup battery from
the back of the hard drive.
Summary of Contents for Phaser 6120
Page 1: ...c o l o r l a s e r p r i n t e r www xerox com office support Phaser 6120 ReferenceGuide ...
Page 11: ......
Page 12: ...Operation on Windows Software ...
Page 34: ...Operation on Mac OS X ...
Page 76: ...Operation on Mac OS 9 X ...
Page 107: ......
Page 108: ...Operation on Linux ...
Page 114: ...Adding the Printer 103 7 Select a printer manufacturer or make and then click Continue ...
Page 124: ...Printer Management Software ...