background image

INKS

5-6

XEROX DOCUPRINT 4850/4890 IPS GUIDE TO PERFORMING ROUTINE MAINTENANCE

Removing the CCU

To remove the CCU from the printer, follow these steps.

1. When the printer is not cycled down, always press the Stop 

button on the printer control console before you open the door 
and attempt to remove the CCU.

2. Open the printer doors and locate the color housing area on the 

left side of the printer.
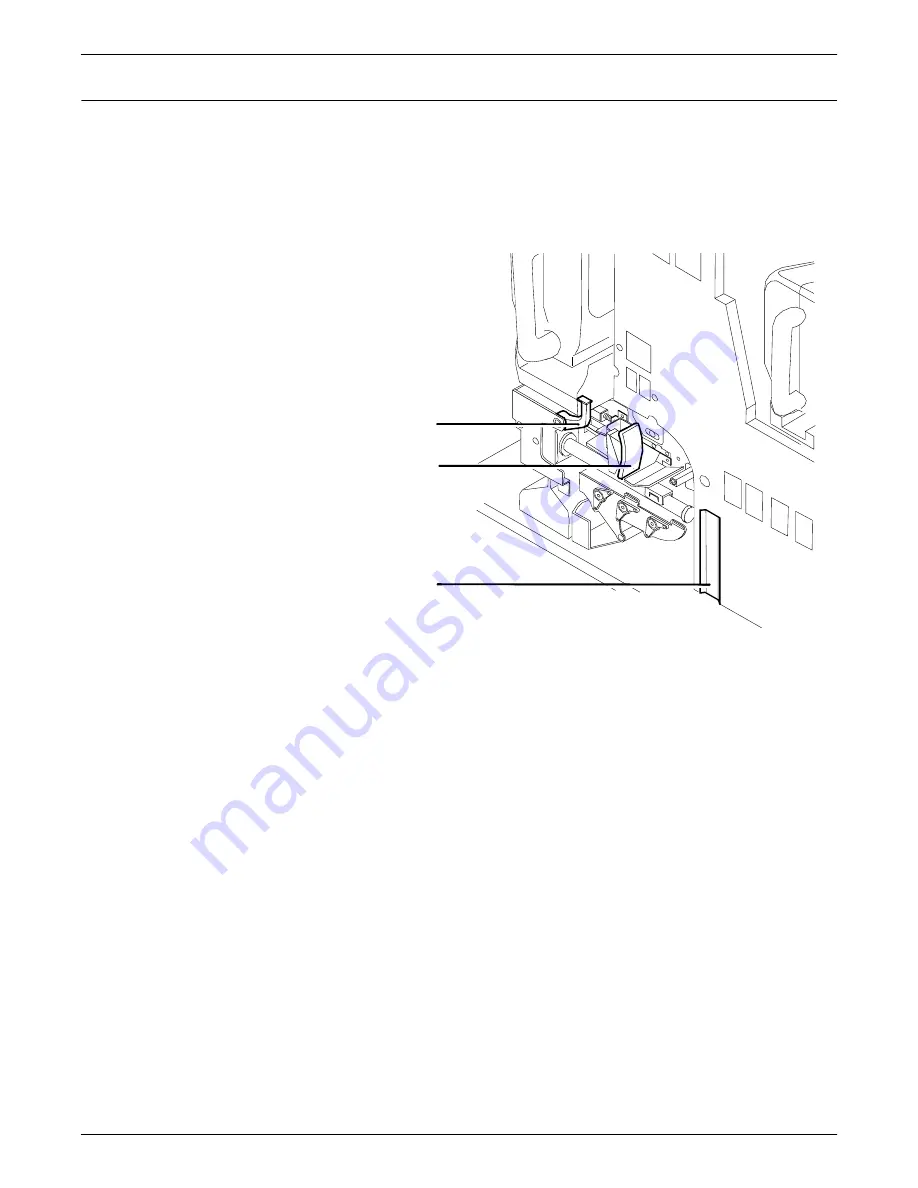
Gold recess used to align cart

Gold backup roller handle

3 Gold 

CCU 

handle

1

2

3

Summary of Contents for DocuPrint 4850 IPS

Page 1: ...Xerox DocuPrint 4850 4890 IPS Guide to Performing Routine Maintenance Version 7 1 August 2000 721P89110...

Page 2: ...after granted including without limitation material generated from the software programs which are displayed on the screen such as icons screen displays looks etc Printed in the United States of Ameri...

Page 3: ...s completely enclosed during all modes of customer operation The laser danger labels on the system are for Xerox service representatives and are on or near panels or shields that must be removed with...

Page 4: ...rox equipment Use of unsuitable materials may result in poor performance and may create a hazardous situation Never move either the printer or the Printer Controller without first contacting Xerox for...

Page 5: ...er trays 2 1 Checking and unloading the stitcher stacker tray 2 3 Checking and unloading the sample tray 2 4 3 Stitcher wire 3 1 4 Fuser lubricant and pressure roll wiper 4 1 Adding fuser lubricant 4...

Page 6: ...4 8 Cleaning 8 1 Cleaning the keyboard monitor and the exterior of the Printer Controller 8 1 Cleaning the 4mm cartridge tape drive 8 2 9 Maintenance and support services 9 1 Xerox Customer Services...

Page 7: ...operators whose job consists of operating each of the system components running print jobs solving simple system problems and performing basic maintenance tasks such as replenishing printer supplies...

Page 8: ...user agent reservoir and how to replace the pressure roll wiper Chapter 5 Inks describes how to add both black and color dry ink and how to replace the Customer Changeable Unit CCU for the color dry i...

Page 9: ...window titles matches the titles as they appear on the screen In cases where a window does not have a title it is referenced using all lower case For example At the graphical user interface use the O...

Page 10: ...ful Facts About Paper Installation Planning Guide Master Index Messages Guide Solutions Guide System Overview Guide Troubleshooting Guide Xerox Standard Font Library Font User Guide The documentation...

Page 11: ...on the door of the tray Each light represents 25 percent of a ream or about 125 sheets of 20 pound or 80 gsm grams per square meter paper You do not have to interrupt a print job to load paper because...

Page 12: ...Guidelines for loading paper When you are loading the paper follow these guidelines to prevent paper jams Remove damaged sheets Load the paper with the package wrapper seam side up Make sure that the...

Page 13: ...dy To Open indicator on the feeder tray door is not lit press the Tray Unlock button and wait for the tray to descend and the Ready To Open indicator light before opening the tray 1 Ready to Open Indi...

Page 14: ...ting to move the lever in any other direction can break it 4 Pull out any partially fed paper from the feeder assembly and discard it There will be some resistance 5 Squeeze the lever against the back...

Page 15: ...aper stack 9 Latch the paper feeder assembly by pressing the green dot next to the green release lever until the assembly clicks into position 10 Slide the tray into the printer until it latches The t...

Page 16: ...message displays the media defined for the tray as well as the paper currently loaded in the tray Currently there is no method of restoring the Input Configuration to its original state Once you sele...

Page 17: ...on the printer control console Checking and unloading dual stacker trays When a stacker tray is full the following occurs The Tray Full indicator lights on the appropriate stacker tray The attention l...

Page 18: ...ker tray raise the scuffer arm and remove the printed pages 1 Scuffer arm 2 Tray Full indicators Note When both trays are full you must empty at least one tray before you can resume printing Note Your...

Page 19: ...when you remove small stapled sets without pulling the tray out The counter is not reset causing the printer to stop before the tray is actually full Each stitcher stacker tray holds 2000 sheets of 20...

Page 20: ...216 by 356 mm A message appears when the sample tray is about to fill as well as when it is full Because a paper jam can occur if the tray is overfilled empty the sample tray regularly if it is in us...

Page 21: ...cator on the 4850 4890 printer control console Note The percentage that displays on the wire percentage indicator is an approximation and has a small margin of error When the stitcher spool empties th...

Page 22: ...status display shows the following message OUT OF WIRE Contact your key operator or your service representative when you see this message This should seldom happen because your service representative...

Page 23: ...scribes the procedure for adding fuser lubricant in the printer Your service representative usually adds fuser lubricant However you might choose to add the fuser lubricant yourself if you have been t...

Page 24: ...hich can cause eye irritation upon contact Wash your hands with soap and water after you finish this procedure 6 Locate the fuser reservoir and remove the cap by turning it counter clockwise Caution T...

Page 25: ...or until you see the oil reach the top edge below the fuser cap The reservoir may require up to two tubes of lubricant if it was empty 8 Replace the reservoir cap by turning it clockwise 9 Close the f...

Page 26: ...irst few prints of a job have oil or dirt on them An interval of 80 000 to 100 000 prints are made The number of prints made is tracked by the billing meter which you can view through the Administrati...

Page 27: ...rawer out and wait for the fuser to cool DO NOT touch the fuser while it is hot If you DO NOT feel heat continue with the procedure Warning Perform this task only when the fuser is cool Exercise care...

Page 28: ...INE MAINTENANCE 6 Locate the pressure roll wiper assembly and release the top rod by pulling upward as shown 7 Remove the lower rod from the springs and lift the wiper assembly away 8 Place the used w...

Page 29: ...t off with a clean cloth Discard the cloth in the trash receptacle when you are finished 10 Insert the short rod in the upper loop of the new wiper 11 Insert the long rod through the lower loop of the...

Page 30: ...the brackets on both ends of the pressure roll as shown 14 Remove and dispose of the gloves in a trash receptacle being careful not to let any residue come in contact with your skin 15 Close the fuse...

Page 31: ...print quality adjustments When the Attention light is a steady yellow and a message displays on the printer control console indicating that the printer is low on either black or color dry ink add dry...

Page 32: ...inter Note When you replace colored dry ink it is not necessary to remove the CCU from the printer 1 Colored dry ink bottle 2 Black dry ink bottle 2 Spread a dropcloth on the floor under the dry ink a...

Page 33: ...This mixture may have settled during shipping and the bottle must be agitated before you install it in the printer to ensure the dry ink is dispensed properly Unmixed dry ink causes print quality pro...

Page 34: ...cloth Caution If any dry ink gets on your hands wash them with soap and cold water If any dry ink gets on your clothes brush them with a dry paper towel or a stiff bristled brush If this does not remo...

Page 35: ...ousing and continue to print documents that do not require a specific color You cannot print documents requiring the faulty color housing until your service representative has corrected the problem Ca...

Page 36: ...hese steps 1 When the printer is not cycled down always press the Stop button on the printer control console before you open the door and attempt to remove the CCU 2 Open the printer doors and locate...

Page 37: ...top cover of an empty cart 1 Gold alignment knob 2 Top cover 3 Pedal 4 Pallet 4 Push the cart up to the printer lining up the gold knob on the cart with the gold recess on the printer inner cover 5 P...

Page 38: ...ORMING ROUTINE MAINTENANCE 6 Push firmly on the cart pedal until you hear or feel the pedal catch The pedal should stay locked down The pallet within the cart is raised 7 Turn the backup roller handle...

Page 39: ...sing the CCU latch handle pull the CCU out of the printer until it is completely in the cart 10 Push down firmly on the cart pedal until you hear or feel a click The pallet which now contains the CCU...

Page 40: ...INKS 5 10 XEROX DOCUPRINT 4850 4890 IPS GUIDE TO PERFORMING ROUTINE MAINTENANCE 11 Close the cart top cover and store the cart...

Page 41: ...the printer lining up the gold knob on the cart with the gold recess on the printer inner cover 3 Push the cart firmly against the printer until you can feel the two latch together 4 Push down firmly...

Page 42: ...r a quarter turn 8 Push down firmly on the cart pedal until you hear or feel a click If the pallet does not drop check that the CCU is all the way in the printer and the pallet is released then push d...

Page 43: ...dry ink for a printer so they will not use a solvent that sets the stain When you are not using a cart and CCU store them in a dry dust free area that has little variation in temperature and humidity...

Page 44: ...INKS 5 14 XEROX DOCUPRINT 4850 4890 IPS GUIDE TO PERFORMING ROUTINE MAINTENANCE...

Page 45: ...nd developer waste container Checking and replacing the developer waste container Waste from the developer housings is transported into a sealed container located in the lower left corner at the front...

Page 46: ...eveloper waste container is located under the color dry ink bottle 2 Spread a dropcloth on the floor under the developer waste container area 3 Hold the container by the tab on the top Lift the contai...

Page 47: ...ay into the compartment 8 Close the printer doors 9 Dispose of the drop cloth Checking and replacing the dry ink waste container Waste dry ink is transported into the sealed waste container located in...

Page 48: ...ner 1 Open the service door at the rear of the printer by grasping the handle and pulling the door out and down 2 Grasp the container handle and pull the container up and out over the ridge at the bas...

Page 49: ...ssage DRY INK WASTE CONTAINER NOT PRESENT displays on the printer control console and the printer remains idle until a new container is inserted 5 Remove the cap from the new dry ink waste container 6...

Page 50: ...handle and pull the container up and out over the ridge at the base of the storage compartment A full dry ink waste container weighs about 15 pounds 6 8 kg 3 Place the cap which is tethered to the bot...

Page 51: ...ENANCE 6 7 5 Remove the cap from the new dry ink waste container 6 Align the waste container with the support guides and slide the container into the storage compartment gently lifting it up and over...

Page 52: ...WASTE CONTAINERS 6 8 XEROX DOCUPRINT 4850 4890 IPS GUIDE TO PERFORMING ROUTINE MAINTENANCE...

Page 53: ...transport The bypass transport is installed in tray 1 of the dual stacker on the DocuPrint 4890 IPS This chapter describes how to remove and install the bypass transport Figure 7 1 DocuPrint 4890 IPS...

Page 54: ...ve the bypass transport from the printer 1 Power off the printer 2 Disconnect your finishing device following the instructions provided with the device 3 Unplug the two cables from the rear of the byp...

Page 55: ...of the bypass transport and slide the transport out of the tray toward the front of the printer 6 Place the transport in its storage location 7 Press downward on the scuffer arm in stacker tray 1 unt...

Page 56: ...ollow these steps to install the bypass transport 1 Power off the printer 2 Raise the scuffer arm in stacker tray 1 to its highest position A spring holds the scuffer arm in the raised position 3 Lift...

Page 57: ...transport and lock the transport by turning the green handle clockwise one quarter turn You will feel some resistance 5 From the rear of the dual stacker module plug the two cables into the rear of t...

Page 58: ...BYPASS TRANSPORT 7 6 XEROX DOCUPRINT 4850 4890 IPS GUIDE TO PERFORMING ROUTINE MAINTENANCE...

Page 59: ...es Monitor Use a soft lint free cloth dampened with a glass cleaner Do not spray the liquid directly onto the monitor it may cause damage Keyboard Use a mild household detergent that has been poured o...

Page 60: ...udio devices as these can damage your tape drive To clean the tape drive 1 Insert the cleaning cartridge into the tape drive as you would a regular tape cartridge 2 Observe the green LED blinking slow...

Page 61: ...your Xerox representative Xerox Customer Services Support Center Before calling your Customer Service Support Center make sure you have tried the corrective actions described in the Troubleshooting Gu...

Page 62: ...ating company can send you samples and catalogs of the fonts available for your printer To receive font samples obtain price information obtain technical support or order licensed or custom fonts call...

Page 63: ...d the serial number for your system The serial number is located behind the narrow door to the far left on the front of the printer If you are reporting meters for other Xerox printers during the same...

Page 64: ...annot be cleared or reset This recording is reported by the customer Meter C counts all sheets fed into the paper path from trays 1 2 3 or 4 It is a user meter and can be cleared by the controller Met...

Page 65: ...tridge tape drive 8 2 keyboard 8 1 monitor 8 1 Printer Controller exterior 8 1 Customer Changeable Units see CCUs customer education 9 3 D danger labels iii developer waste container replacing 6 1 6 3...

Page 66: ...ry ink adding 5 1 5 4 feeder trays loading 1 3 1 5 fuser lubricant adding 4 1 4 4 pressure roll wiper replacing 4 4 4 8 publications related x R Ready To Open indicator 1 3 Reporting billing meters 9...

Page 67: ...pc0060a cgm 4 7 IPS LPS Graphics dpc0061a cgm 4 8 IPS LPS Graphics dpc0031a cgm 4 8 IPS LPS Graphics DPC0032A CGM 5 2 IPS LPS Graphics dpc0033a cgm 5 2 IPS LPS Graphics dpc0035a cgm 5 3 IPS LPS Graphi...

Page 68: ...IS TEXT FROM ANY MASTER PAGE AND EDIT THE DEFINITION IPS LPS Graphics dpc0073a cgm 7 4 IPS LPS Graphics dpc0074a cgm 7 4 IPS LPS Graphics dpc0075a cgm 7 5 IPS LPS Graphics dpc0076a cgm 7 5 IPS LPS Gra...

Reviews: