background image

Troubleshooting

6 - 11

6

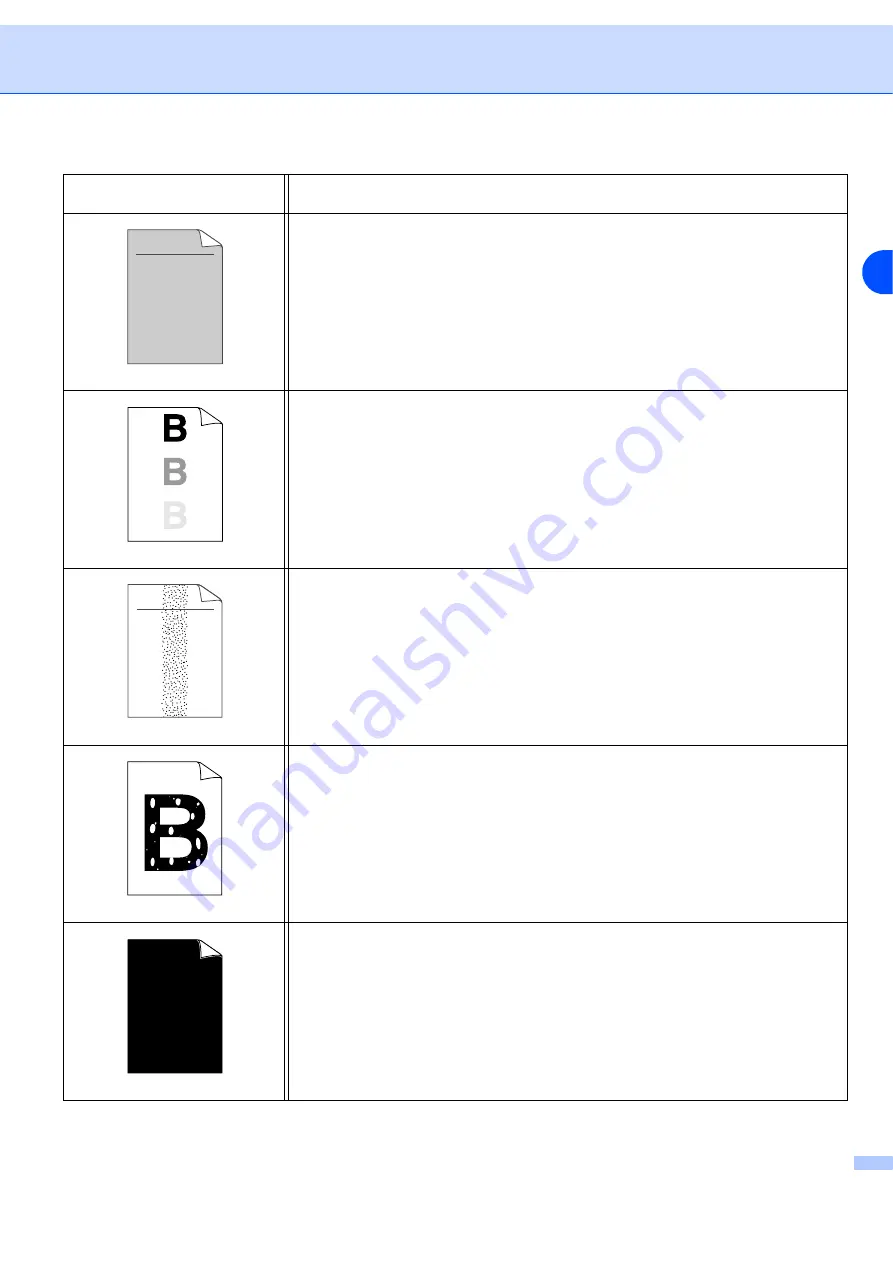
Gray background

„

Make sure that you use paper that meets the recommended specifications. See 

What kind of paper can I use? in Chapter 2.

„

Check the printer’s environment - high temperatures and high humidity can 
increase the amount of background shading. See 

Positioning the printer

 on page 

2-4.

„

Use a new toner cartridge. See 

Replacing the toner cartridge

 on page 5-3

„

Use a new drum unit. See 

Replacing the drum unit

 on page 5-8.

Ghost

„

Make sure you use paper that meets our specifications. Rough-surfaced paper 
or thick print media may cause this problem. See 

What kind of paper can I use?


on page 2-5. 

„

Make sure that you choose the appropriate media type in the print driver. See 

What kind of paper can I use?

 on page 2-5.

„

Try using a new drum unit. See 

Replacing the drum unit

 on page 5-8.

Toner specks

„

Make sure that you use paper that meets our specifications. Rough-surfaced 
paper may cause the problem. See 

What kind of paper can I use?

 on page 2-5.

„

The drum unit may be damaged. Put in a new drum unit. See 

Replacing the drum 

unit

 on page 5-8.

Hollow print

„

Make sure that you use paper that meets our specifications. See 

What kind of 

paper can I use? in Chapter 2.

„

Choose 

Heavyweight 1

 mode in the print driver, or use thinner paper than you 

are currently using.

„

Check the printer’s environment because conditions such as high humidity can 
cause hollow print. See 

Positioning the printer

 on page 2-4. 

All black

„

Clean the primary corona wire inside the drum unit by sliding the blue tab. Make 
sure you return the blue tab to the home position (

). See 

Cleaning the corona 

wire

 on page 5-14.

„

The drum unit may be damaged. Put in a new drum unit. See 

Replacing the drum 

unit

 on page 5-8.

Examples of poor print 
quality

Recommendation

ABCDEFGH
abcdefghijk

A B C D
a b c d e
0 1 2 3 4

ABCDEFGH
abcdefghijk

A B C D
a b c d e
0 1 2 3 4

Summary of Contents for DocuPrint 203A

Page 1: ...e Quick Setup Guide to set up the printer You can find a printed copy in the box Please read this User s Guide thoroughly before you use the printer Keep the CD ROM in a convenient place so you can us...

Page 2: ...trademarks of the respective holders Xerox and The Document Company are registered trademarks Damage related to computer virus Fuji Xerox is not responsible for any breakdown of machines due to infec...

Page 3: ...cies from the paper tray 2 8 Printing on plain paper bond paper or transparencies from the manual feed slot 2 11 Printing on heavyweight paper labels and envelopes 2 14 Printing on heavyweight paper l...

Page 4: ...he toner cartridge 5 3 Drum unit 5 7 Change Drum message 5 7 Replacing the drum unit 5 8 Cleaning 5 11 Cleaning the outside of the printer 5 11 Cleaning the inside of the printer 5 12 Cleaning the cor...

Page 5: ...erating environment of the personal computer in use networking environments and how to operate a personal computer Please read this guide thoroughly to obtain the best performance on this product Afte...

Page 6: ...e various items and safety information Quick Setup Guide This guide describes how to set up the printer and install the print driver Organization of this Guide This guide consists of the following cha...

Page 7: ...l computer or workstation The following indications are used in this guide Notes tell you how you should respond to a situation that may arise or give tips about how the current operation works with o...

Page 8: ...thorized Service Provider for more information For installation relocation Do not place the machine near heaters or volatile flammable or combustible materials such as curtains that may catch fire Pla...

Page 9: ...g diagram shows the minimum clearances required for normal operation consumables replacement and maintenance to ensure your machine operates at peak performance When moving the machine be sure to unpl...

Page 10: ...r touch a power cord with wet hands Danger of electric shock exists Stop operation immediately if your machine produces smoke excessive heat unusual noise or smell or if water is spilt onto the machin...

Page 11: ...or bent The plug and receptacle are free of dust The cord is not cracked or frayed If you notice any unusual conditions contact our Customer Support Centre For machine operation Do not place any liqui...

Page 12: ...ouch a labelled area found on or near the fuser unit You can get burnt If a sheet of paper is wrapped around the heat roller do not try to remove it by yourself to avoid injuries or burns Switch off t...

Page 13: ...to inhale the toner If your clothes are smeared with toner wipe off the toner with a dry cloth and immediately wash the clothes in cold water to avoid stains Radio interference 220 240 volt model onl...

Page 14: ...aser radiation in the scanner unit You should not open the scanner unit under any circumstances Caution Use of controls or adjustments or performance of procedures other than those specified herein ma...

Page 15: ...machine You can copy two 1 sided originals on both sides of a sheet of paper You can also make 1 sided copies For information about this feature refer to Printing on both sides of the paper 2 sided pr...

Page 16: ...l or trademarks without the consent of the owner Postage stamps and other negotiable instruments This list is not inclusive and no liability is assumed for either its completeness or accuracy In case...

Page 17: ...rd Parts may vary from one country to another Note The AC power cord may be slightly different than the one in the illustration above depending on which country you bought the printer in The printer c...

Page 18: ...e a USB interface cable that is longer than 2 0 meters Do not connect the USB cable to a non powered hub or a Mac keyboard When you use a USB cable make sure you connect it to the USB connector of you...

Page 19: ...ort Flap 2 Control Panel 3 Manual Feed slot 4 Manual Feed Paper Guides 5 Paper Tray 6 Power Switch 7 Front Cover 8 Face down Output Tray Back view 1 Back Cover 2 AC Power Connector 3 Parallel Interfac...

Page 20: ...utlet if there is an emergency Only use the printer within the following ranges of temperature and humidity Temperature 10 C to 32 5 C Humidity 20 to 80 without condensation You should use the printer...

Page 21: ...Manual Paper type Tray 1 Manual Select the Paper type from the print driver Plain paper 75 g m2 to 105 g m2 L L Plain Recycled paper L L Recycled Bond paper L Bond Heavyweight paper 105 g m2 to 161 g...

Page 22: ...paper Do not use acidic or alkaline paper Use long grain paper Use paper with a moisture content of approximately 5 Note If you use paper other than the ones recommended a paper jam or misfeeding may...

Page 23: ...mm 6 01 mm 6 01 mm 6 01 mm 3 4 23 mm 4 23 mm 4 23 mm 4 23 mm 4 23 mm 4 23 mm 4 23 mm 4 23 mm 4 6 01 mm 6 35 mm 6 35 mm 6 01 mm 6 35 mm 6 01 mm 6 01 mm 6 01 mm A4 Letter Legal B5 ISO Executive A5 A6 B6...

Page 24: ...aper you want to use see What kind of paper can I use on page 2 5 Printing on plain paper or transparencies from the paper tray Note Do not put more than 10 transparencies in the paper tray if you pri...

Page 25: ...Note Paper jams may occur if you put more than 250 sheets 80 g m2 of plain paper in the paper tray at any one time Paper jams may occur if you put more than 10 transparencies in the paper tray at any...

Page 26: ...not to lift up the output tray support flap we recommend that you remove printed pages immediately after they come out of the printer 8 Send the print data to the printer Note If you print on transpa...

Page 27: ...ode when you put paper in the manual feed slot 1 Select the Paper Size Paper Type Paper Source and other settings in the print driver 2 Send the print data to the printer Note A No Paper Manual Feed s...

Page 28: ...of the paper or envelope touches the paper feed roller When you feel the machine pull in the paper let go Note Put the paper into the manual feed slot with the side to be printed face up Make sure th...

Page 29: ...the next sheet of paper or the transparency as in Step 5 above Repeat for each page that you want to print Note If you print on transparencies remove each transparency immediately after printing Stac...

Page 30: ...age 2 17 Printing on heavyweight paper labels and envelopes from the manual feed slot 1 Select the Paper Size Paper Type Paper Source and other settings in the print driver Note For envelope users Whe...

Page 31: ...elope in the manual feed slot 3 Lift up the support flap to prevent paper from sliding off the face down output tray Note If you choose not to lift up the output tray support flap we recommend that yo...

Page 32: ...jam Do not put more than one piece of paper or one envelope in the manual feed slot at any one time as it may cause a jam If you put any Media paper envelope and so on in the manual feed slot before t...

Page 33: ...ime because it may cause paper jams or misfeeds Do not print envelopes using 2 sided printing For proper printing you must choose the same paper size from your software application as the paper in the...

Page 34: ...on it is possible that there may be paper jams or poor print quality If there is a paper jam see Paper jams and how to clear them on page 6 5 Printing on both sides of the paper 2 sided printing Note...

Page 35: ...rint mode and from the Basic tab choose the Paper Source to be Manual feed 2 Using both hands put the paper in the manual feed slot with the side that is going to be printed on first facing up Follow...

Page 36: ...edge top of the paper in first To print the second side put the paper face down with the leading edge top of the paper in first If letterhead paper is used this would be put in with the heading face...

Page 37: ...f the following operating systems from our company s web site at http www fxprinters com The installation instructions for installing the print driver for Windows and Macintosh are in the Quick Setup...

Page 38: ...ce Resolution Toner Save Mode 2 Sided Print 1 Watermark 1 Store Job 1 Quick Print Setup 1 Sleep Timer 1 Status Monitor 1 Administrator 1 2 Page Protection 1 Print Date Time 1 Density Adjustment 1 Prin...

Page 39: ...t in the print driver Note The screens in this section are from Windows XP The screens on your PC will vary depending on your Operating System Basic tab Note If you are using Windows 2000 or XP you ca...

Page 40: ...can access the Advanced tab by clicking Document Defaults in the file menu of the Printers and Faxes folder Change the tab settings by clicking the following icons 1 Print Mode 2 2 Sided Print 3 Wate...

Page 41: ...m Halftone Improve gray printing 2 Sided Print 2 Sided Print If you select 2 Sided Print the dialog box for the 2 sided print settings will appear There are six types of 2 sided print binding directio...

Page 42: ...for the Printer Features by clicking the feature names in the list below Store Job Quick Print Setup Sleep Timer Status Monitor Administrator For Windows 95 98 Me users only Page Protection Print Dat...

Page 43: ...out setting depending on how often you use your printer While the printer is in sleep mode the Ready LED is dim but the printer can still receive data from the computer Receiving a print file or docu...

Page 44: ...Protection Page Protection refers to a setting that reserves additional memory for the creation of full page images Selections are AUTO OFF and Printer Default The page protection feature allows the p...

Page 45: ...ease or decrease the print density Print Error Message You can choose whether the printer reports problem by printing error page or not About the errors see Error message printout on page 6 3 Selectio...

Page 46: ...Driver 3 10 3 Paper Tray Attributes tab Paper Source Settings This feature recognizes the paper size in each paper tray...

Page 47: ...you are using Windows NT 4 0 you can access the Support tab by clicking Document Defaults in the file menu of the Printers folder You can download the latest driver or get other product information b...

Page 48: ...n your Macintosh will vary depending on your Operating System Page setup You can set the Paper Size Image Orientation and Scale Print Layout Set the Pages per Sheet Layout Direction and Border Pages p...

Page 49: ...per Type Toner Save Mode Print Mode You can change the resolution as follows 300 dpi 600 dpi HQ 1200 Paper Type You can change the paper type as follows Plain Recycled Heavyweight 1 Transparency Heavy...

Page 50: ...stalling we recommend that you restart your PC to remove files that were in use during uninstall Print driver for Windows For Windows 95 98 Me Windows NT 4 0 and Windows 2000 1 Click Start and select...

Page 51: ...c OS X 10 2 4 or greater 1 Disconnect the USB cable between the Macintosh and your printer 2 Restart the Mac 3 Log on as an Administrator 4 Run the Print Center from the Go menu Applications Utilities...

Page 52: ...a control panel button Go on the control panel The LED indications shown in the table below are used in the illustrations in this chapter Note When the power switch is off all the LEDs are off When th...

Page 53: ...ady to print The printer is ready to print Warming up The printer is warming up Receiving data The printer is either receiving data from the computer processing data in memory or printing the data Dat...

Page 54: ...artridge position error The toner cartridge is not installed correctly Take out the toner cartridge and put it back into the printer again Replace drum soon The drum unit is near the end of its life W...

Page 55: ...paper bond paper or transparencies from the manual feed slot on page 2 11 or Printing on heavyweight paper labels and envelopes from the manual feed slot on page 2 14 Memory full The printer memory i...

Page 56: ...wer switch wait a few seconds and then turn it back on and try to print again If you cannot clear the error and see the same service call indication after turning the printer back on contact our Custo...

Page 57: ...the front cover is fully closed before you report a service call 1 If this error occurs turn the power switch off wait a few seconds and then turn it on again Leave the printer for 10 minutes with th...

Page 58: ...is not automatically cleared press the Go button to clear the error and then continue to use the printer Form feed If the green Ready LED blinks for a long time press the Go button The printer will pr...

Page 59: ...Hold down the Go button as you turn on the power switch Keep the Go button pressed down until the Toner Drum and Paper LEDs light up Release the Go button Make sure that the Toner Drum and Paper LEDs...

Page 60: ...closed and the power cord is plugged in 2 Turn on the printer and wait until the printer is in the Ready state 3 Press the Go button three times within 2 seconds The printer will print the current pri...

Page 61: ...s or clean the printer regularly pay attention to the following If your clothes are smeared with toner wipe off the toner with a dry cloth and immediately wash the clothes in cold water to avoid stain...

Page 62: ...according to what is printed on the page and the print density setting If you change the print density setting for lighter or darker printing the amount of toner that is used will change Wait to unpac...

Page 63: ...the toner cartridge Note To ensure high quality printing make sure you use quality toner cartridges When you want to buy toner cartridges contact our Customer Support Centre or your dealer We recommen...

Page 64: ...from side to side five or six times to spread the toner evenly inside the cartridge IMPORTANT We recommend that you place the drum unit and toner cartridge assembly on a piece of disposable paper or...

Page 65: ...ay result in unsatisfactory print quality Our warranty coverage does not apply to any problem that was caused by the use of unauthorized third party toner and toner cartridges To protect your investme...

Page 66: ...b from right to left and left to right several times Return the tab to the home position before you put the drum unit back in the printer If you do not printed pages may have a vertical stripe 8 Put t...

Page 67: ...life we cannot guarantee a minimum number of pages that will be printed by your drum For best performance use only genuine toner The printer should be used only in a clean dust free environment with...

Page 68: ...drum unit 1 Make sure that the printer is turned on and the Drum LED is blinking Open the front cover of the printer 2 Press and hold down the Go button for about 4 seconds until all the LEDs light up...

Page 69: ...lift automatically IMPORTANT We recommend that you place the drum unit and toner cartridge assembly on a piece of disposable paper or cloth in case you accidentally spill or scatter toner To prevent...

Page 70: ...ine maintenance 5 10 5 7 Put the drum unit and toner cartridge assembly in the printer 8 Close the front cover 9 Make sure that the Drum LED is now off IMPORTANT When installing the assembly hold its...

Page 71: ...clean the inside of the printer with a dry lint free cloth Cleaning the outside of the printer Clean the outside of the printer as follows 1 Turn off the printer power switch and unplug the printer f...

Page 72: ...ay 5 Wipe the inside of the paper tray with a soft cloth to remove dust 6 Put the paper tray firmly back in the printer 7 Plug the printer back in and turn on the printer power switch Cleaning the ins...

Page 73: ...r of the printer 3 Pull out the drum unit and toner cartridge assembly CAUTION After you have just used the printer some parts inside the printer are extremely hot Wait for the printer to cool down be...

Page 74: ...r 6 Close the front cover 7 Plug the printer back in and turn on the printer power switch Cleaning the corona wire If you are experiencing print quality problems please clean the corona wire as follow...

Page 75: ...have a vertical stripe 4 Put the drum unit and toner cartridge assembly back in the printer Close the front cover of the printer IMPORTANT We recommend that you place the drum unit and toner cartridg...

Page 76: ...is installed and selected The PC is set up to connect to the correct printer port Printer does not print If you did not solve your problem with the above checks please identify your problem and then g...

Page 77: ...to AUTO by using the supplied Windows driver No Paper Tray 1 No Paper Manual Feed The paper tray may be out of paper or not properly installed If it is empty put a new stack of paper in the paper tra...

Page 78: ...resolution or reduce the complexity of your document PRINT OVERRUN Press the Go button to print the data left in the printer Cancel the print job if you want to delete the data remaining in the print...

Page 79: ...the paper tray and then try again Check that manual feed mode is not selected in the print driver The printer does not feed paper from the manual feed slot Re insert the paper firmly one sheet at a ti...

Page 80: ...ess the Go button If the printer still does not start printing please check that all the remaining jammed paper has been removed from the printer Then try printing again Note Always remove all paper f...

Page 81: ...front cover 4 Pull out the drum unit and toner cartridge assembly slowly The jammed paper will be pulled out with the drum unit and toner cartridge assembly IMPORTANT To prevent damage to the printer...

Page 82: ...6 Pull the tab toward you to open the rear chute cover 7 Pull the jammed paper out of the fuser unit If the jammed paper cannot be pulled out easily push down the tab with one hand as you gently pull...

Page 83: ...any inside the drum unit 10 Put the toner cartridge back into the drum unit until you hear it lock into place If you put it in properly the lock lever will lift automatically CAUTION After you have j...

Page 84: ...9 6 11 Put the drum unit and toner cartridge assembly back in the printer 12 Put the paper tray firmly back in the printer 13 Close the front cover 14 Make sure that the Paper LED is now off and the...

Page 85: ...2 4 or greater Check that the printer is turned on Check that the USB interface cable is connected correctly Check the print driver is installed correctly Unable to print from application software Ma...

Page 86: ...ecks Make sure that you use paper that meets our specifications Rough surfaced paper may cause the problem See What kind of paper can I use on page 2 5 The drum unit may be damaged Put in a new drum u...

Page 87: ...ct position of the poor print 2 Turn the drum unit gear by hand while looking at the surface of the OPC drum 3 When you have located the mark on the drum that matches the print sample wipe the surface...

Page 88: ...unit may be damaged Put in a new drum unit See Replacing the toner cartridge on page 5 3 Lines across the page Clean the inside of the printer and the primary corona wire in the drum unit See Cleaning...

Page 89: ...paper tray on page 2 8 Check the paper type and quality See What kind of paper can I use on page 2 5 Curl or wave Check the paper type and quality High temperatures and high humidity will cause paper...

Page 90: ...the Advanced tab in the print driver The printer cannot print full pages of a document An error message MEMORY FULL is printed out Press the Go button to print the data left in the printer Cancel the...

Page 91: ...ophotographic Print speed Up to 20 ppm A4 size First print time Less than 10 sec 1 Resolution Windows 95 98 Me Windows NT 4 0 Windows 2000 XP HQ1200 600 dpi 300 dpi DOS N A Mac OS HQ1200 600 dpi 300 d...

Page 92: ...paper Print driver GDI Driver for Windows 95 98 Me Windows NT 4 0 Windows 2000 XP FX Laser Driver for Mac OS 9 1 to 9 2 and Mac OS X 10 2 4 or greater Utilities Interactive Help 3 LED 4 LEDs Button 1...

Page 93: ...per Recycled paper and Transparencies 5 Paper weights Manual feed slot 60 to 161 g m2 Paper tray 60 to 105 g m2 Paper sizes Manual feed slot Width 69 8 to 216mm 1 0mm Height 116 to 406 4mm 1 0mm Paper...

Page 94: ...in rooms where predominantly intellectual work is done Due to their noise emissions these devices should be set up in separate rooms Standby 4 3B A Ecology Power save Yes Toner save Yes Computer Platf...

Page 95: ...er carriage direction of the paper Paper can be classified into two types long grain and short grain Long grain paper s fiber direction is parallel to the carriage direction of the paper in the printe...

Page 96: ...racteristic of the paper changes greatly The fixing of the toner may become worse For storage of the paper and during use we recommend that the humidity of the surrounding environment is between 50 an...

Page 97: ...view 2 3 I Interface A 1 L LED 4 1 M Macintosh 3 12 Manual feed slot 2 11 2 14 2 19 Memory A 1 Memory full 4 4 N No paper 4 3 4 4 O OPC drum 6 12 P Paper 2 5 A 5 Paper handling A 2 Paper jams 4 4 6 5...

Page 98: ...Index I 2 I T Toner cartridge 5 2 A 3 Toner empty 4 3 5 3 Toner low 4 3 U Utilities A 2 W Web site 3 1 Weights A 3...

Page 99: ...DocuPrint 203A User s Guide Fuji Xerox Co Ltd ME3414E2 1 Edition 1 Human Interface Design Development May 2005 Copyright 2005 by Fuji Xerox Co Ltd...

Reviews: