background image

Page 24

Xerox Document Centre User Guide

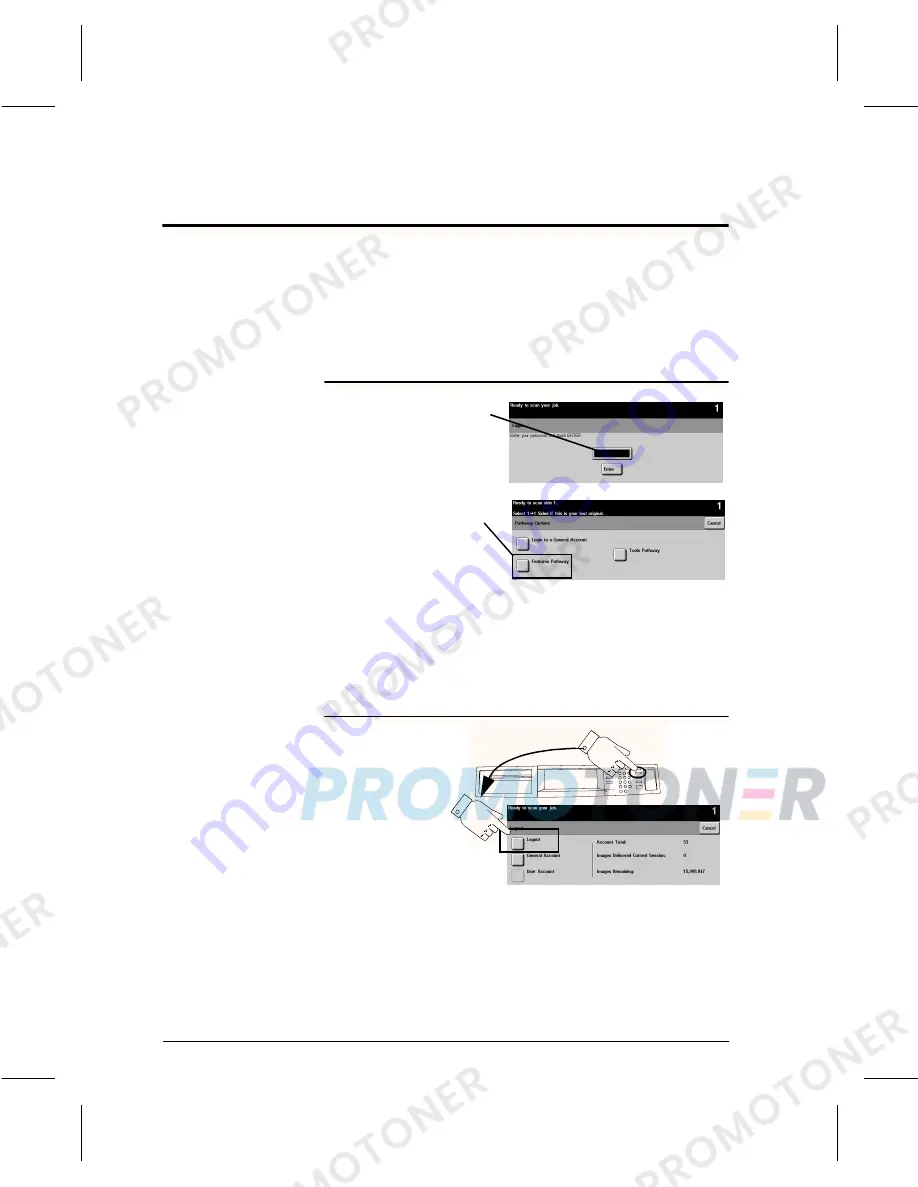
Making copies with the Auditron enabled

When the Auditron mode is enabled, a PIN number must 
be entered to make copies. Obtain a PIN number and 
Auditron access from the Electronic Auditron 
Administrator or Machine Administrator.

Login using the Auditron

Logout using Auditron


Enter your assigned PIN

Select 

Features Pathway


or 

General Accounts

If the 

Features Pathway

 is 

selected, copies will be 
charged to your user 
account.

If 

General Accounts

 is 

selected, copies will be 
charged against the 
General Account you 
enter.

300103A-LKS

0

Press 

Access, 

then 

Logout

 to prevent unauthorized use of 

your account.

Summary of Contents for Document Centre Series

Page 1: ...September 1 1998 Launch version Document Centre ST Document Centre DC Xerox Document Centre 240 DC ST 255 DC ST 265 DC ST User Guide December 1 1998 701P99729...

Page 2: ......

Page 3: ...ed supplies In The USA Calling for Service and ordering Replaceable Units 1 800 821 2797 USA Ordering Supplies 1 800 822 2200 USA In Canada Calling for Service 1 800 939 3769 Canada Ordering Supplies...

Page 4: ...sation The Document Centre ST model includes an implementation of LZW licensed under U S Patent 4 558 302 Product names used in this guide may be trademarks or registered trademarks of their respectiv...

Page 5: ...harmful interference to radio or television reception which can be determined by turning the equipment off and on the user is encouraged to try to correct the interference by one or more of the follow...

Page 6: ...your right to file a complaint with the FCC 4 If the telephone company requests information on what equipment is connected to their lines inform them of A The telephone number this unit is connected t...

Page 7: ...uipment should be made by an authorized Canadian maintenance facility designated by the supplier Any repairs or alterations made by the user to this equipment or equipment malfunctions may give the te...

Page 8: ...Treasury Notes and United States Bonds E Federal Reserve and Federal Reserve Bank Notes F Certificates of Deposit G National Bank currency H Fractional Notes I Paper money and Postal Money Orders J Bo...

Page 9: ...arried by military or Naval personnel or by members of the various Federal Departments and Bureaus such as the FBI and Treasury unless the photograph is ordered by the head of such Department or Burea...

Page 10: ......

Page 11: ...Safety 6 Safety Extra Low Voltage Approval 8 Welcome 9 What can you do with a Document Centre 9 Document Centre 240 255 265 Features 10 At your workstation 10 At the machine 11 Quick Reference 13 Quic...

Page 12: ...ded Copies 30 Improving Image Quality 31 Removing Unwanted Marks on the Edges of Copies 32 Copying Pages from Books or other Bound Documents 33 Using Reduction Enlargement 34 Shifting an Image 35 Addi...

Page 13: ...and approval and compliance to established environmental standards Please read the following instructions carefully before operating the machine and refer to them as needed to ensure the continued sa...

Page 14: ...be easily accessible 3 Use the power cable that is supplied with your Document Centre Do not use an extension cord or remove or modify the power cord plug 4 Plug the power cable directly into a correc...

Page 15: ...ntative to correct the problem l The Document Centre emits unusual odors or makes unusual noises l The power cable is damaged or frayed l A wall panel circuit breaker fuse or other safety device has b...

Page 16: ...e minimum cubic requirements are listed below Document Centre 240 DC 710 cubic feet Document Centre 255 ST DC 1 060 cubic feet Document Centre 265 ST DC 1 060 cubic feet Document Centre 240 ST 1 060 c...

Page 17: ...xposure The Document Centre complies with international safety standards and is certified as a Class 1 Laser Product With specific regard to lasers the equipment complies with laser product performanc...

Page 18: ...with the equipment l Always exercise care when moving or relocating the equipment Please contact your local Xerox Service Department to arrange relocation of the copier to a location outside of your...

Page 19: ...ver attempt any maintenance function that is not specifically described in the Document Centre documentation l Never remove any covers or guards that are fastened with screws There are no operator ser...

Page 20: ...ations All system ports meet the requirements for Safety Extra Low Voltage SELV circuits for connection to customer owned devices and networks Additions of customer owned or third party accessories th...

Page 21: ...nt Driver What can you do with a Document Centre A Document Centre offers the ability to both print documents from a PC and copy documents at the machine Because of its digital design you can expect l...

Page 22: ...sided l Stapled sets if you have a Finisher l Resolutions up to 1800x1800 dpi l Add standard or customized watermarks l Secure Printing print your confidential document after you get to the printer l...

Page 23: ...entre performs different tasks such as scanning and printing simultaneously Make Copies look like Originals not Copies The Document Centre allows the reproduction of high quality images especially pho...

Page 24: ...h the Document Feeder Transparencies You can produce transparencies and transparency separators with or without images in one step Booklets The machine can sequence and reduce or enlarge the images au...

Page 25: ...day documents you can produce on the Document Centre the table below lists several applications that you may not have considered before Most of these jobs can also be done from the Print Driver if you...

Page 26: ...14 Xerox Document Centre User Guide 2 sided copies Page 30 Improving image quality Page 31 Removing unwanted marks Page 32 Copying pages from books or other bound documents Page 33 Input Output See P...

Page 27: ...rox Document Centre User Guide Page 15 Welcome Using reduction enlargement Page 34 Shifting an image Page 35 Adding covers Page 36 Placing multiple images on a single page Page 37 Input Output See Pag...

Page 28: ...Page 16 Xerox Document Centre User Guide Making transparencies with dividers Page 38 Making brochures and booklets Page 39 Copying Mixed Size Originals Page 40 Input Output See Page Booklet Front Back...

Page 29: ...Job Overview Unique programming for each segment Page 41 Pages in a book Copying bound documents using Build Job Page 42 Using Build Job and Sample Set Page 43 Input Output See Page Segment 1 Segment...

Page 30: ...Page 18 Xerox Document Centre User Guide...

Page 31: ...inals that will not feed through the Document Feeder Press the Touch Screen to make copy selections Use the buttons to access other features Use Tray 6 and its 3100 sheet capacity of 8 5 x 11 inch pap...

Page 32: ...he Document Glass to copy bound stapled folded or wrinkled originals odd or oversize documents books or glossy photographs 1 Raise the Document Glass Cover 2 Place the original face down into the top...

Page 33: ...ss screen will appear This screen displays information about your job After your job is complete or you press the Program Next Job button it will close Get your Output When the copy processing is comp...

Page 34: ...ze descriptions as required Loading paper in Tray 5 the Bypass Tray Use Tray 5 to load special or odd size stock Insert paper as shown Do not load paper above the maximum fill line Pull out the extens...

Page 35: ...l Press Promote to promote a job to the top of the job queue The promoted job will move near the top of the job queue l Press Release to release a held job This feature is typically used to print the...

Page 36: ...Auditron Administrator or Machine Administrator Login using the Auditron Logout using Auditron Enter your assigned PIN Select Features Pathway or General Accounts If the Features Pathway is selected c...

Page 37: ...wn menu and select Secure Print Select Secure Print Setup enter a PIN number click OK then Print When you are ready to retrieve your job go to the Document Centre At the Machine 1 Press the Job Status...

Page 38: ...Page 26 Xerox Document Centre User Guide...

Page 39: ...These Jobs This section contains step by step instructions to help you get the most from your Document Centre Advanced Features and options are accessed through these tabs Most of what you need is in...

Page 40: ...on Enlargement and Paper Supply Touch the screen to make your selections Use the keypad to enter the number of copy sets 3 Press the Start button HINT Auto Paper vs Auto Auto Paper automatically picks...

Page 41: ...taple to appear 2 Make your desired programming selections from the Basic Copying Tab Output 2 sided Copy Reduction Enlargement and Paper Supply Touch the screen to make your selections Use the keypad...

Page 42: ...Copying Tab Output 2 sided Copy Reduction Enlargement and Paper Supply Touch the screen to make your selections Use the keypad to enter the number of copy sets 3 Select the option based on your origin...

Page 43: ...nals and then press Save Normal This defaul setting provides excellent copies for most types of originals Magazine Photo Improves the copy quality of a magazine with pictures or text with graphics Tex...

Page 44: ...tput 2 sided Copy Reduction Enlargement and Paper Supply Touch the screen to make your selections Use the keypad to enter the number of copy sets 3 Press the Image Adjustment Tab then the Edge Erase b...

Page 45: ...of copy sets 3 Change the image quality setting by pressing the Image Adjustment Tab then the Image Quality button if necessary 4 Press the Image Adjustment Tab then press the Bound Originals button...

Page 46: ...selections Use the keypad to enter the number of copy sets 3 In the Basic Copying Tab under Reduce Enlarge select an existing preset or select More Select from the additional presets or enter your de...

Page 47: ...d Paper Supply Touch the screen to make your selections Use the keypad to enter the number of copy sets 4 Press the Image Adjustment Tab 5 Select Image Shift then press Margin Shift 6 Enter the amount...

Page 48: ...ion Enlargement and Paper Supply Touch the screen to make your selections Use the keypad to enter the number of copy sets 4 If necessary use the appropriate Original Type image quality setting in the...

Page 49: ...of your originals 4 Select the number of rows and columns 5 Load the originals into the Document Feeder as illustrated on the Multi Up screen 6 Make your desired programming selections from the Basic...

Page 50: ...parency Dividers screen select either Blank or Imaged Dividers Selecting Imaged Dividers will produce dividers with the same image as on the transparency 5 Review the tray selections Press the transpa...

Page 51: ...let Creation screen 3 Select One or Two sided Originals and Save 4 Make any other necessary selections from the Basic Copying Tab Some selections will have already been made when you selected the Book...

Page 52: ...ature to work correctly Valid mixed sizes will be displayed on the screen 4 Press Save 5 Make your desired programming selections from the Basic Copying Tab Output 2 sided Copy Reduction Enlargement a...

Page 53: ...applies to entire copy job Copy Job with Build Job Each segment can be programmed differently Build Job examples l Make Image Quality settings on one segment a photograph that are not required on othe...

Page 54: ...s 3 Press the Job Assembly Tab Select Build Job and Save to allow the machine to capture all the pages of the article before printing your job 4 If necessary change the Original Type image quality set...

Page 55: ...r the first segment of the job then press the Start button The appearance of the End Build Job button indicates that the copier is in the image collation mode Repeat this procedure for each remaining...

Page 56: ...Page 44 Xerox Document Centre User Guide...

Page 57: ...Binding Edge 35 Booklet Creation feature 39 Border Erase feature 32 Bound Documents copying 33 Brochures making 39 Build Job feature 43 Bypass Tray Loading Paper 22 C CentreWare 10 Clear All button 20...

Page 58: ...Accounts 24 H High Capacity Feeder Loading Paper 22 I Image Adjusting Image Quality 31 rotating the second side 30 J Job Queue 23 L Large Jobs 43 Lighten Making lighter copies 31 Login Auditron 24 Lo...

Page 59: ...34 Relocation ozone requirements 4 S Safety Electrical 2 Laser 5 Operational 6 Secure Print 25 Shifting an image 35 Shifting the image 35 Stapling 29 Status of Job 23 T Thumbnails 37 Tools Pathway See...

Page 60: ......

Page 61: ......

Reviews: