background image


Xerox

®

 ColorQube™ 9301/ 9302/ 9303

XEROX®, XEROX and Design® and ColorQube® are trademarks of Xerox Corporation in the United States and/or other countries. © 
2010 Xerox Corporation. All rights reserved.
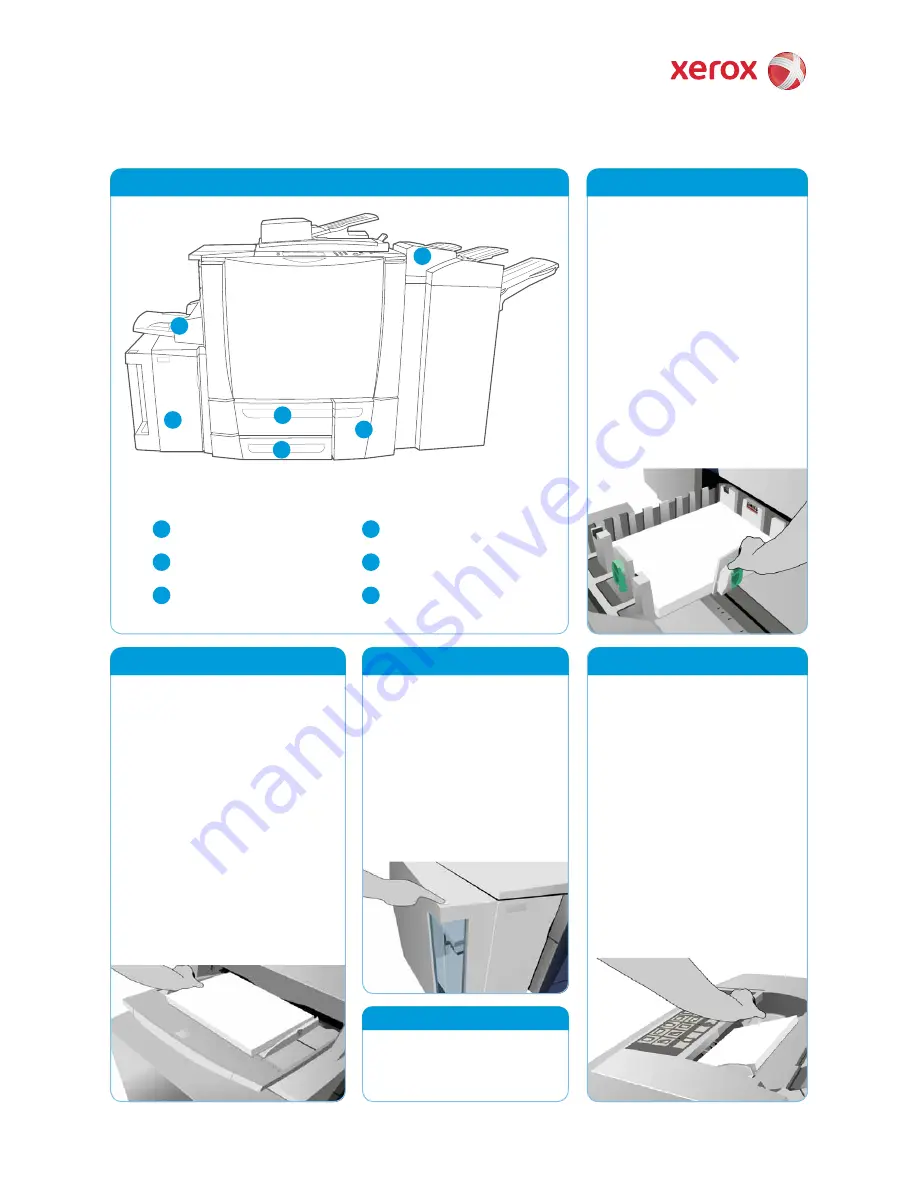
Tray 6 (Inserter)

Tray 2

Tray 4 (Bypass)

Tray 3  

Tray 5 

Tray 1

Machine Overview

Trays 1, 2 and 3

Open the tray.

1. 

Place the media face up in the tray. 

2. 

Paper must not be loaded above the 
maximum fi ll line.

Trays 1 and 2 only. Make sure that 

3. 

the paper guides just touch the 
paper. 

Close the tray. The paper settings for 

4. 

the tray are displayed on the touch 
screen.

Check and confi rm or change the 

5. 

settings.

Tray 4 (Bypass)

Make sure the tray is in the down 

1. 

position.

For larger media, use the tray extension.

2. 

Place media face down in the tray. Paper 

3. 

must not be loaded above the maximum 
fi ll line.

Make sure that the paper guides just 

4. 

touch the paper. 

The paper settings for the tray are 

5. 

displayed on the touch screen.

Check and confi rm or change the 

6. 

settings.

Tray 5

Press the button to open the door.

1. 

Wait for the paper tray to lower.

2. 

Place media face down in the tray. 

3. 

Paper must not be loaded above 
the maximum fi ll line.

Close the door. The tray 

4. 

automatically rises.

Tray 6 (Inserter)

Place the media face up in the tray 

1. 

and check it is the correct orientation 
for that media.

Paper must not be loaded above the 

2. 

maximum fi ll line.

Make sure that the paper guides just 

3. 

touch the paper. The paper settings 
for the tray are displayed on the touch 
screen.

Check and confi rm or change the 

4. 

settings.

2

5

4

6

2

1

3

5

4

6

User Guides 

• 

http://www.support.xerox.com

• 

Paper weights and sizes are in the  

• 
 User 

Guide

More information

How to Load Paper

1

3

Summary of Contents for ColorQube 9301

Page 1: ...us Numeric Keypad Copy E mail Fax Internet Fax Server Fax Print From Work ow Scanning More information For more information please refer to User Guides http www support xerox com Machine Overview Cont...

Page 2: ...in the tray Paper 3 must not be loaded above the maximum ll line Make sure that the paper guides just 4 touch the paper The paper settings for the tray are 5 displayed on the touch screen Check and co...

Page 3: ...cument feeder or 2 face down on the document glass Copy Press the 3 Services Home button Select the 4 Copy option The Copy tab is displayed Make any programming changes that are required such as Outpu...

Page 4: ...ocument feeder or 2 face down on the document glass Fax Press the 3 Services Home button Select the 4 Fax option The Fax tab is displayed Select the entry eld and enter the fax number Select 5 Add to...

Page 5: ...der or 2 face down on the document glass Fax Press the 3 Services Home button Select the 4 Server Fax option The Server Fax tab is displayed Select the entry eld and enter the fax number Select 5 Add...

Page 6: ...the document glass Fax Press the 3 Services Home button Select the 4 Internet Fax option The Internet Fax tab is displayed Select 5 New Recipient Check that To is displayed on the drop down menu Ente...

Page 7: ...amming selections Print Press the 3 Services Home button Select the 4 Print From option The Print Ready Saved Jobs are displayed Use the up down arrows to scroll and select the folder or job 5 require...

Page 8: ...wn on the document glass E mail Press the 3 Services Home button Select the 4 E mail option The E mail tab is displayed Select 5 New Recipient Check that To is displayed on the drop down menu Enter th...

Page 9: ...der or 2 face down on the document glass Scan Press the 3 Services Home button Select the 4 Work ow Scanning option The Work ow Scanning tab is displayed Select a template for the job from the templat...

Page 10: ...e 4 Scan to USB option The Work ow Scanning tab is displayed Make any programming changes that are required 5 Press 6 Start to scan the originals and process the scan job The scanned images are led on...

Page 11: ...the paper path to clean the system These pages will be directed to the top tray and should be discarded For additional options in correcting image quality access the Tools section Press the 10 Machine...

Reviews: