background image

                                                                      Wireless Key Telephone Handset 


- 4 - 

Reset Handset................................................................................................................ 22 

Registration and Troubleshooting..................................................................................... 23 

Handset Registration................................................................................................. 23 
De-registering a Handset........................................................................................... 25 

Specifications.................................................................................................................... 28 

Frequency Range .......................................................................................................... 28 
Electrical Specification (Handset) ................................................................................ 28 
Lamp Cadence (Handset).............................................................................................. 28 
Beep / Ringer Cadence (Handset)................................................................................. 28 
Base Unit....................................................................................................................... 28 
FCC Rules and Regulations .......................................................................................... 28 

User’s Guide ..................................................................................................................... 29 

Belt Clip........................................................................................................................ 29 
Power On/Off................................................................................................................ 29 
Key Lock....................................................................................................................... 29 
Answer a Call................................................................................................................ 29 

Hold........................................................................................................................... 29 
Transfer ..................................................................................................................... 30 

Terminate a Call............................................................................................................ 30 
Place a Call ................................................................................................................... 30 

INDEX .............................................................................................................................. 31 


Revision Table 

Revision  

Description of Changes 

Date Released 

Preliminary Release – PAL 


12/2004 

V2.1 – 8 ½ x 11 

New format for Electronic Users. - PAL 


Summary of Contents for PCS digital

Page 1: ...Wireless Key Telephone Handset 1 PCS digital 2 4 GHz Wireless Handset...

Page 2: ...Wireless Key Telephone Handset 2 Notes...

Page 3: ...ion Feature 7 Hold Power 8 Programmable Feature Buttons 8 Volume 8 Headset Jack 8 Speaker 8 Quick Setup Guide 9 Installation 9 Getting Started 9 Wireless Key Telephone Handset 9 Wireless Base Unit 10...

Page 4: ...ation Handset 28 Lamp Cadence Handset 28 Beep Ringer Cadence Handset 28 Base Unit 28 FCC Rules and Regulations 28 User s Guide 29 Belt Clip 29 Power On Off 29 Key Lock 29 Answer a Call 29 Hold 29 Tran...

Page 5: ...ess environment It has a hot keypad so telephone number can be dialed without having to press the Talk or Speaker buttons and it can be used for hands free communications The Wireless Handset has 3 in...

Page 6: ...Buttons 3 3 Speaker Yes With LED Yes System Programming Yes Yes Talk N A Yes Transfer Flash Yes Yes Volume UP Down Yes Yes Left Side Feature Matrix Feature Description 2 4 GHz Frequency Hopping 90 Ch...

Page 7: ...e Line A 16 Character Display F 1 F 2 F 3 Dial Keypad The dial keypad is used to dial telephone numbers Talk The Talk Button is used to answer or originate an Intercom or Central Office calls Flash Tr...

Page 8: ...Do Not Disturb etc To program a feature function button 1 Press f 3 2 Press the button to be programmed 3 Select the desired feature using the soft buttons Volume Left Side The volume bar is used to...

Page 9: ...unit handset charging base and electrical plug come as a kit Before you begin make sure that all of these items are in good working order Not shown here is the wall mount plate that gets mounted under...

Page 10: ...ireless Base Unit The wireless base unit is a compact radio transmitter that connects the telephone system with the Wireless Key Telephone Handset It contains Printed Circuit Boards PCB s that can be...

Page 11: ...ause interference When using more than one base unit be sure to place them at least 15 feet apart b For proper operation the dipswitches on the back of the base unit should all be set to the Off posit...

Page 12: ...liseconds off Transition Mode 1000 milliseconds on 1000 milliseconds off De Register Mode 125 milliseconds on 125 milliseconds off e Handset Registration The Wireless Handset that comes with a Base Un...

Page 13: ...ry charge The Handset becomes active when a call is received or when any key is pressed The display will indicate a change in status POWER ON POWER OFF Normal Operation 1 Once the Wireless Handset is...

Page 14: ...e of the battery ICON If the charge gets too low the ICON gets very small the display will show Low Battery If the handset is in use an audible tone is heard once every 15 seconds Battery Full Charge...

Page 15: ...its Although the keys are locked incoming calls can still be answered by pressing the talk or speaker keys The in the display is the indication that the handset is locked Key Unlock To Unlock the Hand...

Page 16: ...up Yes F2 Center Scroll down No F3 Right Select OK Programming Fields There are six 6 programming fields that can be customized for each Wireless Handset Heading Parameters Language English French Spa...

Page 17: ...AGE FRANCAIS Once the desired language is in the display press OK F3 A confirmation tone will be heard and the word OK will appear in the display LANGUAGE ENGLISH OK The telephone system may deliver s...

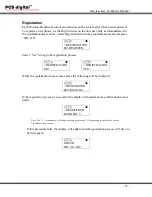
Page 18: ...elect Yes to begin the registration process REGISTRATION NO A REGISTRATION YES While the registration process takes place the following will be displayed REGISTERING PLEASE WAIT If the registration pr...

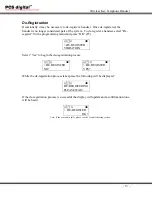
Page 19: ...e programming menu and press OK F3 DE REGISTER VIBRATION Select Yes to begin the de registration process DE REGISTER NO A DE REGISTER YES While the de registration process takes place the following wi...

Page 20: ...When set to Vibrator the handset will vibrate when the extension number is dialed Press OK F3 the ICON will update VIBRATION RING VIBRATOR When set to Ring and Vibrator the handset will ring and vibr...

Page 21: ...rty Select auto pickup to customize the way each handset will answer incoming calls AUTO PICKUP RELEASE CALL When set to Receiver the use can answer a ringing call by removing the handset from the cha...

Page 22: ...andset to initialize the handset press OK F3 RESET HANDSET LANGUAGE Press F1 or F2 to toggle between No and Yes press OK F3 when the desired answer is in the display RESET HANDSET NO A RESET HANDSET Y...

Page 23: ...Hold button for 3 seconds to turn the handset off Wait 10 seconds before beginning the registration process Handset Press the Hold button for 3 seconds to power up the wireless handset PLEASE REGISTE...

Page 24: ...n restoring power to the base unit Wait 5 seconds the LED begins flashing rapidly For the next 30 seconds while the LED is rapidly flashing PRESS THE OK F3 BUTTON on the Handset REGISTRATING PLEASE WA...

Page 25: ...can be De register or from the handset each can be de register individually Handset While in the programming mode select the De registration parameter DE REGISTER VIBRATION Press F1 or F2 to toggle be...

Page 26: ...en the process is complete remove power from the base unit by unplugging port 1 Place the dipswitches back into the Normal Operation mode by placing all switches up or off position De register Individ...

Page 27: ...he Normal Operation mode by placing all switches up or off position Because the de registration process is initiated from the base unit the handset remains passive and will update once the de registra...

Page 28: ...r Cadence Handset Key Tone 50 milliseconds Single Beep 500 milliseconds Double Beep 250 milliseconds on 250 milliseconds off 250 milliseconds on then off Intercom Ring 300 milliseconds on 400 millisec...

Page 29: ...the current date and time extension number and ring mode To conserve energy the back lit display will turn off in 10 seconds and after 20 seconds the handset will go into sleep mode and only displayi...

Page 30: ...ion 2 While on a telephone call press one of the 6 preprogrammed buttons containing the extension number where the call will be transferred to Terminate a Call Press the Talk button to terminate an ac...

Page 31: ...Programming 17 Headset Jack 8 Hold 31 Hold Button 8 Hot Keypad 5 Installation 10 Base Unit 11 Handset 10 Introduction 5 Key Lock 30 Key Unlock 16 Language 18 No Link to Base 15 Normal Operation Displa...

Page 32: ...Wireless Key Telephone Handset 32 Copyright PCS Digital 4 2005...

Reviews: