background image

26  Ilumina GL Users Guide

bb

• 

For single-sided printing on letterhead, load the paper into the 
multi-purpose tray with pre-printed side up and top edge into the 
Ilumina.   

• 

For two-sided (duplex) printing on letterhead, load the paper with 
pre-printed side down and top edge away from the Ilumina.        

• 

Envelopes should be loaded face-up with long edge into the Ilumina. Do 
not select duplex printing on envelopes.   

• 

Do not leave space between the paper and the guides.  

• 

Do not exceed the paper capacity of approximately 230 sheets, 100 
transparencies or 25 envelopes. Maximum stacking depth is 1".      

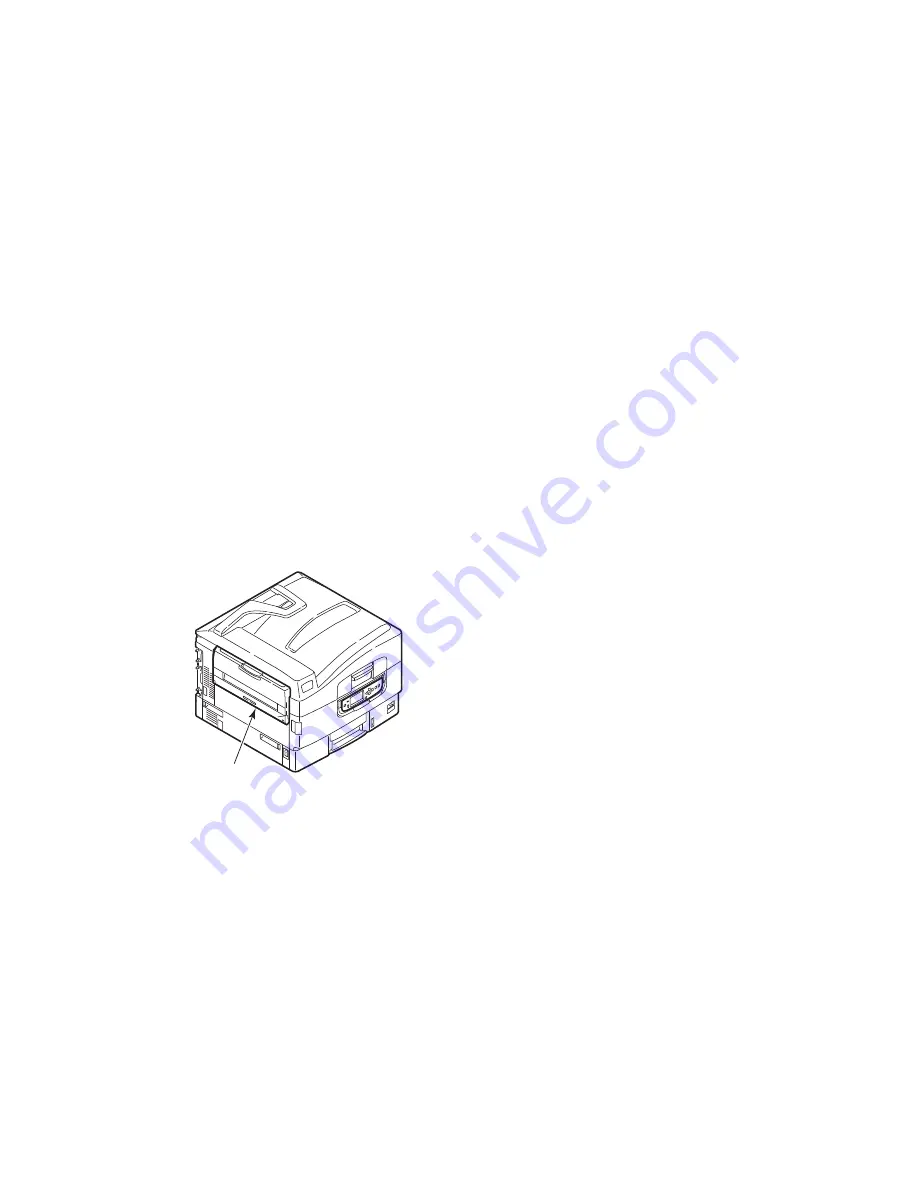
Using the Stackers 

Face-Down Stacker   

When the face-up stacker (1) on the left side of the Ilumina is closed (its normal 
position), paper is ejected to the face-down stacker on the top of the Ilumina.

1

Face-Down Stacker

Face-Up Stacker  


The face-up exit path is used for heavy paper (cardstock, etc.), envelopes, 
transparencies,  and  labels.         

Summary of Contents for Ilumina GL

Page 1: ...User s Guide 110 220 volt edition Xant Corporation 2800 Dauphin St Mobile AL 36606 2400 Phone 251 473 6502 Fax 251 473 6503 Web Site www xante com Ilumina GL User s Guide v1 01 26 10...

Page 2: ...names are trademarks registered trademarks or service marks of their respective holders Manual Notice Xant Corporation reserves the right to make changes to this manual and to the equipment described...

Page 3: ...mplies with the requirements of the Council Directives 89 336 EEC EMC 73 23 EEC LVD and 1999 5 EC R TTE as amended where applicable on the approximation of the laws of the member states relating to El...

Page 4: ...ut Information 20 Trays and Stackers 22 Trays 1 To 5 22 MP Tray 22 Face Down Stacker 22 Face Up Stacker 23 Duplex Unit If Installed 23 Tray and Stacker Examples 23 Loading Trays 1 TO 5 23 Using the MP...

Page 5: ...mation 39 Maintenance Item Order Details 40 Replacing Consumables Maintenance Items 40 Cleaning the LED Heads 40 Cleaning the Paper Feed Rollers 41 Cleaning the Ilumina Casing 43 Chapter 6 Optional Ac...

Page 6: ...formation 79 U S and Canada 79 Xant Authorized Service Providers 79 Xant Contact Locations 79 Sales and Service Dealers 79 Telephone Support 79 Automated Services for Your Convenience 79 Quick Referra...

Page 7: ...ty Data Sheet MSDS 86 58371301 for Type C7 Black Toner P N 200 100225 86 Emergency First Aid Procedures 86 Toner Swallowed Ingested 86 Toner Inhaled 86 Toner Gets in the Eyes 86 Toner Gets on the Skin...

Page 8: ...ata 93 Minimal fire hazard Large quantities may cause risk of dust explosion 93 Toxicological Properties 94 Reactivity Data 94 Preventive Measures 95 Personal Protective Equipment 95 Engineering Contr...

Page 9: ...for Type C7 Yellow Toner P N 200 100224 101 Emergency First Aid Procedures 101 Toner swallowed ingested 101 Toner inhaled 101 Toner gets in the eyes 101 Toner gets on the skin 102 Ingredients 102 Styr...

Page 10: ...howing the finest detail Xant MultiBit technology produces smoother gradations of color to lend photographic quality to your documents Single Pass Color Digital LED technology for high speed processin...

Page 11: ...This is a paper document that is packaged with the Ilumina This User s Guide helps you become familiar with your Ilumina and make the best use of its many features Guidelines are also included for tro...

Page 12: ...vigation and viewing tools provided in Acrobat You can access specific information in two ways In the list of bookmarks down the left hand side of your screen click on the topic of interest to jump to...

Page 13: ...o 3 for the range of pages you specify by entering their page numbers 3 Click on OK Safety Warnings Please be careful to read and understand the safety warnings in this section before operating the Il...

Page 14: ...nd main power switch are in the OFF position before connecting the AC power cable This product has a grounded plug as a safety feature and will only connect to a grounded socket Never circumvent this...

Page 15: ...e Ensure loose clothing and hair are kept clear of moving parts when Ilumina is in operation to prevent possible risk of injury To prevent burns when the Ilumina cover is open do not touch the fuser u...

Page 16: ...Ilumina that are not specified in the User s Guide This may result in electric shock fire and or injury After installing additional memory the cover door must be closed and secured to prevent risk of...

Page 17: ...Top Cover Closing Top Cover To close the top cover push gently 1 until the cover stops midway and then push harder 2 to close the cover completely Ensure that the cover is securely closed Identifying...

Page 18: ...ctor 14 Network interface connector 17 Power connector 15 Parallel interface connector 18 Ventilation openings 19 20 21 22 23 24 25 26 27 28 29 19 Image drum cartridge toner cartridge Cyan 25 Fuser un...

Page 19: ...nery can be used but the ink must not offset when exposed to the high fuser temperatures used in the printing process Using pre printed stationary that does not meet this criteria can cause non warran...

Page 20: ...to the labels peeling off during the printing process Suitable types of labels are Avery White Laser Label types 7162 7664 7666 A4 or 5161 Letter Use of labels that do not meet this criteria can cause...

Page 21: ...ker Banner W Letter width L 18 48 34 lb recommended MP Tray Face up Stacker Index card 3 x 5 15 71 lb MP Tray Face up Stacker Postcard Tray 1 MP Tray Face up Stacker Envelope 4 72 x 9 25 3 54 x 8 07 9...

Page 22: ...trays but in weights up to 73 lb 330 g m For very heavy paper stock use the face up paper stacker This ensures that the paper path through the Ilumina is almost straight The multi purpose tray can fee...

Page 23: ...er stocks heavier than 57 lb 216 g m Duplex Unit If Installed This feature provides automatic two sided printing on plain paper fed from Trays 1 5 or the MP Tray Applicable paper sizes are A6 A4LEF B4...

Page 24: ...the tab 2 on the paper guide and adjust the guides 3 for a snug fit to the paper To avoid paper jams Do not leave space between the paper and the guides or rear stopper Do not overfill the paper tray...

Page 25: ...pose Tray Extend Supports and Adjust Guides 2 Fold out the paper support section and swivel out the extension supports 2 3 Adjust the paper guides 3 to the size of the paper being used 4 Fan the paper...

Page 26: ...mina Do not select duplex printing on envelopes Do not leave space between the paper and the guides Do not exceed the paper capacity of approximately 230 sheets 100 transparencies or 25 envelopes Maxi...

Page 27: ...Ilumina GL Users Guide 27 1 2 Open the Stacker Flip Out the Support 2 Flip out the paper support 2 3 Swivel out the paper support extension 3 3 Open Support Extension...

Page 28: ...the control panel are identified and briefly explained as follows 2 7 4 5 1 3 11 6 8 9 10 Control Panel 1 Shutdown Restart button Hold down for more than 2 seconds for a soft shutdown You can then pre...

Page 29: ...e and enables downward movement through the displayed list of menu items 7 Back button Returns to the previous higher level menu item 8 Enter button Enters menu mode and selects the menu item highligh...

Page 30: ...rmation User menus accessed by pressing the Enter button Up arrow button or Down arrow button on the control panel These menus are available to the general user to make various settings that are used...

Page 31: ...ng the Menus Menu details are given in Appendix B Menu system for reference The Enter Up arrow Down arrow and Back buttons are used to move through the Ilumina menus You can adjust settings e g set th...

Page 32: ...alue is highlighted 7 Press the Enter button to select this Value If you are setting a parameter ensure that an asterisk appears beside the selected parameter Value 8 Press the Online button to exit m...

Page 33: ...Ilumina Location Check that you have sufficient space for access around and above your Ilumina 60cm 60cm 20cm 8in 100cm 40in 24in 24in 70cm 28in Ilumina Access Space Turning Off On Turning Off 1 Hold...

Page 34: ...port printing is English If required this can be changed using the Panel Language Download Utility located on the installation CD under Optional Utilities Checking Current Settings Carry out the follo...

Page 35: ...This port requires a bi directional IEEE 1284 compliant parallel cable USB For connection to a PC running Windows 98 or above not Windows 95 upgraded to Windows 98 or Macintosh This port requires a ca...

Page 36: ...e at this time You will be instructed when to connect the USB cable when you run the Drivers CD If you are connecting your Ilumina directly to a stand alone computer proceed to the section entitled Pr...

Page 37: ...n the Software Installation Guide and or the Network and Configuration Guide for further details on how to configure the network connection before installing the drivers for the Ilumina Administrator...

Page 38: ...ble maintenance item is left by using the appropriate menus For example enter the menu system and follow the path Configuration Supplies Life Cyan Toner The percentage of Cyan Toner remaining is displ...

Page 39: ...feed 20 lb 24 lb 75 g m2 to 90 g m2 200 100223 Toner Yellow 16 500 Letter A4 pages 5 coverage long edge feed 20 lb 24 lb 75 g m2 to 90 g m2 200 100224 Image drum Black 42 000 Letter A4 pages avg long...

Page 40: ...on replacement You are advised to follow these instructions carefully 1 Only use genuine Xant consumables to ensure the best quality and performance from your hardware Non Xant products may damage yo...

Page 41: ...LED lens cleaner or soft cloth gently wipe each of the four heads 1 Move the cleaner as shown using a clean section of the cleaner with each pass Be careful not to damage the guards 2 3 Close the top...

Page 42: ...f 1 Turn Off Open Tray 1 Pull out Paper Guide Plate 2 Open Tray 1 side cover and pull out the paper guide plate 1 3 Remove Tray 1 completely from the Ilumina 2 Remove Tray 1 Clean Paper Feed Rollers 4...

Page 43: ...ide Plate Close Side Cover 6 Return the paper guide plate to its original position and close Tray 1 side cover 7 Turn on the Ilumina Turn On Ilumina Cleaning the Ilumina Casing 1 Follow the correct st...

Page 44: ...mina GL Users Guidebb 2 Wipe the Ilumina surface with a soft cloth moistened sparingly with water or neutral detergent 3 Use a soft dry cloth to dry the Ilumina surface 4 Turn on the Ilumina Turn on I...

Page 45: ...high capacity tray equivalent to three paper trays Tray configurations are Tray 1 only Tray 1 2nd Tray Tray 1 2nd Tray 3rd Tray Tray 1 HC Tray Tray 1 2nd Tray HC Tray If a high capacity feeder is ins...

Page 46: ...You are advised to follow these instructions carefully After installation print out a Menu Map Configuration document to check that the installation has been successful For the following accessories y...

Page 47: ...Jams Ilumina If a paper jam occurs a message appears on the display panel in the Ilumina Control Panel You can press the Help button to display guidance on how to clear the jam For full details of cl...

Page 48: ...Reposition Paper Guide Close Side Cover 4 Put the paper guide back into position and close Tray 1 side cover MP Tray Side Cover 1 If the MP Tray is open close it so that the side cover 1 is visible 1...

Page 49: ...Paper Close Side Cover 4 Close the side cover Top Cover 1 Squeeze the top cover handle 1 and open the top cover Be careful not to touch the fuser unit because it is hot after printing 1 2 Open Top Cov...

Page 50: ...hot after printing If the fuser unit is hot wait until it cools before attempting to remove any jammed paper Holding the fuser unit 4 by the handle lift it out of the Ilumina and place it on a flat s...

Page 51: ...e Up Stacker Open Side Cover Remove Jam 8 Open the side cover paper exit 8 and remove the jammed paper 9 Close the side cover paper exit and then the face up stacker 9 Close Side Cover and Face Up Sta...

Page 52: ...se the top cover and ensure it is latched Close Top Cover Paper Jams Duplex Unit If Installed Check Duplex Unit Paper Jam 1 Operate the duplex cover release button 2 and open the cover 2 Open Cover 2...

Page 53: ...Jammed Paper Pull Out Duplex Unit 3 Operate the levers 3 and pull out the duplex unit 4 Holding the front top cover by the grip 4 push it gently inwards and raise it 4 Raise Front Top Cover Remove Ja...

Page 54: ...nd clear any paper jammed under the rear top cover Remove Jammed Paper Replace Two Top Covers 7 Replace the two top covers 8 Raise the front cover of the duplex unit Raise Front Cover Replace Duplex U...

Page 55: ...iate paper Decurled paper can be used Your paper sheets are not aligned with each other Remove the sheets jog them into alignment and reload them Your paper is not aligned properly in the paper tray A...

Page 56: ...idge The paper is not suitable for the Ilumina Use recommended paper Printing is light The toner cartridge is not properly seated Reinstall the toner cartridge The toner is low Replace the toner cartr...

Page 57: ...artridge if the problem is not resolved White area of paper is lightly stained Paper contains static Use paper stored in proper temperature and humidity conditions Paper is too thick Use thinner paper...

Page 58: ...m Paper output Face down stacker 500 sheets Face up stacker 250 sheets Interfaces Parallel USB 2 0 10 100BaseT Duty cycle 150 000 pages month maximum Toner life Black Cyan Magenta Yellow 18 500 Lette...

Page 59: ...g 1 500 W maximum 780 W typical Standby 600 W maximum 200 W typical Power save 35 W Operating environment Operating 50 90 F 20 80 RH Off 32 110 F 10 90 RH Noise level Operating 54 dBA maximum Standby...

Page 60: ...ser Unit Near Life The fuser unit is nearing the end of its working life Change Fuser Unit The fuser unit has reached the end of its working life and has to be changed Invalid Data Press ONLINE Button...

Page 61: ...orrectly located or put tray X loaded with paper back into the Ilumina Open Cover Paper Remains Tray X Please see HELP for details Additional paper has been detected after a paper jam has been cleared...

Page 62: ...mand that can be executed to display or print a status or setting value Bold values followed by an A denote default values associated with locations where A4 is default paper size Bold values followed...

Page 63: ...ym where m is in range 1 to 5 MP Tray nnnnnn Displays total printed pages from MP tray Supplies Life Item Value Description xxxx Drum Remaining nnn Displays the remaining life span of the xxxx drum as...

Page 64: ...Displays the network MAC address Network FW Version xx xx Displays the network firmware version Web Remote Version xx xx Indicates the network web page version Paper Size in Tray Item Value Descripti...

Page 65: ...Memory xx MB Fxx Displays total flash memory installed in the Ilumina and version Same as Flash Memory of Menu Map HDD if installed xx xx GB Fxx Displays size of hard disk and file system version Same...

Page 66: ...the Up arrow or Down arrow buttons repeatedly until Monochrome Page is highlighted 7 Press the Enter button and the monochrome page count is displayed 8 Press the Online button to exit menu mode and...

Page 67: ...cute Prints a list of jobs stored on the Hard Disk PS Font List Execute Prints PostScript font list PCL Font List Execute Prints PCL emulation font list IBM PPR Font List Execute Prints IBM PPR emulat...

Page 68: ...intable files Print When you select Print Set Collating Amount is displayed to enable you to specify a number of copies After specifying the number of copies press Enter to print all jobs with the spe...

Page 69: ...milar arrangement for all trays Y Dimension 5 8 11 L 11 7 A 18 148 279 L 297 A 457 mm Sets Custom paper length for Tray X Sets for the same direction as paper movement Media Type Plain Letterhead Tran...

Page 70: ...i Paper A3 Nobi A3 Wide Tabloid Extra The Ilumina detects A3 Nobi A3 Wide and Tabloid Extra sizes as the same Use this setting to tell the Ilumina which of the three sizes is loaded in Tray X Legal 14...

Page 71: ...d Extra Tabloid Letter Sht Edge Letter Long Edge L Executive Custom Com 9 Envelope Com 10 Envelope Monarch Envelope DL Envelope Landscape Postcard Double postcard C5 C4 Envelope Index Card Sets paper...

Page 72: ...Type5 User Type6 User Type7 User Type8 User Type9 User Type10 Sets the media type for MP Tray Media Weight Auto Light Medium Light Medium Medium Heavy Heavy Ultra Heavy 1 Ultra Heavy 2 Ultra Heavy 3...

Page 73: ...30 sec 60 sec If paper is not fed within this time in manual feed the job is cancelled Wait Timeout OFF 5 sec 10 sec 20 sec 30 sec 40 sec 50 sec 60 sec 90 sec 120 sec 150 sec 180 sec 210 sec 240 sec 2...

Page 74: ...vals Adjusts the position of the whole printing image 0 25 mm 0 01 interval parallel to the direction of paper movement i e vertically Print Position Adjust Duplex X Adjust 2 mm at 25 mm intervals Dur...

Page 75: ...t for a significantly white horizontal dotted line a significantly faded image or other such a problem that occurs in results printed on transparencies Decrement setting when a white horizontal dotted...

Page 76: ...ects print result variations caused by differences in temperature and humidity environment or print density or frequency This setting must be changed when print quality varies by printed result BG Set...

Page 77: ...he Enter button to select this Item 8 Press the Up arrow or Down arrow buttons repeatedly until MediaType is highlighted 9 Press the Enter button to select this Item 10 Press the Up arrow or Down arro...

Page 78: ...ton to select this Item 8 Press the Up arrow or Down arrow buttons repeatedly until Paper Size is highlighted 9 Press the Enter button to select this Item 10 Press the Up arrow or Down arrow buttons r...

Page 79: ...all 1 800 926 8393 Xant Contact Locations Xant Corporation Xant Corporation 2800 Dauphin Street Suite 100 6921 RE Duiven The Netherlands Mobile AL 36616 2400 Sales and Service Dealers Consult the stor...

Page 80: ...mal maintenance of your machine Error message interpretation solutions Parts and supplies identification Consumer relations Technical Support Representatives are not trained to provide assistance with...

Page 81: ...and 2000 and carries no issue for the September 9 1999 9999 programming concern These products when used in combination with products purchased from other manufacturers whose products properly exchang...

Page 82: ...and on the user is encouraged to try to correct the interference by one or more of the following measures Reorient or relocate the receiving antenna Increase the separation distance between the equip...

Page 83: ...Volt Models This Xant apparatus complies with the Class A limits for radio interference as specified in the IC Radio Interference Regulations European Union Council of the European Communities EUCEC E...

Page 84: ...e sure the enclosure is properly ventilated Do not use your press near water Do not spill liquid of any kind into it cord not supplied with this press or an extension cord may result in overheating Do...

Page 85: ...The provided documentation explains how to get your press serviced by qualified Xant Technicians If anything happens that indicates that your press is not working properly or has been damaged unplug...

Page 86: ...al Safety Data Sheet MSDS 58371301 for Type C7 Black Toner P N 200 100225 For more information contact Xant at 2800 Dauphin Street Suite 100 Mobile AL 36606 2400 USA 1 800 926 8393 http www xante com...

Page 87: ...s Carbon Black 3 10 IARC Group 2B Possible Carcinogen CAS 1333 86 4 OSHA PEL 3 5 mg m3 ACGIH TLV 3 5 mg m3 LD50 Not available LC50 Not available Styrene Acrylate Copolymer 80 95 CAS Confidential OSHA...

Page 88: ...n Hazard Data Minimal fire hazard Large quantities may cause risk of dust explosion Flash Point Method Used Not applicable Flammable Limits Lower Explosive Limit Not applicable Upper Explosive Limit N...

Page 89: ...given to chemicals for which there is inadequate human evidence but sufficient animal evidence on which to base an opinion of carcinogenicity The classification is based upon the development of lung...

Page 90: ...oves and safety goggles during cleanup Engineering Controls Ventilation Outside of normal ventilation not normally required Other Protective Equipment and or Hygienic Practices None Spill Cleanup Smal...

Page 91: ...ion Special Shipping Information Non hazardous UN Number None Hazards Class None User s Responsibility This bulletin cannot cover all possible situations which the user may experience when using this...

Page 92: ...tion Toner Inhaled Remove person to fresh air If necessary seek medical Remove person to fresh air Seek medical attention Toner Gets in the Eyes Flush eyes with large quantities of cool water for 15 m...

Page 93: ...ssure Not available Vapor Density Air 1 Not available Evaporation Rate Butyl Acetate 1 Not available Specific Gravity H2O 1 About 1 2 at 20 C 68 F Solubility in Water Negligible Solubility in Solvents...

Page 94: ...erved in 92 of the rats in the high concentration 16 mg m3 exposure group A minimal to mild degree of lung fibrosis was observed in 22 of the rats in the middle 4 mg m3 exposure group No pulmonary cha...

Page 95: ...inhalation of fine dust Large Spills 1 Remove sources of ignition and keep unnecessary and unprotected personnel away from area 2 Wear protective gear dust respirator mask leather gloves safety goggle...

Page 96: ...It is your responsibility to use this information to develop appropriate work practice guidelines and employee instructional programs for your operation Preparation Date of MSDS Date May 1 2005 Prepar...

Page 97: ...ical attention Small amounts of toner on skin or clothing can easily be removed with soap and cold water Hot water makes toner harder to remove Ingredients Styrene acrylate copolymer 80 95 CAS Confide...

Page 98: ...sion Hazard Data Minimal fire hazard Large quantities may cause risk of dust explosion Flash Point Method Used Not applicable Flammable Limits Lower Explosive Limit Not applicable Upper Explosive Limi...

Page 99: ...ted OSHA No components are listed Reproductive Toxicity Not available Teratogenicity Not available Mutagenicity Not available Name of Toxicoligically Synergistic Products Not available Reactivity Data...

Page 100: ...of material into natural waters and sewers Follow appropriate federal state and local regulations Small amounts can be incinerated Careful Combustion can create harmful gases such as carbon monoxide...

Page 101: ...ation 2800 Dauphin Street Suite 100 Mobile AL 36606 2400 Tel 251 473 6502 Fax 251 473 6503 www xante com Material Safety Data Sheet MSDS 58371001 for Type C7 Yellow Toner P N 200 100224 For more infor...

Page 102: ...80 95 CAS Confidential OSHA PEL Not listed ACGIH TLV Not listed LD50 Not Available LC50 Not Available Wax 5 15 CAS Confidential OSHA PEL Not listed ACGIH TLV Not listed LD50 Not Available LC50 Not Ava...

Page 103: ...ical Impact Not available Sensitivity to Static Discharge Not available Extinguishing Media Water foam or dry chemical Special Fire Fighting Procedures Fight fire from upwind position Avoid inhalation...

Page 104: ...sition or Byproducts Combustion products include carbon monoxide and carbon dioxide Incompatibility Avoid exposure to strong oxidizers Preventive Measures Personal Protective Equipment Respiratory Pro...

Page 105: ...p away from excessive heat sparks and open flames Precautions for Storage Keep out of reach of children Keep container closed Store at room temperature Keep away from strong oxidizers Other Precaution...

Page 106: ...m 2005 Xant Corporation Other brands and product names are trademarks or registered trademarks of their respective holders 2800 Dauphin Street Suite 100 Mobile AL 36606 2400 USA Inbound and Outbound c...

Reviews: