background image

RM200QC User Manual 


26


3.


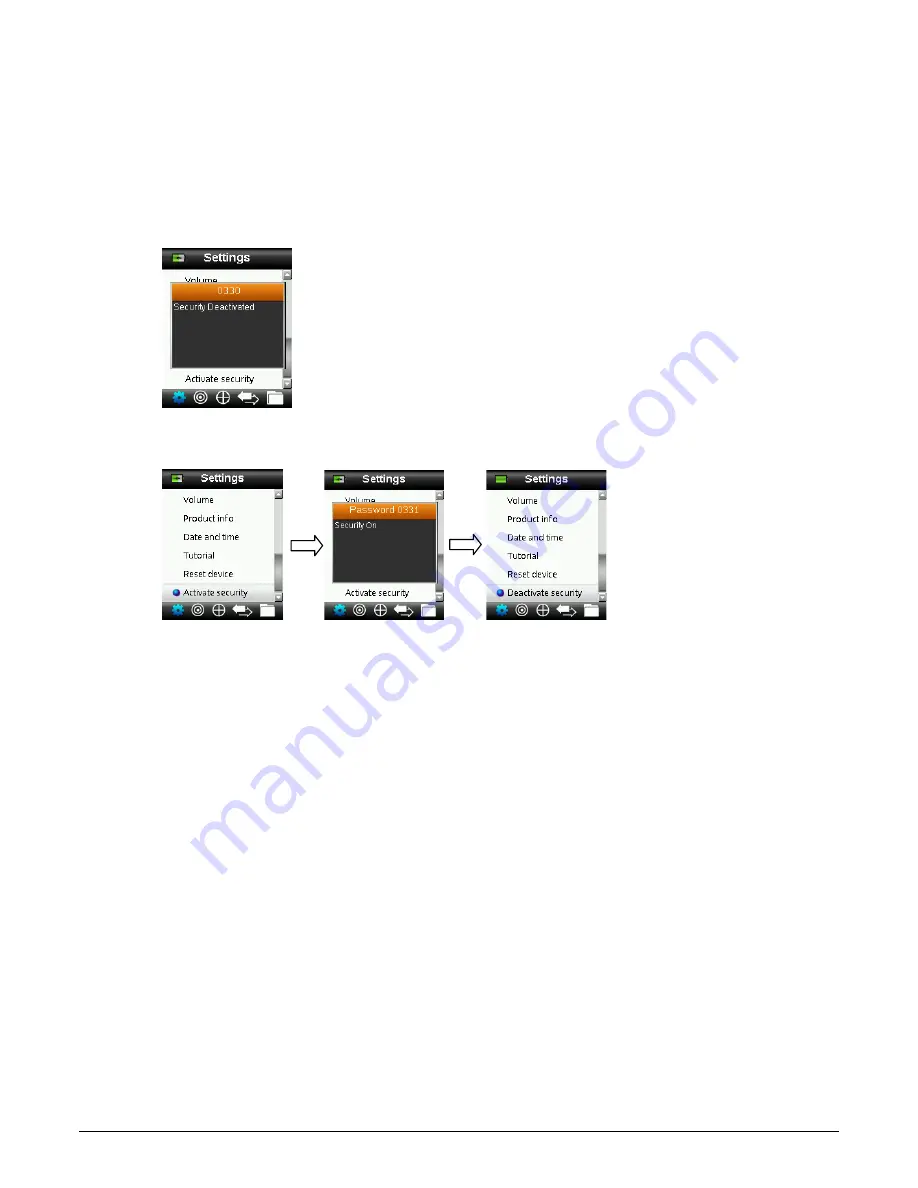
Enter the password (default is 999) with the virtual keyboard using the Navigation control 
and Enter button.  

4.


When finished, highlight OK on the virtual keyboard and press the Enter button. If the 
password you entered is correct the “Security Deactivated” message will display. The device 
is now unlocked, and standards and settings can now be modified. The device will stay in 
this state until you activate security. 


5.


To reactivate security, press the Enter button on the highlighted menu item “Activate 
Security”, your device is now locked. 


Summary of Contents for RM200QC

Page 1: ...RM200QC User Manual...

Page 2: ...he recycling of such equipment CE Declaration Hereby X Rite Incorporated declares that this RM200 Series is in compliance with the essential requirements and other relevant provisions of Directive s 2...

Page 3: ...ents or modifications to the warranted goods that are not manufactured distributed or approved by X Rite Consumable parts and Product cleaning are also not covered by the warranty X Rite s sole and ex...

Page 4: ...or part is strictly prohibited Publication of this information does not imply any rights to reproduce or use this manual for any purpose other than installing operating or maintaining this instrument...

Page 5: ...Recertification 17 Operation 18 Settings Menu 18 Language 18 USB Report Mode 18 Calibrate 20 Aperture 20 Display Options 21 Measurement Setup 21 Tolerance 22 Volume 23 Product Info 23 Date and Time 2...

Page 6: ...on control Navigates the on screen menus and function bar in four directions Pressing on the left side moves the focus to the next available item to the left Pressing on the right side moves the focus...

Page 7: ...on screen are for guidance only verify with samples for visual accuracy or use Delta E for color difference comparison Variables that may affect the results given by the instrument include Obstructio...

Page 8: ...er to the Initial Startup section on the following page for first time operation Note Some computers have low power USB ports which are typically located at the front It is recommended that RM200QC is...

Page 9: ...g the Enter button Make sure to always position the white reference slider over the optics when powering down the instrument You will need to press the Power button to turn on the instrument when this...

Page 10: ...control takes you back one screen 2 After the last Tutorial screen appears the calibration screen appears Instrument Calibration 1 Perform a calibration as described on the screen For additional info...

Page 11: ...ct from a list or measure a new standard Perform Color QC sample measurements Perform Color Compare and Opacity measurements View and delete saved sample records Press Enter tag highlighted Press Navi...

Page 12: ...ogress bar appears at the bottom of the display to indicate the measurement status 4 It is important that the instrument is held steady for the duration of the measurement Sample information appears i...

Page 13: ...the Settings menu Navigating the Screens Many secondary screens contain the words Back Select and Exit at the bottom This refers to actions that take place when using the Navigation control and Enter...

Page 14: ...RM200QC User Manual 14 Screens that contain images of arrows indicate that the Up and Down sides of the Navigation control are used to adjust or page through options standards etc...

Page 15: ...rks best on samples that are dry and opaque Samples can be oriented horizontally on a table top vertically or at an angle To obtain a good measurement make sure the instrument is flat against the samp...

Page 16: ...ence slider that protects the white reference when not in use 1 When displayed to do so move the white reference slider to the closed calibration position over the optics 2 Press Measure to initiate t...

Page 17: ...r recertification is due a warning message will be displayed on the screen Your device is due recertification in XX days This message will automatically close after 3 seconds or if a button is pressed...

Page 18: ...s the Enter button to select the option Refer below for an explanation of each option Language The language option allows you to select the languages that the instrument operates in This screen also a...

Page 19: ...rt Mode Active window The device will now be recognized on your computer as a removable disk RM200QC If this is the first time you have plugged in your device running in the USB Report mode the new de...

Page 20: ...plug the USB cable from the device to exit from the USB Report Mode Calibrate The calibration option allows you to manually initiate a calibration Refer to the Calibration section earlier in this manu...

Page 21: ...Press the Enter Select button to activate green or deactivate red the option 3 When finished press the right side of the Navigation control Save to go to the Settings window Measurement Setup The mea...

Page 22: ...des of the Navigation control and then press the Enter Edit button 5 Press the up and down sides of the Navigation control to set the limit value between 0 8 to 10 0 E the lowest value of 0 8 is appli...

Page 23: ...of the Navigation control to set the desired volume level 4 Press the Enter Select button to save the volume level and return to the Volume window or 5 Set the other volume level or press the right s...

Page 24: ...ss the up and down sides of the Navigation control to set the attribute 3 Continue with additional attributes until complete 4 Press the Enter button to save your settings and return to the Settings w...

Page 25: ...ontrol 2 Press the Enter button You are asked to confirm that you want to reset the device 3 Highlighting Yes on the screen and press the Enter button The instrument is now reset and all stored standa...

Page 26: ...yboard and press the Enter button If the password you entered is correct the Security Deactivated message will display The device is now unlocked and standards and settings can now be modified The dev...

Page 27: ...dard screen If your device has security enabled you will be prompted to enter the password 999 to unlock Refer to the Security Settings section of this manual for further information 4 Make sure the w...

Page 28: ...e with additional measurements to obtain an average value if standard averaging is activated in the Settings default setting is 3 8 To enter a name for the standard use the up or down sides of the Nav...

Page 29: ...tandard screen Editing a Standard 1 From the Standards screen use the up or down sides of the Navigation control to select the standard to edit 2 Press the left side of the Navigation control Edit to...

Page 30: ...Manual 30 5 Use the up and down side of the Navigation control to select Yes and then press the Enter Select button to save changes 6 Press the right side of the Navigation control Exit back to the St...

Page 31: ...n are selected Selected standards are indicated by the star Up to 20 standards can be selected The instrument will automatically select the closest standard to use during Color QC sample measurements...

Page 32: ...h additional measurements to obtain an average value if sample averaging is activated in the Settings After the measurement a simulated color patch of the sample appears along with the Pass Fail indic...

Page 33: ...tag can be saved with each sample measurement RM200QC can store a maximum of 350 sample measurements which are stored in date time order When the limit of 350 stored records is reached the oldest reco...

Page 34: ...the voice tag you just recorded select Clear voice tag from the list and press the Enter button 3 Text Tag To add a text tag to the current sample select Edit text tag from the list and press Enter Ad...

Page 35: ...Opacity Check displays the percent opacity of a drawn down sample on an opacity card 1 Select the Quick Check icon in the function bar by pressing on the right side of the Navigation control 2 Use the...

Page 36: ...ue with additional sample measurements if averaging is used After the measurement s a simulated color patch of the sample appears along with the Pass Fail indication The sample below would indicate th...

Page 37: ...rtion of the opacity card Take the measurement If you do not want to use the last measurement taken press the left side of the Navigation control to clear Reset the measurement 4 Continue with additio...

Page 38: ...control 3 Samples are stored under the standard that was used for measurement Select the desired standard and press the Enter button to view stored sample measurements 4 To view more details on a samp...

Page 39: ...ed to the selected standard 1 Press the up and down sides of the Navigation control to highlight the desired standard and press the Enter button 2 Press the up and down sides of the Navigation control...

Page 40: ...ides or back Place sample on a white background Instrument requests a Recalibrate Recalibrate the instrument using the Calibrate function in the Settings menu Reference slider not closed continually d...

Page 41: ...dust and dirt for the highest level of accuracy Cleaning the Optics The optics are recessed and therefore protected from dirt during normal usage However if the optics do require cleaning follow the...

Page 42: ...housing and turn 45 clockwise to lock into place Cleaning the Calibration Reference The calibration tile is imbedded in the underside of the white reference slider 1 Opening reference slider to a half...

Page 43: ...tegory II FAQs 1 How many standards and samples does the instrument store 20 standards and 350 samples 2 How do I clean the instrument Please see the instructions in the Cleaning section 3 What should...

Page 44: ...homogeneous material of the part is below the threshold GB T 26572 standards X GB T 26572 Indicates the concentration of hazardous substance in at least one homogeneous material of the part is above t...

Page 45: ...dquarters X Rite Europe GmbH Althardstrasse 70 8105 Regensdorf Switzerland Phone 41 44 842 24 00 Fax 41 44 842 22 22 Asia Pacific Headquarters X Rite Asia Pacific Limited Suite 2801 28th Floor AXA Tow...

Reviews: