iCPlate2
34
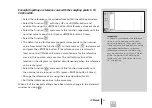
Example: Measuring a plate characteristic curve with the sample
points 5, 10, 30, 60 and 90 (45° reference curve):
• Select the function with the <UP> or <DOWN> button and
execute this using the <ENTER> button. All reference values are
reset. The nominal value 5% and the reference value 5% are shown.
• Measure the 5% patch. The measured value is shown at the top
edge of the Y axis and the 5% reference value is shown below it.
The nominal value of 0% and the reference value of 0% are
shown for the next patch.
• Measure the 0% patch. The measured value is shown at the top
edge of the Y axis and the 0% reference value is shown below it.
The nominal value of 30% and the reference value of 30% are
shown for the next patch.
• Should you have measured the 20% patch instead of the 0%
patch, put the measurement cursor back by one patch by selecting
the function with the <UP> or <DOWN> button and then
pressing the <ENTER> button. The nominal value, reference value
and current measurement value will be put back accordingly.
• Measure the 30%, 60% and 90% patch in the same way. No
new nominal value will be shown now. The curve can then be
transferred to the host PC by selecting the icon and pressing
the <ENTER> button.
iCPlate2
3•Operation
3
Summary of Contents for iCPlate2
Page 1: ...iCPlate2 EN iCPlate2 Plate Measuring Device User Guide Edition 2 1 ...
Page 2: ......
Page 6: ......
Page 12: ......
Page 14: ......
Page 38: ...iCPlate2 38 ...

