


Appendix: How To Scan a Bar Code
The Wi-Fi RF Terminal is available with an optional internal laser bar code scanner. This section will
include information on different scanners as well as how to use each one. You can use this information to
compare the built-in scanner with other types of bar code scanners that are also available from Worth Data.
Laser Scanners
If you are using a laser scanner, technique is not critical. The scanners are “point-and-shoot”; you can’t
miss. Upon triggering the beam, the laser scans the bar code multiple times (100 scans per second) until it
has a good read, at which point it automatically shuts off. These scanners are more expensive, but virtually
foolproof. They read from a distance, so they are much more convenient for distance shelf scanning or
scanning in tight spots. Different laser scanners have different distance capabilities.
Table M-1
shows the
comparison of all the laser scanners available from Worth Data.
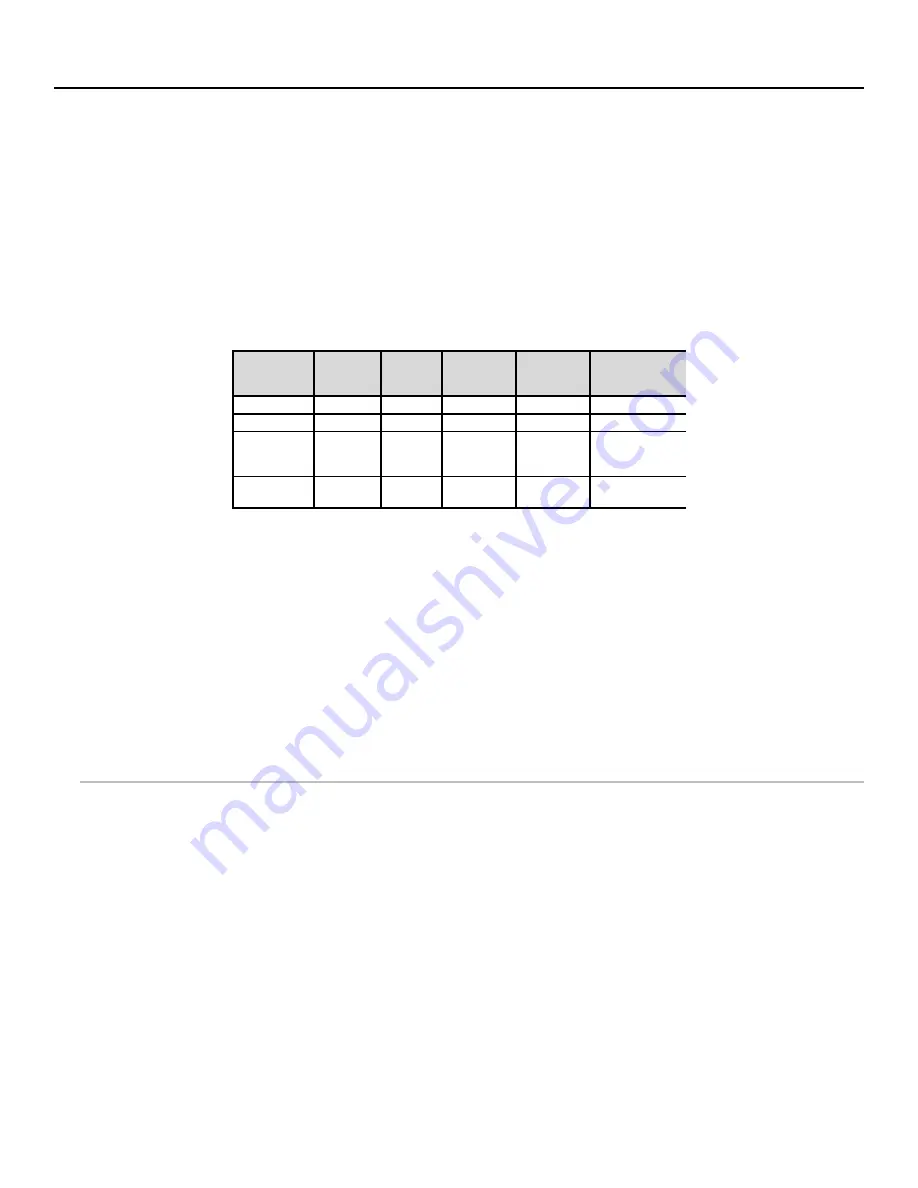
Table M-1. Scanner Comparison
Chart
6 mil = high density 40 mil = low
density 100 mil = very low density (with
paper and retro-reflective label stock)
To scan a bar code
using your laser
scanner, (whether it be a handheld or integrated)
•
put your RF Terminal in One-Way mode with the host computer program not running; or even unplug the
serial cable,
•
point the laser scanner at the bar code at about 6” away.
•
Pull the trigger (or push the button on an integrated model) and line up the beam on the bar code. If you
don’t get a read, vary the distance of the scanner from the bar code by pulling up or moving down. The
idea is to scan through the center of the bar code.
Laser Options
Several options are applicable to all laser scanners that are used with the RF Terminal. These options are: 1)
Longer timeout on the laser reading, and 2) Double decode required.
Longer Laser Reading
:
A temporary solution to problem bar codes is sometimes to increase the length of the
time the scanner attempts to read, from the default 2-second beam to a 4-second beam.
Double Decode:
The default setting for the RF Terminal is one successful decode results in a “good read”. If
you are getting incorrect reads, (due to defective bar codes), a temporary solution is to turn on make the RF
Terminal perform two straight identical decodes before beeping, outputting data, and completing a “good
read” read.
There are two
Setup Options
that do not apply to the LZ160. The two options are:
•
“
Aiming Laser Dot
” for a predetermined time before the laser beam expands into a “line” for reading.
132
Scanner
Hi Density
Code 39
UPC
100%
40 mil
Code 39
Paper
100 mil
Code39
Retro-Reflective
100 mil Code
39
LZ160 Laser
0.5” – 4”
0.5 - 7”
1” – 12”
na
20” – 40”
LZ400 Laser
0.5” – 9”
0 – 17”
3” – 44”
9” – 50”
18” – 9.5 ft.
Integrated
Laser in
Terminal
1'" – 7"
0 – 10"
4" – 29"
10" – 32"
18" – 6.5 ft.
PSC Long
Range
7” – 11”
7” - 31”
11” – 9 ft.
24” – 15 ft.
48” – 17 ft.


