background image

Air Brush Kit

AFTER SALES SUPPORT

e-mail: [email protected]

1800 909 909

MODEL: №. 

TG212  •  07/2016  •  53633

(toll free)

AFTER SALES SUPPORT

(toll free)

Air Brush Kit

e-mail: [email protected]

1800 909 909

MODEL: №. 

TG212  •  07/2016  •  53633

15

•   Acrylic paints cannot be dissolved in water and therefore should only be 

used for more permanent applications and when the user is familiar with 
the Air Brush Kit.

   NOTE:

 Care must be taken when using acrylic paints, as solvents will be 

required for cleaning.

Preparing the Air Brush Gun

This air brush kit contains 2 x paint vessels for use with the air brush gun 
(15), and is fitted with a general purpose nozzle of 0.35mm.
a) 20cc Glass paint jar (12)
b) 5cc Metal paint cup (14)

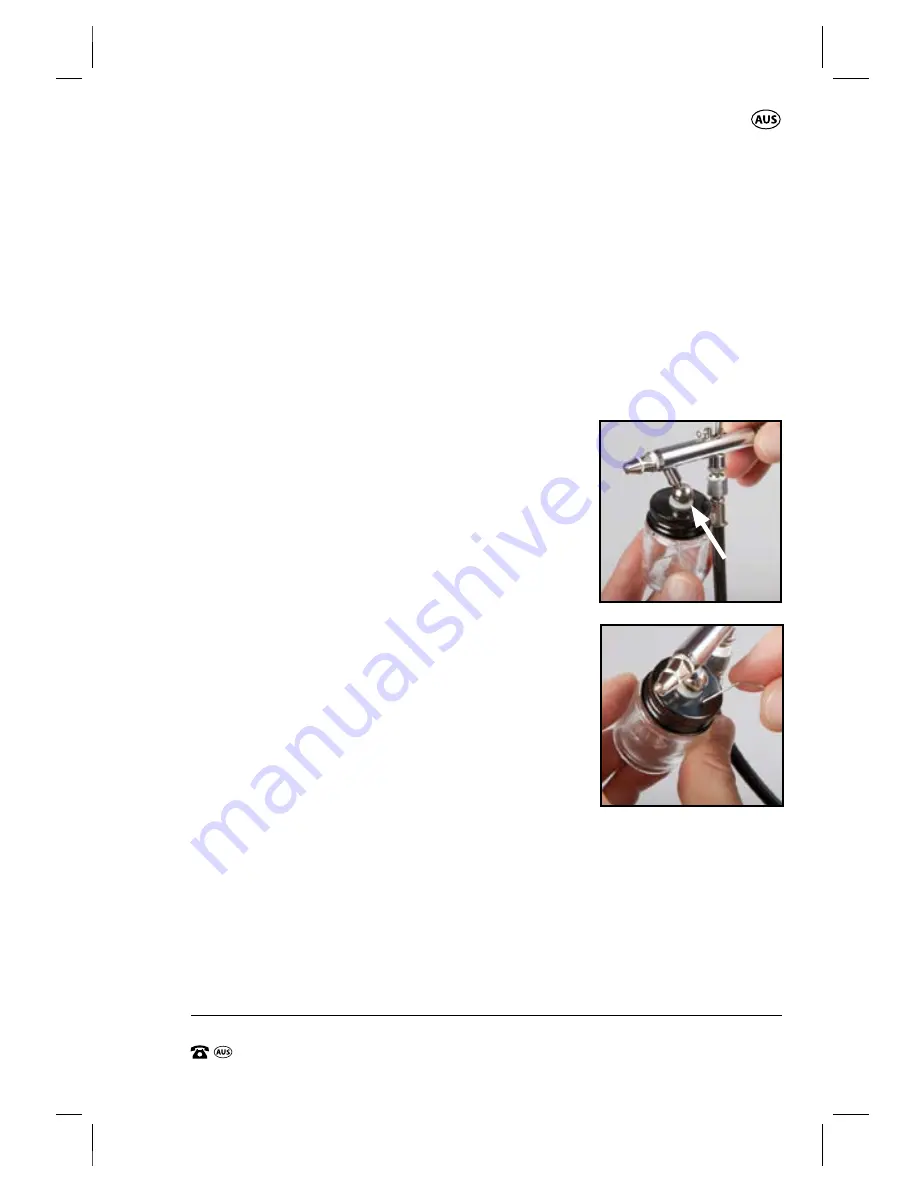
Installing the 20cc Glass jar (12): 

1.   When using the 20cc glass paint jar (12), push 

it up into the paint inlet connection (21) tightly 
until it is secure (Fig J).  The glass paint jar is held 
in position by pressure / friction.

    NOTE:

  The 20cc glass paint jar (12) has a vent 

hole (13) to allow air to enter the glass jar which 
enables fluid to flow into the air brush gun.  
Ensure it is clean and not blocked (Fig K).

2.   Open the lid of the glass paint jar and fill with 

the selected paint after thinning appropriately 
according to the paint manufacturer guidelines. 
Be careful not to overfill.

Installing the 5CC metal paint cup (14):

1.   When using the 5cc metal paint cup (14), push it up into the paint inlet 

connection (24) tightly until it is secure (Fig L). The 5cc metal paint cup 
(14) is held in position by pressure / friction.

2.   Fill the metal cup (10) with the selected paint after thinning appropriately 

according to the paint manufacturer guidelines.  Be careful not to overfill.


 NOTE: 

The 5cc metal paint cup (14) has no top so care must be taken not 

to spill the paint from the metal cup both during use and also filling. 

J.

K.

Summary of Contents for 53633

Page 1: ...AIR BRUSH KIT www powertoolsupport com Read all safety warnings and all instructions thoroughly before operating this product Ensure you keep your manual in a safe place for future reference IM ed11 07 2016 Product Info ...

Page 2: ... website or contact details for example Advantage You are not required to manually enter a website address or contact details How it works To scan the QR code all you need is a smartphone with QR codes reader software and an Internet connection This type of software can be downloaded for free from your smartphone s app store Try it out now Just scan the QR code with your smartphone and find out mo...

Page 3: ...h Gun for use 14 Preparation Mixing andThinning paint 14 RecommendedTypes of Paints to Use 14 Preparing the Air brush gun 15 Operating the Air Brush Gun 16 Paint Flow Adjustment Screw 17 Tips for Operation 18 Cleaning the Air brush gun 19 Cleaning Replacing the Air Intake Filter 20 Draining theWaterTrap 22 Cleaning the Compressor 23 Maintenance 23 Storage 24 Environmental protection 24 Warranty 24...

Page 4: ...t has been rectified Failure to do so could result in serious personal injury Intended use of the Air Brush Kit NOTE This product is for private domestic DIY use only It is not suitable for commercial industrial or trade use This Air Brush Kit is ideal for intricate painting and craft tasks including modelling figurines murals automotive touch ups cake decorating nail art and various hobby arts Co...

Page 5: ... on its use Conforms to relevant standards for electrical safety and electromagnetic compatibility Wear breathing protection Wear eye protection Read the instruction manual Hearing protection must be worn Risk of high temperature Do not open cock before air hose is attached Caution risk of electrical shock Electrical waste products should not be disposed of with household waste ...

Page 6: ...vite accidents Rags cloths cord string and similar items should never be left around the work area b Do not operate power tools in explosive environments such as in the presence of flammable liquids gases or dust Power tools create sparks which may ignite the dust or fumes c Keep children and bystanders away while operating a power tool Distractions can cause the operator to lose control 2 Electri...

Page 7: ...ersonal protective equipment Always wear eye protection Protective equipment such as dust mask non skid safety shoes hard hat or hearing protection will reduce personal injures c Prevent unintentional starting Ensure the switch is in the off position before connecting to power source and or battery pack picking up or carrying the tool Carrying power tools with your finger on the switch or energisi...

Page 8: ...rs e Maintain power tools with care Check for misalignment or binding of moving parts breakage of parts and any other condition that may affect the power tool s operation If damaged have the power tool repaired before use Many accidents are caused by poorly maintained power tools f Keep cutting tools sharp and clean Properly maintained cutting tools with sharp cutting edges are less likely to bind...

Page 9: ... that they can use the appliance safely Young children should be supervision to ensure that they do not play with play with the appliance This compressor is rated at 150W S3 20 WARNING Please ensure that you read understand and apply all the SAFETYWARNINGS in this user guide WARNING Wear protective breathing equipment Paint mist and solvent vapors are damaging to health Always wear protective brea...

Page 10: ... If the compressor overloads or overheats turn the power OFF and wait until it cools before resuming any work Keep flammable sprays and liquids away from the compressor Do not allow the Compressor to become wet Keep the compressor clean and dry and free from moisture If the Compressor is making abnormal sounds or its temperature if quite high turn off the power straight away and let it cool for at...

Page 11: ...21ºC Always ensure there is adequate ventilation when spraying Eye protection is recommended to keep hazardous vapours and liquids out of eyes Always wear a face mask when spraying Always read the paint manufacturers thinning instructions before using Always keep the spray nozzle in place during use Never allow the spray to come in direct contact with the skin Never immerse the airbrush in liquid ...

Page 12: ...ir inlet filter 9 Drain release valve 10 1 8m Braided air hose 11 Spanner 12 20cc Glass paint jar 13 20cc Glass jar vent hole 14 5cc Metal paint cup 15 Air Brush Gun 16 Protective cap 17 Paint outlet 18 Air cap 19 Air cap body nozzle 20 Needle 21 Paint inlet connection 22 Paint flow adjustment screw 23 Trigger 24 1 8 BSP braided air hose female air inlet fitting connection hose to air brush gun 25...

Page 13: ...AFTER SALES SUPPORT toll free Air Brush Kit e mail help powertoolsupport com 1800 909 909 MODEL TG212 07 2016 53633 11 9 3 6 7 5 13 15 12 14 16 29 11 10 28 1 4 2 8 28 ...

Page 14: ...o the air brush inlet fitting 24 Align the thread and screw in a clockwise direction finger tight until firm Fig B 3 Make sure the on off switch 1 is in the OFF as indicated by an O on the on off switch Fig C 4 Plug the power cord 2 into a mains socket Fig D 5 Turn the on off switch 1 on the compressor to the ON position as indicated by an I on the on off switch Fig E NOTE The compressor automatic...

Page 15: ...the mains supply turn on the compressor by pressing the section marked I on the On off switch 1 Fig E The compressor will start and run for a short period of time i e 3 5 seconds 2 Lift the air pressure adjustment knob 5 on the air outlet regulator 29 upward Fig F 3 Depress the trigger 23 on the air brush gun 15 but do NOT pull backward to engage the paint discharge Fig G C B A D E Tighten Tighten...

Page 16: ...MPORTANT The air brush gun cannot be used with materials containing abrasive substances glazes caustic or alkaline substances NOTE For the best results surface preparation and paint thinning are the two most important areas Ensure all surfaces are free of dust dirt and grease when undertaking this task NOTE Follow the manufacturers guide for thinning and mixing ratios which should be labelled on t...

Page 17: ...g J The glass paint jar is held in position by pressure friction NOTE The 20cc glass paint jar 12 has a vent hole 13 to allow air to enter the glass jar which enables fluid to flow into the air brush gun Ensure it is clean and not blocked Fig K 2 Open the lid of the glass paint jar and fill with the selected paint after thinning appropriately according to the paint manufacturer guidelines Be caref...

Page 18: ...rds the front If the air brush is in use in a horizontal position the metal cup is probably best to be rotated to the right or left as far as possible Operating the Air Brush Gun 1 Remove the protective cap 16 from the air brush gun Fig M 2 Turn the on off switch 1 on the compressor to the ON position as indicated by an I refer previous Fig E ensuring the pressure gauge regulator 6 has been set to...

Page 19: ...aint through the nozzle 1 To set the paint flow adjustment screw 22 turn it until the threaded section of the paint flow adjustment screw 22 makes contact with the trigger 23 Fig R As you continue to turn the adjustment screw 22 the trigger 23 is now also moving into the area of distributing paint The further the adjustment screw 22 is turned the more paint can pass through the nozzle NOTE The pai...

Page 20: ...e has been used before there may be a dried build up of the colour liquid in the air brush causing a blockage Before you spray directly onto your work piece it s a good idea to practice on paper first or something similar to what you will be painting with a similar surface To begin spraying hold the air brush in your hand like a pen with either your index finger or thumb resting on the air brush t...

Page 21: ... air brush gun as soon as you have finished spraying as some paints used with the equipment will dry very quickly It is also recommended to clean the air brush gun in between use of different colours which can be done with water or solvents 1 Remove all remaining paint from the glass jar metal cup 12 14 by depressing the air brush trigger 23 and expelling the remaining paint into an old cloth or s...

Page 22: ...needle 20 is extremely sharp and should be handled with care to prevent injury 6 Replace the needle cover 26 ensuring the fitting is screwed on finger tight 7 Flush water through the airbrush to remove any airbrush cleaner residue Cleaning Replacing the Air Intake Filter The function of the compressor is to draw ambient air from the atmosphere into the compressor where it is compressed and then di...

Page 23: ...dry 4 If the filter is damaged or clogged with dirt etc the filter should be replaced 5 Replace the cleaned or new filter into the housing of the compressor Fig AA and press fit the air inlet filter cover back into the compressor housing over the air filter WARNING DO NOT operate the compressor without a filter in place NOTE Replacement air filters are available for purchase by calling us on 1800 ...

Page 24: ...in the reservoir is a normal activity of a compressor To drain the water trap follow these steps 1 Check the water level in the reservoir Fig AB and if there is ANY pooling of water in the bottom of the reservoir depress the drain release valve 9 at the base of the reservoir Fig AC A flat bladed screw driver is suitable for this application The small valve can be lifted by the small clip on the va...

Page 25: ...check all parts before reassembly Maintenance WARNING It is dangerous to use the compressor if it is damaged If the compressor is damaged behaving abnormally or making strange noises call our Customer Service on 1800 909 909 or email help powertoolsupport com for advice on repair before resuming normal operations Maintenance and servicing of your air brush compressor should only be performed by on...

Page 26: ...ld be sorted taken to the local recycling centre and disposed of in an Environmentally safe way Warranty Your new Workzone Air Brush Kit will more than satisfy your expectations It has been manufactured under stringent Workzone Quality Standards to meet superior performance criteria You will find your new Air Brush Kit easy and safe to operate and with proper care it will give you many years of de...

Page 27: ...th the operation of your product please take it with a copy of your receipt to one of our National Service Agents for repair You can also find our most updated listing by visiting powertoolsupport com and clicking on the Service Agent link Alternately call us on our Customer Support line 1800 909 909 for advice or support Accessories When servicing use only identical replacement parts Use of any o...

Page 28: ...ower socket Take the compressor to one of our qualified Service Agents for review repair Turn Off the compressor at the mains switch remove the plug and Allow the motor to cool for 15 minutes Adjust the regulator 3 turns in a clockwise direction to increase pressure and depress the air brush trigger Release air pressure by operating the air brush Motor makes strange noises Loose or damaged bearing...

Page 29: ...lowable Working Pressure 4 Bar Power Cord length 1 5m 100mm Weight 3 5kg Product Dimensions 255mm L x 135mm W x 205mm H Braided Air Hose Connections 1 8 BSP female Length 1 8m Diameter 7 x 4mm Air Brush Gun FeedType Siphon Nozzle Diameter 0 35mm Working Pressure 15 50 PSI Control Double action This product complies with EMC EN 55014 1 2006 A1 2009 A2 2011 EN 55014 2 1997 A1 2001 A2 2008 EN 61000 3...

Page 30: ...not entirely satisfied with this product please return it to your nearest ALDI store within 60 days from the date of purchase for a full refund or replacement or take advantage of our after sales support by calling the supplier s Customer Service Hotline Made in China Workzone is a registered trademark of ALDI Stores DISTRIBUTED BY ALDI STORES 1 SARGENTS ROAD MINCHINBURY NSW 2770 www aldi com au ...

Reviews: