LUMINOUS™ 570 SERIES LED LIGHT BAR - PAGE 5
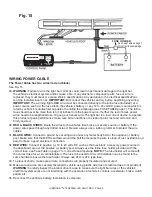
WIRING POWER CABLE
The Power Cable has two wires (red and black)
See Fig. 15.
29. WARNING: Failure to wire the light bar correctly could result in permanent damage to the light bar,
the vehicle’s electrical system and/or cause a fire. If any electronic component parts, fuse or wire is
replaced, they must meet or exceed Wolo’s specifications. Any deviation to the electrical specifications
is at the installers/user’s risk. IMPORTANT: Disconnect the vehicles battery before beginning any wiring.
IMPORTANT: The warning lights RED wire must be connected directly to the inline fuse (included) at a
power source such as; the fuse block, the vehicle’s battery, or any 12 to 24 volt DC power source which is
rated by vehicle’s manufacturer capable of handling the amperage (see FUSE TABLE page 7). The inline
fuse should never be more than ten (10) inches from the power source. If either the red or black power
wires need to be lengthened use 18 gauge or heaver wire. The light bar is a low current device, to operate
this product at peak performance make sure all connections are clean of paint, rust and corrosion and
firmly secured.
30. RED & BLACK WIRES: Route the wires to the vehicles fuse block, accessory source or battery. If the
power wires pass through any drilled holes or firewall, always use a rubber grommet to protect the wire
cables.
31. BLACK WIRE: Connect to ground by securing wire under any metal body bolt or the negative (-) battery
post. Make sure that the METAL surface around the bolt that secures the wire is clean of rust, oxidation and
paint to make a good electrical connection.
32. RED WIRE: Connect to positive (+) 12 to 24 volts DC such as the fuse block, accessory power source in
the dashboard area or the positive (+) battery post. Always use the inline fuse holder provided with the
correct fuse, see Fuse Table on page 7 for correct fuse amperage. NOTE: The fuse holder will come with
the correct fuse for a 12-volt installation. The fuse to be used for 24-volt installation can be found in the
same hardware box as the fuse holder. Always use ATO or ATC type fuse.
33. To prevent shorts, make sure all wire connections are properly insulated and secured.
34. Make sure all wires are securely fastened to vehicle using plastic wire ties or electrical tape (not provided).
WARNING: Carefully inspect the interior driver’s area to make sure the light bar wires or the vehicle’s
electrical system wires are not interfering with the operation of vehicle’s controls; accelerator, brake, clutch
pedals etc.
35. Reconnect the vehicle’s battery. Installation is complete.
F/S
L/A R/A
LOW
M
FLASH PATTERN
LIGHT
PATTERN
LUMINOUS
By
WOLO
®
TM
Fig. 15
FUSE HOLDER
See Fuse Table on page 7
for correct fuse amperage.

