background image

12

Power over Ethernet (PoE)

The LAN port

of the EYE-12 includes Power over Ethernet (PoE) functionality. The necessary power 

will be provided through the Ethernet cable, this way a separate power line and adapter can be saved. The 
EYE-12  is  compatible  with  PoE  power  injectors  or  PoE  switches  according  to  the 
IEEE 802.3af -2003 industry standard.
The PoE adapter used must meet the IEEE 802.3af-2003 industry standard. Adapters not meeting this 
standard are not compatible with this unit and may have damaging effects!  
Power Classification: "High power Class 0 (0.44 to 12.95W)".
More information on PoE-adapters at 

www.wolfvision.com 

(Products / Accessories)


(#9)


USB Port

The USB device port

can be used for direct connections between the Visualizer and a computer. This 

way, a Visualizer can be controlled and can be used as a scanner for 3-dimensional objects. Images in JPG, 
TIF or BMP format can be taken in a fraction of a second - much faster than with a desktop scanner.
The software vSolution Link by WolfVision works under Windows XP, Vista, 7 and 8 (32 and 64-bit) as well as 
Apple Macintosh. It is fully TWAIN/WIA compatible. This is important when using Visualizers in connection 
with  graphic  programs  such  as  Photoshop,  or  for  connecting  them  to  Interactive Whiteboards (Smart 
Boards). The fast USB 2.0 port can also output live motion. The software vSolution Link can store AVI files 
and includes a video capture driver. You can view and save the live image from the Visualizer on your 
computer in almost every modern video editing software.
Please  download  the  latest  version  of  the  software  vSolution  Link  by  WolfVision  from: 


(#7)


www.wolfvision.com


(Support)

Pictures which are stored with the software vSolution Link includes EXIF data, if file format JPG or TIFF is 
used. Included data are:

Manufacturer = WolfVision
Visualizer model (inclusive serial number)  = e.g. EYE-12 (00103701)
Firmware version = e.g. V3.10b
Date and time of create = e.g. 2013-12-01 11:06:29 (yyyy-mm-dd hh:mm:ss)

Ethernet / LAN Port 

10BASE-T/100Base-TX

The LAN port 

(#9)

 makes the Visualizer a part of the internal computer network and it can be used for 

communication over the Internet, if it is assigned an official (WAN) IP address.
Administrators of a larger number of Visualizers can use the LAN port to control, support and update all of 
their units from their local desktop PC. The list of applications for the Visualizers LAN port is constantly 
increasing.  It  can  be  used  for  controlling,  capturing  still  images,  viewing  live  video  streams,  firmware 
updates, adjustments, menu settings and maintenance purposes.
The following protocols are supported: TCP/IP, ICMP and ARP.

d internet b

 are:

/Firefox

In order to prevent unauthorized users from logging into the Visualizer over the network, it is possible to set 
administrator and user passwords. The transmission of the passwords over LAN is encrypted with Md5.
The Visualizer offers streaming of live images in UDP Multicast/Unicast and TCP Singlecast mode. 

Technical Background: UDP Multicast works like a broadcast - many clients are watching the same video 
stream.  In  Multicast  mode  the  bandwidth  is  always  the  same,  no  matter  how  many  computers  are 
connected. However as many routers do not support Multicast, UDP Unicast can be used instead for point-
to-point connection (one client is possible).
In TCP Singlecast mode each computer opens a separate connection to the Visualizer, which requires a lot 
of bandwidth if many clients are connected (max. 128 connections).


Supporte  

rowsers

 Internet Explorer, Netscape Navigator and Mozilla

.

By default, DHCP is activated to receive all network settings automatically.
Possible image transfer resolution up to SXGA- (1280x960).

Please  check  the  separate  description  of  "Built-In  WebServer"  on  our  internet  homepage  at: 

www.wolfvision.com


(Support)

For full functionality JAVA version 1.7.0 or higher is necessary.
For full functionality following ports are necessary: 50000, 50913, 50915, 50921, 8800 and 8801 (default).
Ensure that the used port and IP-address is not blocked by any firewall.
Please note, some network routers are not able to forward multicast streams.

Summary of Contents for EYE-12

Page 1: ...ENGLISH DEUTSCH BEDIENUNGSANLEITUNG BEDIENUNGSANLEITUNG INSTRUCTIONS INSTRUCTIONS Check out our Internet Homepage for additional information www wolfvision com support EYE 12 EYE 12 R...

Page 2: ...locations exposed to strong magnetic fields or electrical currents This could cause monitor image distortion or damage to the CCD camera If the unit is not used for a long time disconnect it from mai...

Page 3: ...EMC and to Directive electrical equipment Inspections tests and evaluation are according to UL60950 CSA22 22 60950 Inspections tests and evaluation are according to the CB Scheme Inspections tests an...

Page 4: ...11 5 14 8 12 10 Power on preset The power on preset is automatically activated when switching on the unit The settings are standard zoom size auto focus on auto iris on 1 Connect the power pack to th...

Page 5: ...Y Control Panel 6 Infrared Remote Control 1 21 20 16 23 22 24 27 26 18 20 28 32 25 27 17 29 26 23 22 16 21 FOCUS MEMORY FREEZE AF WHITE HELP MENU POWER TELE LASER FOCUS 1 2 3 A A 1 2 3 4 5 6 7 8 9 PRE...

Page 6: ...F is switched on see page 6 25 WHITE key Activates one push WHITE BALANCE adjustment see page 7 26 Manual IRIS keys brightness adjustment When the IRIS keys are pressed the EYE 12 switches off the aut...

Page 7: ...en menu see page 10 Digital Zoom Autofocus Auto Iris Manual Iris The EYE 12 is equipped with an auto iris function That means that the brightness of the camera image adjusts automatically When using t...

Page 8: ...alance should be readjusted For specialists The EYE 12 can be switched between Auto Tracking One Push and Manual white balance mode in the on screen menu see page 10 If you work with negative transpar...

Page 9: ...aptured by pressing the FREEZE key 17 When pressing the FREEZE key for 2 seconds preset 1 will be recalled see page 6 Split image of 9 picture memory Picking up a complete vertical portrait document o...

Page 10: ...EYE 12 see page 10 In order to achieve the best picture quality you must set the outputs of the EYE 12 to match the native resolution of your display unit e g LCD or DLPprojector or monitor Important...

Page 11: ...For better readability of handwritten texts the image can be changed to BLUE To change the Detail Settings sharpness and to change the Output Resolution manually Hint Use the Resolution Test function...

Page 12: ...d In some rooms the built in IR receiver may In this case connect the optional external receiver to the IR SENSOR plug 12 and position the IR sensor somewhere on the ceiling or in the room not be enou...

Page 13: ...06 29 yyyy mm ddhh mm ss Ethernet LAN Port 10BASE T 100Base TX The LAN port 9 makes the Visualizer a part of the internal computer network and it can be used for communicationover the Internet if it i...

Page 14: ...en the TRIGGER function is activated the sampling time is controlled by receiving trigger pulses positive or negative edge selectable in the on screen menu see page 10 The image is processed 1 30s aft...

Page 15: ...E TURN FREEZE IRIS AF MENU WHITE HELP The firmware software of your EYE 12 including the o can easily be upgraded to the latest version The firmware update can be done via RS232 USB or Ethernet LAN Fi...

Page 16: ...C thread the EYE 12 can be mounted onto a tripod The UNC threads can be found on the top and bottom sides On the front a filter adapter lens can be attached the M46x0 75 This is helpful e g when short...

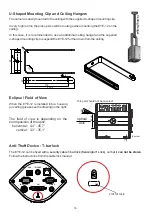
Page 17: ...8 9 MEMORY Eclipse Field of View USB TRIGGER LAN RGB RS 232 DVI IR EXTERN POWER 16 The camera is easily mounted to the ceiling with the supplied U shaped mounting clip In very high rooms the pick up s...

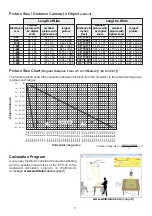
Page 18: ...2m 2 4m 2 6m 2 8m 3 0m 3 2m 3 4m 3 6m 3 8m 4 0m 4 2m 4 4m 4 6m 4 8m 5 0m 5 2m 5 4m 5 6m 5 8m 6 0m 6 2m 6 4m 6 6m 6 8m 7 0m 7 2m 7 4m 7 6m 7 8m 8 0m 8 2m 8 4m 8 6m Wide Tele Zoom range Object distance...

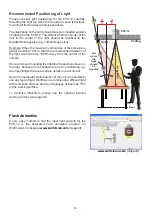
Page 19: ...end mounting the light like the position shown on the right because here shadows are not too disturbing e g when pointing with a pen at certain details on a document Due to the automatic white balance...

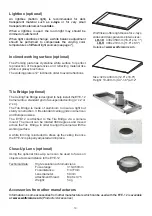
Page 20: ...o the Tile Bridge via a camera mount The mount can be rotated 360 degrees and moved across the Tile Bridge in order to align the camera with the working surface A white trim ring is included to dress...

Page 21: ...57V Auto MDI MDI X IEEE802 3af 2003 0 C to 40 C 32 F to 104 F 40 to 60 rel 5 years European Union EU Tele 0 5m Wide 50mm Camera Technology Pictures per second as picked up by the camera Effective Pix...

Page 22: ...27 on the unit and the Number 8 key arrow down 22 on the remote control Resetting the output mode to the default of auto resolution Simultaneously press both FOCUS keys 27 on the unit and the Number 5...

Page 23: ...lektrischen Feldern in Betrieb nehmen Das Ger t nicht im Wirkungsbereich von R ntgenstrahlung betreiben Dadurch k nnen Teile der Kamera besch digt werden Das Netzkabel und den Netzstecker niemals mit...

Page 24: ...th part 15 of the FCC rules Operation is subject to the following two conditions 1 This device may not cause harmful interference and 2 this device must accept any interference received including inte...

Page 25: ...ngsanschluss 12V DC siehe Seite 11 1 6 2 3 4 11 5 14 8 12 10 Power on Preset Der Power On Preset startet beim Einschalten der Kamera automatisch Die Einstellungen sind mittlere Zoomgr e Auto Focus ein...

Page 26: ...Tasten der EYE 12 6 Infrarot Fernbedienung 1 21 20 16 23 22 24 27 26 18 20 28 32 25 27 17 29 26 23 22 16 21 FOCUS MEMORY FREEZE AF WHITE HELP MENU POWER TELE LASER FOCUS 1 2 3 A A 1 2 3 4 5 6 7 8 9 PR...

Page 27: ...cken der WHITETaste wird ein One Push Wei abgleich durchgef hrt 26 Manuelle IRIS Tasten Bildhelligkeit Wenn die IRIS Tasten gedr ckt werden schaltet die EYE 12 die Autoiris Funktion ab Beim n chsten B...

Page 28: ...n ge ndert werden siehe Seite 10 Digital Zoom Auto Fokus AF Auto Iris Manuelle Iris Die EYE 12 ist mit einer Auto Iris Funktion ausgestattet Das bedeutet dass die Kamera die Bildhelligkeit automatisch...

Page 29: ...rdeinstellung des Wei abgleiches der EYE 12 Mit dieser Einstellung wird der Wei abgleich permanent automatisch nachgeregelt F r einen exakten Wei abgleich sollten mindestens 10 des aufgenommen Bildes...

Page 30: ...ich h herenAufl sung an dasAusgabeger t Der rechte und linke Rand bleibt dabei schwarz 32 Bilddrehmodus Image Turn f r h here Aufl sung Freeze Standbild Durch Dr cken der FREEZE Taste 17 wird das aktu...

Page 31: ...ie tats chlicheAufl sung ist die effektive Pixel Anzahl des eingebauten LCD Displays oder des DLP Chips Ihres Projektors oder Monitors Die meisten LCD oder DLP Projektoren k nnen auch h here Bildaufl...

Page 32: ...dus ge ndert werden F r bessere Lesbarkeit von handgeschriebenen Texten kann der BLAU Modus verwendet werden ndert Einstellungen mitAuswirkung auf dieAusgangssignale wie Sch rfe undAufl sung Tipp Die...

Page 33: ...hen Fall kann der optionale externe Infrarot Empf nger an die IR SENSOR Buchse angeschlossen werden Der externe Empf nger sollte irgendwo an der Decke oder im Raum platziert werden wo der Benutzer nor...

Page 34: ...AN Anschluss 9 erm glicht die Integration des Visualizers in ein internes Computernetzwerk Wenn dem Ger t eine offizielle WAN IP Adresse zugewiesen wird kann es auch zur Kommunikation ber das Internet...

Page 35: ...RIGGER MODUS Die EYE 12 bietet einenTrigger Eingang zur Steuerung des Momentes der Bildabtastung Im Trigger Modus zeigt die EYE 12 jedoch nur dann ein neues Bild wenn sie einen Trigger Impuls von eine...

Page 36: ...ese Substanzen k nnen die Anti Reflex Beschichtung besch digen Reinigung vorne hinten offen X X A A FOCUS ALL WIDE TELE 1 2 3 MEMORY 1 2 3 4 5 6 7 8 9 POWER LASER PRESETS IMAGE TURN FREEZE IRIS AF MEN...

Page 37: ...m undTELE 500mm Bei Einbau der EYE 12 in ein Geh use oder in die Decke muss der f r die Kabel ben tigte Platz ber cksichtigt werden ca 50 bis 100 mm h ngt von den verwendeten Kabeln ab F r den Einbau...

Page 38: ...MEMORY Eclipse Bildfeld USB TRIGGER LAN RGB RS 232 DVI IR EXTERN POWER 16 Mit dem mitgelieferten U f rmigen Kamerahalter kann die Kamera einfach an die Decke oder einen Deckenh nger montiert werden I...

Page 39: ...42 x 856 768 x 1023 893 x 1191 1018 x 1358 1143 x 1525 1269 x 1692 1394 x 1859 1519 x 2026 Abstand in mm kleinstes Bild mit 2x Digital Zoom kleinstes Bild mit optischem Zoom gr tes Bild Bildgr en Char...

Page 40: ...der abgebildetenPosition zu installieren denn hier sind Schatten nicht allzu st rend wenn z B mit einem Stift auf Details von einem Dokument gezeigtwird Durch den automatischen Wei abgleich der EYE 12...

Page 41: ...fixiert Dieser kann um 360 Grad gedreht werden um die Kamera parallel zur Abtastfl che zu stellen Der Kamerahalter kann zur exakten Positionierung vor und zur ck bewegt werden Ein wei er Ring ist eben...

Page 42: ...che Union EU Tele 0 5m Wide 50mm bis unendlich Kamera Technologie Bilder pro Sek von der Kamera aufgenommen Effektive Pixel Gesamtanzahl der Pixel auf dem CCD Verarbeitete Pixel pro Sekunde effektive...

Page 43: ...Ger t und der Nummer 2 Taste Pfeil nach oben 22 an der Fernbedienung Niedriger Modus Gleichzeitiges Dr cken beider FOKUS Tasten 27 am Ger t und der Nummer 8 Taste Pfeil nach unten 22 an der Fernbedien...

Page 44: ...3 9465 Fax 81 0 3 6233 9466 E mail wolfvision japan wolfvision com Canada WolfVision Canada Inc Ottawa Tel 1 613 741 9898 Toll free 877 513 2002 Fax 1 613 741 3747 E Mail wolfvision canada wolfvision...

Reviews: