background image

3-23

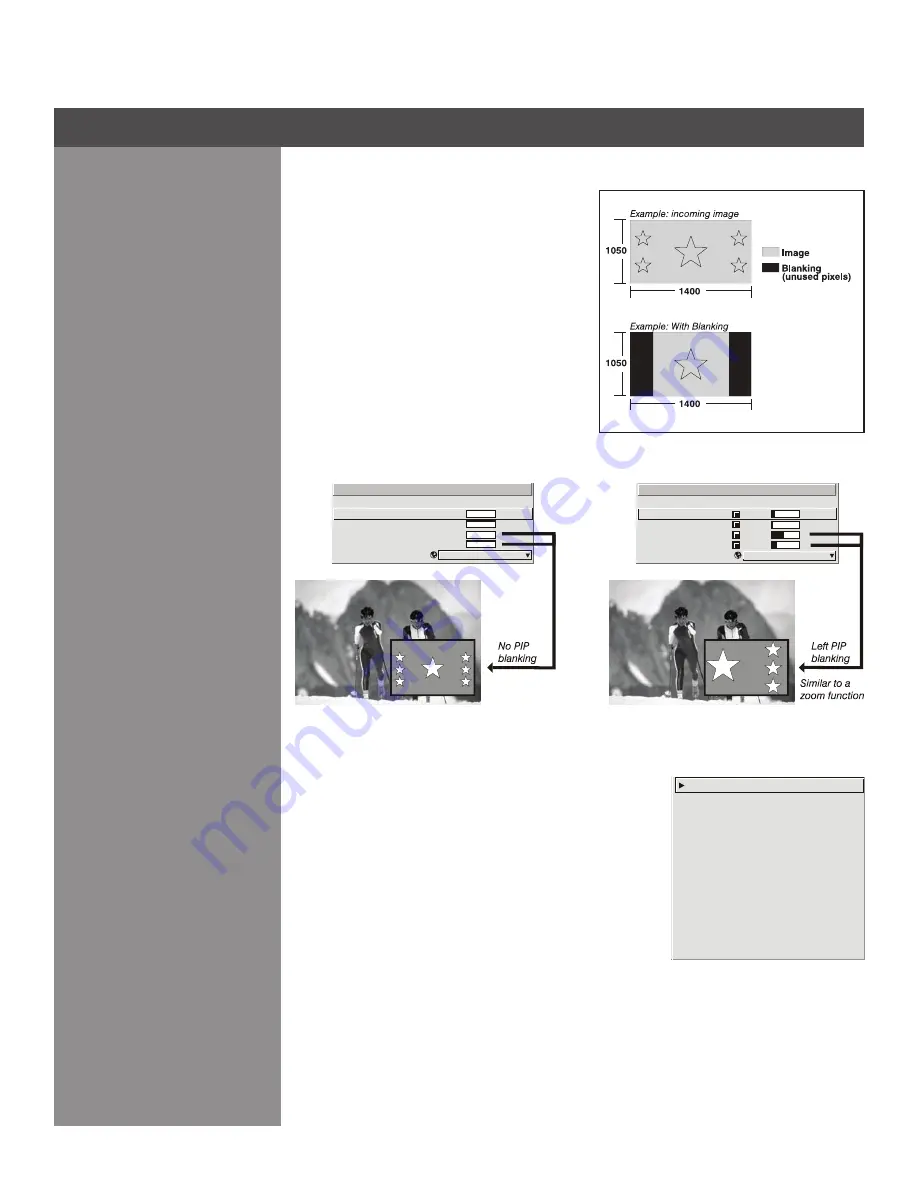
blanKIng (ToP, boTToM, lefT, and RIghT): 

Crop  the  image  as  desired  so  that  unwanted 
edges are removed from the display (changed to 

black—see right). Blanking defines the size of the 

Active Input Window

, or area of interest. Range 

of adjustment depends on the source resolution 
and other factors. After adjustment of blanking it 
may be necessary to perform a source switch. 

noTe:


Blanking  a  PIP  image  resembles  zoom 

(see  Figure  3.14).  For  example,  left  Blanking 
zooms  the  right  side  of  the  PIP  image;  Right 
Blanking zooms the left side. There are no black 
bars. 

PlUg & DIsPlaY (eDID):

 By default, a 

Plug & Play (EDID)


source  outputs  a  signal  according  to  the  EDID  information 
provided  by  the  projector.  To  override  this  information  and 
display in a different format (for example, if your 

Plug & Play 

[EDID]

 device does not support the projector’s resolution and/

or frequency), select the desired 

Plug & Play (EDID)

 resolution 

from the list.

EDID = Extended Display Identification Data standard.

Section 3 ► Operation

1400x1050 60 Hz

DC2K  (2048x720  60Hz)

1024x768x116Hz  3D

1280x1024x110Hz  3D

1400x1050x102Hz  3D

1080p 60Hz / 1080i 60Hz

1080p 50Hz / 1080i 50Hz

1080p 24Hz / 1080i 30Hz

Native Resolution 60 Hz

720p  (1280x720  60Hz)

1.

2.

3.

4.

5.

6.

7.

8.

9.

0.

1.

2.

3.

4.

5.

Active Input Window

Top Blank

Bottom Blank

Left Blank

Right Blank

   Plug & Display <EDID>

PIP Advanced S ize & Pos ition

1600x1200

0

0

0

0

Native Resolution 60Hz

1.

2.

3.

4.

5.

Active Input Window

Top Blank

Bottom Blank

Left Blank

Right Blank

   Plug & Display <EDID>

PIP Advanced S ize & Pos ition

1600x1200

49 

2

485

67

Native Resolution 60Hz

Figure 3.14. Blanking of a PIP Image

Figure 3.13. Blanking of a Primary Image

Summary of Contents for DCX-1000FD

Page 1: ...DCX 500i DCX 500FD DCX 1000i DCX 1000FD DCX 1500i DCX 1500FD O W N E R S M A N U A L ...

Page 2: ......

Page 3: ...signals XXXX models 10 bit video processing Built in multi standard video decoder Display of NTSC PAL and SECAM video input User replaceable Cermax Xenon lamp Lamp Tracking Calibration for constant brightness Lens VariScope System LVS to save and restore lens settings Motorized lens mount for all models Quick Setup feature Networking ability through RS232 and RS422 connectors Status LED display on...

Page 4: ...batteries and a mini stereo cable for conversion to wired Power cord Stereo 3D Cable XXXX only Warranty Card Lamp Type Model Name Resolution Wolf WARP 3D Motorized Lens Mount 500W Models DCX 500i HD 1080p Optional DCX 500FD HD 1080p Optional 1000W Models DCX 1000i HD 1080p Optional DCX 1000FD HD 1080p Optional 1200W Models DCX 1500i HD 1080p Optional DCX 1500FD HD 1080p Optional Please see include...

Page 5: ... further back the projector is positioned from the screen the larger the image will be If required you can level the projector by adjusting its three feet With the projector positioned perpendicular to the screen the image will appear rectangular instead of keystoned For more detailed instructions on positioning the projector refer to Projector Position and Mounting later in this section Connect a...

Page 6: ...appropriately rated power cord Turn the Projector ON Press the POWER button on either the remote or built in keypad to turn the projector on Wait a few minutes to allow the projector to warm up The LED status window displays an active pattern of segments to indicate the projector is changing its state from powered down to powered up The message On appears in the display when the projector has comp...

Page 7: ... flat or curved Flat screens are recommended with this projector They offer a gain of about 1 with a viewing angle just less than 180 This type of screen reflects incident light equally in all directions so the audience can see the display from various angles Curved screens have a gain greater than 1 with a viewing angle much less than 180 This type of screen does not reflect incident light equall...

Page 8: ... of the screen must be at least 13 3 feet 4m Section 2 Installation and Setup Ambient Light Other Considerations The high brightness of this projector is well suited for locations where ambient lighting might be considered less than ideal for projection A typical room with ceiling lights and windows rarely requires special attention Contrast ratio in your images will be noticeably reduced if light...

Page 9: ...projector should be positioned from the screen in order to project a focused image large enough to fill the screen For example using a 0 75 1 lens throw distance would roughly be 0 75 x screen width IMPORTANT Once you determine the type of lens and screen size you re going to use calculate the precise throw distance using the formula located in Appendix C Due to lens manufacturing tolerances for l...

Page 10: ...ontal offset has been applied Vertical offset can also be expressed as the percent of half the image height OR the number of pixels of shift from lens center Refer to Figure 2 1 for some illustrated examples of vertical offset Table 2 1 along with Figure 2 2 show the maximum vertical offset of a lens or alternatively how much of your projected image will appear above or below lens center if the ma...

Page 11: ...up Iso Rear Left View Iso Front Right View Rear View Top View Side Left View Side Right View Iso Rear Left View Iso Front Right View Rear View Top View Side Left View Side Right View Iso Rear Left View Iso Front Right View Rear View Top View Side Left View Side Right View ...

Page 12: ... View Top View Side Left View Side Right View Iso Rear Left View Iso Front Right View Rear View Top View Side Left View Side Right View Iso Rear Left View Iso Front Right View Rear View Top View Side Left View Side Right View Iso Rear Left View Iso Front Right View Rear View Top View Side Left View Side Right View ...

Page 13: ...hift to one side of lens center Refer to Figure 2 3 for some illustrated examples of horizontal offset See also Table 2 1 along with Figure 2 4 which shows the maximum horizontal offset of a lens or alternatively how much of your projected image will appear to one side of lens center if the maximum horizontal offset is applied using that lens Figure 2 3 Horizontal Offset Examples Section 2 Install...

Page 14: ...w Rear View Top View Side Left View Side Right View Iso Rear Left View Iso Front Right View Rear View Top View Side Left View Side Right View Iso Rear Left View Iso Front Right View Rear View Top View Side Left View Side Right View Iso Rear Left View Iso Front Right View Rear View Top View Side Left View Side Right View ...

Page 15: ...ojector can be rotated front to back up to 360 degrees and mounted without it affecting performance However the side to side tilt limit of the projector must not exceed 15 degrees This tilt limit is required to ensure optimal performance of the lamp Figure 2 5 Adjusting projector height You can modify the height of the projector to remedy a slightly unlevel mounting surface by adjusting the two fe...

Page 16: ...ive BNCs connectors for linking to a variety of sources The typical connection would be to an RGB source such as a PC Mac This projector supports multiple sync types with RGB signals sync on green composite sync and separate H V syncs NOTE Depending on your source you may need a custom adapter cable with BNC connectors at the projector end and a different type of connector at the other such as a 1...

Page 17: ...ignals below Connect a YPbPr signal component video to INPUT 1 or INPUT 2 as shown in Figure 2 8 NOTES 1 If for some reason the projector fails to recognize a YPbPr signal specify this Color Space option within the Picture Adjustments menu See 3 5 Adjusting the Image 2 Do not connect digital component signals known as YCbCr to INPUT 1 Install an appropriate optional module in INPUT 5 or INPUT 6 fo...

Page 18: ...igh quality DVD players satellite receiver and digital cable TVs NOTES 1 To ensure true digital output from devices that transmit digital signals connect to the DVI I connector 2 DVI loop through is not available unless you have the optional DVI Input Module installed at INPUT 5 or INPUT 6 Optional modules allow you to increase your total number of inputs and or accommodate different signal types ...

Page 19: ...rols for more information There are two types of serial ports available on the projector RS232 and RS422 You can connect a device with a serial interface such as a computer to either of these connectors not both and control the projector remotely by entering specific serial communication commands Connecting RS 232 The two nine pin DIN connectors labeled RS232 IN and RS232 OUT on the input panel ar...

Page 20: ...of how it is assigned once a projector has a valid and unique address it will respond to commands sent to this address To determine the projector s current IP address consult the Information or Communications menus Refer to Section 3 for further information about setting up and using a projector connected via Ethernet Ethernet Communications Connect a RS422 device only Section 2 Installation and S...

Page 21: ...end to the projector via a serial command The IP address will be in effect until it is changed again or until the DHCP checkbox is re enabled for use with a DHCP server on the network Section 2 Installation and Setup CHANGING THE PORT On some Ethernet networks firewall restrictions may require that the port number of the projector be changed from its default of 3002 If so enter a new port number i...

Page 22: ...cessible The input voltage to the projector must be capable of 100 240 VAC in 500W and 1000W models and 200 240VAC in 1200W models See also Section 6 Specifications for complete details on all power requirements Use the approved North American rated power cord supplied with the projector If you are connecting to an area outside of North America ensure an appropriately power cord rated for the regi...

Page 23: ...rized lens mount that allows for easy lens control and adjustment This includes such functions as adjusting vertical and horizontal offsets zoom and focus The lens mount can be fitted with any one of the available optional lenses see Section 6 Specifications Zoom and Focus There are two internal lens motors that allow for quick motorized adjustment of zoom and focus Adjust zoom to fit the displaye...

Page 24: ... the Exhaust Divider must be attached using noted screws If Exhaust 2 is used the Exhaust Divider must be removed The two IR sensors located on the projector receive transmissions from the IR remote from up to 100 feet away It is important to keep the transmission path to these sensors unobstructed for uninterrupted communications with the projector The Front IR sensor is located next to the proje...

Page 25: ... in keypad has fewer keys than the remote keypad certain projector functions are accessible only through the menu system rather than via a direct key NOTE The built in keypad cannot be disabled Refer to the key descriptions provided for the IR remote see Figure 3 2 The IR remote keypad controls the projector by way of wireless communications from a battery powered infrared IR transmitter Use the I...

Page 26: ...hich require you to press and hold or press twice or press and use the up down arrow keys NOTE To turn the OSD off you must press OSD and Figure 3 2 Remote Keypad Press and hold to toggle or press twice to toggle or press and release followed by ON or OFF Quick Setup Quick Setup ...

Page 27: ...o toggle the projector on or off with a single keystroke Or press and release followed immediately by on or off to guarantee the correct toggle useful if you are unsure of the present state NOTES 1 After powering down the lamp cooling fan remains on for approximately five minutes to cool the lamp 2 It is a good idea to avoid turning a projector back on until it has been off for a few minutes Hot r...

Page 28: ...erface module installed in the Option 1 slot NOTE If you have the optional Dual SD HD SDI Module installed and there are two inputs connected here the second input B is considered INPUT 7 If you are using the built in keypad or the remote keypad press INPUT 5 to access INPUT 7 as follows While displaying from INPUT 5 press Input 5 again This switches to INPUT 7 While displaying from any input othe...

Page 29: ...rrect for most video and 2 6 for film If excess ambient light washes out the image and it becomes difficult or impossible to see details in dark areas lower the gamma setting to compensate This will improve contrast ratio while maintaining good details for blacks and whites Menu Press Menu to enter or exit the projector s menu system OSD On screen display Press OSD to hide the projector s menu sys...

Page 30: ...tening if there is no checkmark you are communicating with a different projector To control a specific projector with the keypad press Proj and then enter the three digit number assigned to the projector you want to use If you switch to a projector other than the one you are currently using the checkmark will disappear To broadcast to multiple projectors press Proj and then Proj again without ente...

Page 31: ...y while still keeping it rectangular Use the Lens V or keys to position the image vertically while still keeping it rectangular Press Exit to return to presentation level NOTE Use the Lens Shift key built in keypad with the general keys to get the same effect as if using the arrow keys related to Lens V or Lens H on the IR remote Laser Press to activate the laser pointer on the remote This feature...

Page 32: ...u option number for any numbered option or use the keys to highlight the desired option then press Extra long menus have a scroll bar on the right use the arrow keys to access the remainder of the menu Locked items or items that do not pertain to the current action or condition appear dimmed and cannot be selected NOTES 1 If there is no signal present all source dependent adjustments are disabled ...

Page 33: ...ion desired and press Enter Move the highlight to the option desired and press to adjust immediately Bypass the menus entirely and use a single key to immediately access an adjustment during your presentation NOTE applies only to options having their own key such as Focus Zoom etc For blind access hide the entire menu system see OSD key above and or direct slidebars activated by their own key such...

Page 34: ...turn to your presentation NOTES 1 You can still adjust a direct slidebar as usual if the display is turned off see OSD or Menu Preferences menu the slidebar just won t be visible 2 A direct slidebar disappears if it is not used within 5 seconds Checkboxes Conditions are present if its adjacent checkbox contains a checkmark To toggle the checkbox simply highlight and press or highlight and use to c...

Page 35: ...ursor location press Func To delete a highlighted character or space press Func PRESS ENTER WHEN FINISHED To accept edits and leave the edit window press Enter NOTE Press Exit at any time to cancel changes and return to the previously defined text Enter numbers directly from the keypad in order to specify numbers representing projectors channels source setups or slots As each digit is entered it i...

Page 36: ...eter such as contrast V Position etc then a channel was automatically created and still exists in projector memory see below Using one of the Input keys will automatically recall this channel and all its setup parameters and update the display accordingly If more than one channel exists for the input the image will be displayed according to the setup parameters for the first channel with matching ...

Page 37: ...r this type of signal The channel number assigned is the lowest available number from 01 50 NOTES 1 An automatic channel will be discarded unless one or more of its parameters are changed and will not appear in the channel list see below 2 If two channels have the same distinguishing source characteristics except for the reversal of sync connectors i e H sync and V sync are switched they are still...

Page 38: ... NOTE If you have more than a handful of channels use and to see the remaining channels not visible in the initial display of channels SIGNAL TYPE Either channel list whether the Channel key list or the Channel Setup menu identifies signal types in a shortened form as defined below These descriptors indicate what signal information the projector uses to identify a match for a given channel and are...

Page 39: ...l will be created It is identical to original which still remains but it is identified with the next available number from 01 50 If you change your mind and do not want to copy the current channel press Exit to cancel and return to the previous menu Copying channels is a quick method for creating numerous channels each of which can then be edited and adjusted for a variety of aspect ratios in the ...

Page 40: ...the relevant channel and press The Channel Edit menu will appear similar to the sample shown below If desired review and or edit the following channel setups in the Channel Edit menu CHANNEL NAME An alpha numeric label can be defined and or changed here Channel names can be up to 12 characters in length CHANNEL NUMBER A 2 digit channel number can be changed here NOTES 1 If you enter a channel numb...

Page 41: ...nu and accept any changes you may have entered Settings are saved with the current channel From your presentation you can access any of the individual options in these menus by pressing Menu followed by the appropriate two digit number representing their location in the menu system For example press Menu 2 3 to quickly access the Gamma option in the Picture Adjustments menu Note that for certain o...

Page 42: ... or height of your display Size Position and Blanking parameters will automatically adjust accordingly or if Blanking is set first which defines an Active Input Area Resize Preset scaling will occur in this region of interest only Resizing options are explained in detail below WHAT IS THE RESIZING DEFAULT By default when displaying a new source your image will utilize as much of the projector s di...

Page 43: ...aspect ratio The image will fill the screen from side to side and be centered Size Size controls both the image width and height in tandem maintaining the current aspect ratio proportion of the displayed signal data Vertical Stretch Vertical Stretch adjusts the height of the image while keeping the width constant Use Vertical Stretch to change the aspect ratio of the display Pixel Track Steady fli...

Page 44: ...ly according to the signal watch the image while adjusting V Position This option moves the image up or down within the area of available pixels NOTE The value shown represents where the approximate center of the image lies in relation to the total number of pixels available vertically This varies widely according to the signal watch the image while adjusting Advanced Size and Position SUBMENU Thi...

Page 45: ...ation and display in a different format for example if your Plug Play EDID device does not support the projector s resolution and or frequency select the desired Plug Play EDID resolution from the list EDID Extended Display Identification Data standard Section 3 Operation 1400x1050 60 Hz DC2K 2048x720 60Hz 1024x768x116Hz 3D 1280x1024x110Hz 3D 1400x1050x102Hz 3D 1080p 60Hz 1080i 60Hz 1080p 50Hz 108...

Page 46: ...ark gray causing washed out images Gamma SHORT CUT Press Gamma and adjust the slide bar Gamma is a global setting that determines what gray shades are displayed between minimum input black and maximum input white for all signals A good gamma setting helps to optimize blacks and whites while ensuring smooth transitions for the in between values utilized in other colors Thus unlike Brightness and Co...

Page 47: ...C Adjust as desired keeping in mind that reducing noise which reduces high frequencies may also soften the image Color Space Color Space determines how the color components of an analog input signal are decoded for accurate color in the display Selecting a color space option is useful only for analog signals connected to INPUT 1 INPUT 2 INPUT 5 or INPUT 6 Although color space for these analog sign...

Page 48: ... a different video standard then going back Standard Where Used SUBJECT TO CHANGE NTSC N America and Japan NTSC 4 43 A tape only standard for partially translated hybrid signals PAL Most of Europe China Australia some of S America some of Africa PAL M Brazil PAL NC Argentina Chile other Latin American countries PAL 60 SECAM France Eastern Europe most of Africa Auto Color Level Video Standard Input...

Page 49: ...evels that is the drives and black levels for each of the three colors red green and blue ensure that images from analog sources other than decoded video have maximum contrast without crushing black or white By default and in a Quick Setup the projector automatically determines the best input levels by monitoring image content and adjusting the controls appropriately further adjustment is typicall...

Page 50: ... values to stabilize 5 Alternatively do not use Auto reduce blacklevels manually instead Judge by eye and change one or more of the six levels as necessary to obtain proper blacks and whites You may want to see only a certain color while adjusting use the Color Enable option described below Delete the Auto checkmark and leave the Input Levels menu 6 IMPORTANT Do not use Input Levels to adjust colo...

Page 51: ... as a uniform gray field before adjustment Display one primary color 2 NOTE Selecting Auto Color Enable ensures the correct color is displayed for each setting For the current color adjust its corresponding Black Level slide bar 3 just until a single band of black appears at one edge of the screen This band represents the first band of the grayscale pattern which should be 100 black Do not adjust ...

Page 52: ...ely you can specify a color temperature which enables the nearby Color Temperature slidebar and applies its current setting default 6500K If none of the pre defined Select Color Adjustment options or color temperatures suit your application select one of four color gamuts previously defined by a user User 1 2 3 4 A User option applies a customized color performance in which the user has precisely ...

Page 53: ...irly constant indicating that timing of input and output frames is locked the Frame Delay Monitor value should stay within 5 10 lines or so of the Frame Delay setting If a frame is lost or dropped the bar will move suddenly and the values will change indicating that the frame input is no longer equal to the output FRAME DELAY Set the number of lines delayed between the input signal and its appeara...

Page 54: ...inate from film or for moving computer generated images FILM 4 For video images that originated from film This will optimize image quality and stability 2 3 PULLDOWN THRESHOLD This setting determines how sensitively the projector can detect if an incoming video signal originated from film or not DETAIL THRESHOLD Use Detail Threshold to define at what frequency level the Detail control will begin t...

Page 55: ...The change will take effect immediately Image Orientation Set the orientation of the image according to the orientation of your projector If the setting is incorrect projected images will be reversed and or upside down Auto Power up Enter a checkmark to enable the projector to automatically power up after losing power due to a power failure or due to unplugging the projector during operation Wolf ...

Page 56: ...menu will appear here The Display Channel List option also enables on screen feedback when using the Channel key If you prefer to hide the channel list and input dialog box while switching channels and sources during a presentation clear the checkbox NOTE The Channel List and input dialog box cannot be hidden during use of the menus DISPLAY SLIDEBARS Enter a checkmark to superimpose a small slideb...

Page 57: ...or currently in use If the current projector already has a number assigned that number will appear here for example 004 in the menu shown above Numerical identity for projectors enables you to communicate with a single projector within a multiple projector application see also Proj key in 3 2 Using the Keypads If you make a mistake in assigning or changing the projector number press Exit to cancel...

Page 58: ... unique IP address for use on the network to which the projector is currently connected This address will overwrite any previous IP address such as the projector s factory defined default 0 0 0 0 or one that has been assigned by a DHCP server or other user It takes approximately 10 seconds for the projector to respond at its new address PORT On some Ethernet networks firewall restrictions may requ...

Page 59: ...eration In the Display Setup menu select the Geometry and Color submenu when you need to modify overall color performance and or image geometry for all sources Test Pattern Choose the desired internal test pattern or select OFF to turn off a test pattern Alternatively use the Test key for cycling through test patterns Keystone Not recommended to use Keystone on Wolf WARP pictures Use to correct a ...

Page 60: ... of the projector s display area Color Adjustments by X Y and Color Temp Adjust SUBMENUS NOTES 1 For defining or changing a User 1 2 3 or 4 color performance or gamut Sometimes known as Comprehensive Color Adjustment 2 Factory defined primary color levels which ensure a specific color performance from projector to projector can be calibrated in the Service menu only If you suspect alteration of th...

Page 61: ...anced Image Settings menu Select Color Adjustment Section 3 Operation COLOR ADJUSTMENT BY X Y Use this submenu if you want to create alter or copy a color gamut i e color adjustment Controls in this menu define the precise hue of each primary color component red green blue and white used to generate the millions of colors produced in displays The x y coordinates for each color define its location ...

Page 62: ... of each primary color red green blue and white by using more or less of it in relation to the other colors NOTE A Color Temp Adjust adjustment defines the corresponding x y coordinates shown in the Color Adjustment by X Y submenu These x y coordinates will remain stable for this User gamut until they are changed again via either menu Values displayed in the Color Temp Adjust menu however will lik...

Page 63: ...rtical in the Black Edge Blending test pattern The intersection of these lines is the true center of the projector s display area 2 Adjust white levels before adjusting black levels 3 Blinders are recommended for fixed installations Default Color Adjustments SUBMENU Refer to System Configuration Geometry and Color Color Adjustments by X Y for description Lens VariScope LVS SUBMENU LVS provides the...

Page 64: ...offset of odd pixels in relation to even pixels This will smooth out very narrow one pixel wide checks or vertical stripes that indicate adjacent on and off pixels Using the Level Detector simplifies this process see Figure 3 18 Use an external analog native sized continuous grayscale test pattern with at least 1 256 levels Turn Level Detector on 2 Set Level Value to 3 200 The image should now be ...

Page 65: ...blacks and whites input levels that fall below a specified Level Value see below are displayed as black and all others are displayed as white It aids in Odd Pixel Adjustment To use Enable Level Detector and display a continuous grayscale 1 Set Level Value to near black such as 200 2 Adjust Offsets to minimize area of black stripe 3 Set Level Value to near white such as 800 4 Adjust Gains to minimi...

Page 66: ...mmended to leave this feature disabled The two Option Card entries In the Display Setup menu identify which optional input modules a k a cards are present at INPUT 5 Option 1 and INPUT 6 Option 2 If either of these option slots is empty the corresponding read only menu entry does nothing If there is a module installed the corresponding menu entry may activate a submenu of further options pertainin...

Page 67: ...x two signals of the same type Signal Type Description Input Location 1 5 BNCs RGBHV or YPbPr 2 DVI I analog or digital 3 Decoded signals Input 3 Input 4 Composite video S Video or any video signal via Input 1 BNC connectors or via an analog option card 4 Analog Option Cards 5 Digital Option Cards 6 Digital Option Cards HD interlaced sources are not recommended for the PIP window Other PIP or Seam...

Page 68: ...IP image maintains its intended aspect ratio Use Anamorphic for NTSC signals having narrower pixels this will stretch the pixels horizontally to regain the intended aspect ratio of the PIP image NOTE If the image is already resized at the source it will remain that way in the PIP window If for example an NTSC signal is already set to anamorphic through the Resize and Preset menu it will remain tha...

Page 69: ...g to the Fade Time control Seamless Switching overrides the Frame Lock Enable settings and forces the output to run at 60Hz regardless of the input signal Image is 100 seamless when switching sources NOTE Disable PIP and Best Switching for Interlaced sources 35kHz Fade Time Set how long in seconds it takes to gradually dissolve one image into another for a source switch when Image Optimization is ...

Page 70: ... up until you install a new lamp Set LAMP LIMIT to the number of hours you expect to log on the current lamp before replacing it This will trigger a lamp message on screen if enabled NOTES 1 If you change modes over the life of a lamp the lamp limit you originally expected may no longer be possible 2 Turning the lamp on and off reduces lamp life significantly as do other factors 3 It is recommende...

Page 71: ...l remains constant Specifying a maximum power level here is the same as operating in Max Brightness mode NOTE Power level can be set only if the lamp is in Power mode INTENSITY This value and slidebar represents the current brightness of your lamp decreasing over time when you are operating in Max Brightness mode or at a specific Power level When you are operating in Intensity mode this value rema...

Page 72: ...ore easily maintained as the lamp ages 2 Intensity can be set only if the lamp is in Intensity mode 3 Intensity cannot exceed the output of Max Brightness mode IRIS The IRIS inside the projector controls the diameter of the light beam passing through the system With a fully open aperture slidebar default of 0 the maximum amount of light passes through for maximum brightness in your images Increase...

Page 73: ...iry message will appear upon power up when the lamp has reached its defined Lamp Limit The lamp should be replaced The Lamp Limit setting should not exceed the expected lamp life as an old lamp becomes increasingly fragile and more prone to sudden failure The read only Information menu lists a variety of details about the standard and optional components currently detected in the projector Refer t...

Page 74: ...t each Lamp Power setting is as high as possible for your application while still maintaining a good overall match of light output from screen to screen By nature achieving a uniform brightness will require a slightly reduced overall brightness this reduction will help ensure that you have enough range of adjustment when examining brightness variables more closely from screen to screen and will he...

Page 75: ...ched wall continue to Step 1e If you prefer maximum brightness rather than a particular color temperature select Max Drives IMPORTANT Do not change User 1 Color Adjustment in color matched applications 1e In the White Uniformity menu set the Overall output level to 50 0 and all remaining slide bars to 0 0 This decreases the light output just enough throughout the screen so that any color level can...

Page 76: ...using on its center and then adjust its corners See Figure 3 21 Repeat the color adjustment of sides and corners for each edge of the screen that does not yet match the center note that each corner is adjustable in either of its two adjacent side menus When done all areas of a given screen should match Repeat Steps 2a 2b for all remaining screens Step 3 Adjust Light Output in Eight Zones 3a For ea...

Page 77: ...e Blending is an innovative set of software functions that can quickly and easily blend white levels along the edges of multiple adjacent projected images to create a single seamless larger image What is a Blend In simple terms a blend appears as a gradient strip along an edge of a projected image It is darkest along the extreme edge of the image and lightens nearer to the rest of the image see ri...

Page 78: ...signifies no blending For best results in most applications use a blend width of 16 48 steps 128 384 pixels Ranges 0 80 horizontal 0 60 vertical Blend Shape determines the rate of roll off across the blend width i e how quickly the white levels across the blend change from light and dark Increasing the Blend Shape setting accelerates the rate of change at both extremes so that less of the region a...

Page 79: ...dge Blending Procedure NOTE Before attempting to work with edge blending software functions you must 1 physically align the projectors images by correctly overlapping the displays from your intended external source and 2 Match colors and White Field Uniformity IMPORTANT For a shared edge all Blend procedures and settings should be identical on BOTH projectors Start with two projectors Display full...

Page 80: ...ht images the Blend Width may be slightly higher set according to how much overlap you have between images Use the following as a guide examples show overlapping width only values for overlapping height will differ Recommended overlap is 12 5 25 Similar to Edge Blending Black Edge Blending allows you to adjust the black level hues of multiple adjacent projected images to create one large seamless ...

Page 81: ...on link or 2 a web interface or an Ethernet network Using a PC interface can also prove to be useful in instances where extreme warping is applied and the menu items become illegible and hard to navigate VIA ASCII MESSAGING Connect a serial link between your controller and the RS232 or RS422 port recommended or open an Ethernet socket i e Telnet between your controller and the valid projector addr...

Page 82: ... level i e there are no menus present and have selected an input on which the projector detects a problem While menus remain operational and any key press will temporarily remove any displayed error message you must resolve the signal problem in order to permanently eliminate the message No Signal The message No signal occurs when there is no source signal detected at the selected input both HSYNC...

Page 83: ...power the projector down and up again with the power key System Errors A system error message indicates that a serious malfunction has been detected and must be investigated as soon as possible see Status LED Codes below The projector will no longer operate and must be reset power the projector down and up again with the power key The Status LED Codes If the status code display on the back of the ...

Page 84: ...m DigMux PLD 62 Unable to program Control PLD 63 Unable to program Bubks PLD 64 Unrecognized ROM type 65 Write to flash ROM failed 66 TIPM failure 67 Downloaded code will not fit 68 Scaler communication problem Clear system errors with Exit Exit If necessary try resetting the projector by powering it off and on again cooling if necessary For detailed information monitor the RS232 IN port Contact d...

Page 85: ... user to important operatingandmaintenance servicing instructionsintheliteratureaccompanying the projector The lightning flash and arrowhead symbol within the equilateral triangle alerts the user to uninsulated dangerous voltage within the projector s enclosure that may be of sufficient magnitude to constitute a risk of electric shock Read all operating instructions prior to using the projector Op...

Page 86: ...ctions The North American rated power cord is provided with each projector Ensure that you are using a power cord socket and power plug that meets the appropriate local rating standards Use only the attachments and or accessories recommended by Wolf Cinema Use of others may result in the risk of fire shock or personal injury WARNING Use only an AC power cord recommended by Wolf Cinema Do not attem...

Page 87: ...mediately unplug the projector from the power outlet and ask a qualified service technician to look at it The power cord has been damaged The internal cooling fans do not turn on within two minutes when the projector is first powered up Liquid has been spilled into the projector The projector has been exposed to excessive moisture The projector is not operating normally or its performance has sign...

Page 88: ...absolutely necessary Never touch the glass surface of the lamp Fingerprints left on the glass will seriously degrade lamp performance or cause hotspots which can lead to an accumulation of intense heat in the touched area and cause the lamp to shatter To clean Wait until lamp is cool Moisten a clean microfiber cloth with isopropyl alcohol and gently rub the surface of the glass in a circular motio...

Page 89: ...of the projector below the input panel and can be accessed by removing the lamp access panel Use only the Wolf Cinema approved Lamp for your specific projector model See Table 4 2 below Projector Model Lamp Watts DCX 500i 500W DCX 500FD 500W DCX 1000i 1000W DCX 1000FD 1000W DCX 1500i 1200W DCX 1500FD 1200W A lamp should be replaced when it reaches its end of life 2000 hours typical or sooner if a ...

Page 90: ...ean lint free gloves and a face shield when working with the lamp 1 TURN THE LAMP OFF Press power to turn the lamp off Allow the cooling fans to stop automatically within approximately five minutes before proceeding with Step 2 This wait period is also required to allow the lamp to sufficiently cool before handling 2 UNPLUG THE PROJECTOR When the cooling fans have stopped turn the projector s main...

Page 91: ... and bottom guides on the left side of the lamp compartment see Figure 4 5 Slide the lamp all the way in a slightly harder push may be required right at the end to ensure it s fully seated into the terminal block NOTE The lamp module must make full contact with the terminal block The projector will not power up again if the lamp is not fully connected to the terminal block WARNING Improper install...

Page 92: ...ector Do not attempt to re align or adjust the lamp module 9 RECORD THE SERIAL NUMBER OF THE NEW LAMP Plug in the projector and power it up In the Lamp menu select Change Lamp In the Lamp S N text box enter the serial number Press to record the number and to reset the lamp timer The timer will now begin to log time for the new lamp IMPORTANT If you neglect to enter a serial number the lamp timer w...

Page 93: ...wapped out while the projector is running but this can result in dust being drawn into the projector Avoid if possible Before removing or installing any lens turn off the projector and allow the fans to cool the lamp before unplugging the projector Ensure that the lens cap is on WARNING Unplug the projector Install the lens cap and press the lens release button See Figure 4 7 Section 4 Maintenance...

Page 94: ...re tightly secured and the lens release button CLICK Secure lock down screws optional For added stability secure the adjustment screws provided on the lens retaining ring see Figure 4 9 If you have installed a large zoom lens one or more of the screws may be inaccessible simply tighten those that are accessible Figure 4 10 NOTE Recommended for heaviest lenses such as 0 73 1 and 1 2 1 Power Up Remo...

Page 95: ...I 1 3 inputs 1 on front panel 2 Component 1 S Video 1 Composite Outputs 1 HDMI 1080P Video set to native rate of display 1 HDMI audio loop out with delay 1 HDMI 1080P Video set to native rate of display 1 HDMI audio loop out with delay Contrast Ratio 2 500 50 000 1 full on off 2 500 50 000 1 full on off Lumens 2500 2500 Lamp Life 2500 to 4000 depending on lamp power setting 2500 to 4000 depending ...

Page 96: ...nel 2 Component 1 S Video 1 Composite Outputs 1 HDMI 1080P Video set to native rate of display 1 HDMI audio loop out with delay 1 HDMI 1080P Video set to native rate of display 1 HDMI audio loop out with delay Contrast Ratio 2 500 50 000 1 full on off 2 500 50 000 1 full on off Lumens 5500 5500 Lamp Life 2500 to 4000 depending on lamp power setting 2500 to 4000 depending on lamp power setting Powe...

Page 97: ...n front panel 2 Component 1 S Video 1 Composite Outputs 1 HDMI 1080P Video set to native rate of display 1 HDMI audio loop out with delay 1 HDMI 1080P Video set to native rate of display 1 HDMI audio loop out with delay Contrast Ratio 2 500 50 000 1 full on off 2 500 50 000 1 full on off Lumens 7250 7250 Lamp Life 2500 to 4000 depending on lamp power setting 2500 to 4000 depending on lamp power se...

Page 98: ...he IR remote to a wired remote if desired Refer to Section 3 for a specific description of each key and how to use them correctly Toggle keys which require you to either press and hold or press twice or press and use the up down arrow key Press and hold to toggle or press twice to toggle or press and release followed by ON or OFF Quick Setup Quick Setup ...

Page 99: ...hat it can be controlled remotely from a PC or other controller From a PC connect a standard nine wire RS232 serial cable to the RS232 IN port Or for long distance 100 ft links with an RS422 compatible PC or controller connect RS422 cable to the RS422 port Appendix B SERIAL COMMUNICATIONS ...

Page 100: ...ring Channel 1 CHA1 Channel 2 CHA2 Channel 3 CHA3 Channel 4 CHA4 Channel 5 CHA5 Channel 6 CHA6 Channel 7 CHA7 Channel 8 CHA8 Channel 9 CHA9 Channel 10 CHA10 Channel 11 CHA11 Channel 12 CHA12 Channel 13 CHA13 Channel 14 CHA14 Channel 15 CHA15 Channel 16 CHA16 Channel 17 CHA17 Channel 18 CHA18 Channel 19 CHA19 Channel 20 CHA20 To To Channel 99 CHA99 Quick Start Appendix B Serial Communications ...

Page 101: ...e control information passes in and out of the projector as a simple text message consisting of a three letter command code and any related data Opening and closing round brackets parentheses surround each message as shown below Messages can be a command to set a projector parameter at a specific level such as changing to a certain channel Or the controller can request information such as what cha...

Page 102: ...to the current message include one or more of the following special characters between the function code and first parameter If more than one M SP add in any order A Auto Mode adjustment rare for video standard selection only See 2 6 Other Special Functions E Enable Control Inquiry See 2 6 Other Special Functions G Global Control Inquiry See 2 6 Other Special Functions H Return the Help text for a...

Page 103: ...equire a 2 character combination as shown Special Characters for Text If you want this Enter this Description Backslash Quote Left bracket Right bracket 0x01 b Start of binary message control code 0x0A n New line if the text can be displayed on more than one line this will set the line break 0x1B x Control code ESC 0x0E e End of binary message control code 0x11 g Xon control code 0x13 s Xoff contr...

Page 104: ...space space space For Single Projector For Broadcasting For Specific Projector Within a Network 1 Controller Present For Specific Projector Within a Network Multiple Controllers Present Examples Examples Examples Function Function Function Message Format Message Format Message Format SET AND ACKNOWLEDGE MESSAGE message processed What is Actually Sent in a Message Although you will send and read me...

Page 105: ...ximum message integrity add a checksum character just after the as shown below You must then also include the correct checksum total 0 255 just before the end code Make sure to add a space before the calculated checksum to separate it from the last data parameter con64 240 The checksum is the low byte of the sum of the ASCII values of all characters between the and the beginning of the checksum Ca...

Page 106: ...any order PARAMETER LIMITS For single parameter projector function codes you can find out the current range of adjustment by adding the letter M to your request message For example LPL M What is the minimum and maximum lamp limit LPL M000 5000 Minimum lamp limit 0 maximum lamp limit 5000 Ranges cannot be determined in this manner if the function has multiple parameters Note also that for text base...

Page 107: ...STD L001 001 00000 PAL STD L001 001 00004 PAL M STD L001 001 00005 PAL C STD L001 001 00006 PAL 60 STD L001 001 00002 SECAM STD L001 001 00009 STD L111 END The end of the list is marked with P1 111 You can also access the text for a specific item in that list by adding the value of that item after the L For example STD L4 What is the text for item for in the Video Standard list STD L001 001 00004 ...

Page 108: ...ojector before processing of earlier messages is complete the projector will just store messages in a buffer until ready to process However if a series of messages is sent it is possible that the projector may not be able to process them as fast as they arrive and the buffer will become full If this happens the projector will send the 13h Xoff code to instruct the controller or any devices prepari...

Page 109: ...atically tracks the sync amplitude of the incoming signal AIL Auto Input Levels AIL allows the projector to continuously monitor the input signal levels and make adjustments as necessary to prevent crushing APJ Active Projector Use APJ to temporarily disable 0 or enable 1 the IR and Wired Keypad inputs to a specific projector in a network of projectors APJ is essentially the same as using the Proj...

Page 110: ...nge depends on the incoming signal Baud Rates BDR Set the RS232 only baud rate to 1200 2400 9600 19200 38400 57600 or 115200 Omit the 00 if desired BDS Set the RS422 only baud rate to 1200 2400 9600 19200 38400 57600 or 115200 Omit the 00 if desired Wait at least 2s before sending the first message at the new rate A reply returns a 7 digit value the complete number plus leading zeros see below An ...

Page 111: ... first input path is Input 1 BNC connectors The second input path is one of Input 2 DVI A connector or Input 5 or Input 6 one of the analog option cards To leave one of the input values unaffected enter a value of 0 for the input If only one value is specified then both input paths will have the same value BRT Brightness Set the image brightness from 0 1000 The BRT value represents a percentage e ...

Page 112: ...ion to change the factory set native colors Max Drives in the projector or to define one or more custom color palettes i e color gamut CCA changes x y coordinates for red green blue and white points for a given gamut Can be applied with CCS command NOTE Remember that Max Drives represents the measured native colors of the projector and that all color performance depends on these native colors A ne...

Page 113: ...efault 1 Color Temperature 2 SD Video 3 HD Video 4 User 1 5 User 2 6 User 3 7 User 4 CHA Channel Select Use CHA to select a channel 1 99 This is the same as SRC command CLE Color Enable Enable a specific color to be projected on the screen 1 red 2 green 3 blue 4 yellow 5 cyan 6 magenta 7 white 8 black NOTE Colors will always revert to white full color upon power up and if Exit at presentation leve...

Page 114: ...power off DRK Dark Interval Use DRK to control the time interval in active output lines between frames projected to the screen so that active 3D applications are well synchronized with shutters in 3D glasses Range depends on source frequency For 3D models only DTA Source Data Use DTA to read from the projector or load into the projector all of the settings related to a specific source setup 1 99 o...

Page 115: ...000 001 05996 03150 059 CON S005 045 BRT S005 167 Etc READING SETTINGS DATA FOR ALL SOURCE SETUP To request all settings for all sources use P1 0 DTA S0 The reply will be a sequence of replies for each source If you requested an acknowledgement it will arrive after the last reply for the last source Example DTA S0 DTA S005 000 001 05996 03150 059 setup CON S005 045 BRT S005 167 Etc DTA S034 000 00...

Page 116: ... as they change the way your network operates and you may accidentally break communication For example BDR should always be broadcast to all projectors or you will be unable to talk to some projectors DTL Detail Use DTL to set the detail for RGB and video images DTT Detail Threshold Sets the minimum change required before the detail DTL function is activated This sharpens images without increasing...

Page 117: ...g feature This feature can only be enabled when Edge Blending has been enabled EBS EBL Edge Blending Use EBL to blend together the overlapping edges of adjacent images and or to turn EBL on off To find out if EBL is on send a request with no parameters The reply will be off 0 or on 1 Note that on screen values do not match values through ASCII messaging Parameter Description P1 Which blend edge or...

Page 118: ...d a text explanation Error messages also include the address of the source projector NOTE The type of error and the text explanation are enclosed together in quotation marks separated by a colon and a space Below the text explanation appears as Error Code P1 Type of Error P2 Meaning 001 System Error System crash 002 System Warning System error 003 Invalid parameter Invalid parameter number 004 Too...

Page 119: ...l continue until it reaches the end stop To nudge the focus a minimum amount script in a delay between FCS K3 and FCS K0 Depending on your application a delay of at least 20 30 milliseconds may be sufficient FIL Input Filter Use FIL to force an internal filter for HDTV 1 SDTV 2 EDTV 3 Graphics RGB 4 or to turn the automatic filtering feature off 0 This automatic filter is for analog sources only F...

Page 120: ...ue indicates the new address of this source projector 003 Proj Selected 0 RS232 Inactive UI Inactive 1 RS232 Inactive UI Active 2 RS232 Active UI Inactive 3 RS232 Active UI Active This projector has been activated or inactivated via the PROJ key or the APJ serial message 004 Baud Rate 7 digit baud rate P1 value indicates the new baud rate 005 Standby 0 Off 1 On P1 value indicates whether the syste...

Page 121: ...ns available on the 9pin DIN GPIO connector plus power and ground GPIO Pins Connector Pin Signal 1 12V 200mA 2 GPIO 1 3 GPIO 2 4 GPIO 3 5 Ground 6 GPIO 4 7 GPIO 5 8 GPIO 6 9 GPIO 7 General Message format GIO Request state and configuration of all pins GIO C Read configuration for specific pin GIO C Input Output Set pin configuration to Input I Output O GIO C List of configurations Set multiple pin...

Page 122: ...separate analog input paths The first input path is Input 1 BNC connectors The second input path is one of Input 2 DVI A connector or Input 5 or Input 6 one of the analog option cards To leave one of the input values unaffected enter a value of 0 for the input If only one value is specified then both input Examples GOG 130 135 Sets the BNC analog path to 130 the DVI option card path to 135 GOG 0 1...

Page 123: ... 002 for above setting HDC Request configuration for either slot returns HDC 001 000 HDC 002 002 if cards exist in both slots HDD DHDM Dual Link Format When the Dual SD HD SDI module is present it can be configured to accept a Dual Link 292M serial input by combining the separate SDI inputs to allow a higher bandwidth higher resolution 1920 X 1080 source The table below shows how to configure the ...

Page 124: ... for slot 2 only returns HDL 002 003 for above setting HDL Request loop thru for either slot returns HDL 001 001 HDL 002 003 if cards exist in both slots HIS Lamp History Use the read only HIS request to obtain the projector s lamp history Note for dual lamp this information is stored separately for each lamp P1 identifies Lamp 1 or 2 see examples below Examples HIS 1 What is the Lamp 1 history HI...

Page 125: ...to proceed with lens motor calibration see LCB Lens calibration is necessary for LVS to function Since calibration will take a couple of minutes the user is allowed to decline and leave LVS turned off INM In Menu Use INM to specify whether a source setup is to be included in 1 or excluded from 0 the source setup selection menu See section See also 2 5 Accessing Specific Source Setups IOP Image Opt...

Page 126: ...lor Bars 9 RGBW Grey Scale 10 Multi Color 11 Edge Blend 12 Aspect Ratio 13 Red Blue ramp KEN Keypad Enable Use KEN to set the keypad input protocols Wired IR Front and IR Rear to respond to the protocol of the desired keypad The following table outlines how to use the command parameters to set the desired protocols Note the built in keypad cannot be disabled NOTE Protocols B G are used with the Br...

Page 127: ...nd codes representing each keypress NOTE For most keys sending a key code to depress a key also sends a code to release the key Key codes for arrow keys and lens keys however cause continual adjustment that must be stopped with a separate code Quick Setup Appendix B Serial Communications ...

Page 128: ...bled refer to LVS command a Reference calibration will be performed when the projector is powered up Motion calibration only needs to be done once when LVS is initially enabled because the results are retained in memory for future use Therefore if LVS is to be used it is only necessary to perform motion calibration once LVS can only be enabled if both calibrations have been performed at least once...

Page 129: ...t least 20 30 milliseconds may be sufficient LTC Lamp Tracking Calibration Use LTC to calibrate the current lamp and optical response Parameter Description P1 Calibration 0 Use default settings 1 Run automatic calibration on current projector or if more parameters present 1 Set custom gain and offset P2 Gain Gain value can be from 0 to 32767 P3 Offset Offset value can be between 32768 to 32767 NOT...

Page 130: ...ss you must also specify the desired level using the corresponding LPI intensity or LPP power command See LPI and LPP LPP Lamp Power Use LPP to set the desired lamp power level in watts range depends on the projector model and automatically put the lamp into the Power mode LPS Lamp Status Use the read only request LPS to find out the status of the current lamp s 0 Good lamp 1 Lamp fan has failed N...

Page 131: ... Enables MNU 3 x to enable or disable Automatic Test Pattern selection Parameter Value Description P1 0 3 0 presentation level 1 main menu 2 sub menu 3 enable or disable automatic test patterns P2 When P1 2 0 9 When P1 3 0 1 to enable or disable automatic test patterns the number of the submenu you wish to go to 0 restore normal operation 1 disable automatic test pattern MNU can also be used to cr...

Page 132: ... NSI Number Select Image Use NSI to use the numeric keys 1 8 as input keys for the main image This option is only effective when the Menu system is not active for example when Picture in Picture is enabled 0 Never 1 Only when the PIP window is active 2 Always NTR Network Routing Use NTR to specify which ports are joined in a common network By default only RS232 ports IN OUT are linked If desired a...

Page 133: ... DarkMagenta 6 DarkYellow 7 DarkGrey 8 LightGrey 9 Red 10 Green 11 Blue 12 Cyan 13 Magenta 14 Yellow 15 White See also PBW PBW PIP Border Width Use PBW to specify the width 0 10 of the border of the Picture in Picture window See also PBC PDT Peak Detector Enable 1 or disable 0 the peak detector test mode as an aid in setting up input levels PHP PIP Horizontal Position NOTE Not available in v1 0 Us...

Page 134: ... CTM etc you wish to lock or unlock Where several related options such as blanking controls share a single lockout locking or unlocking any one of the options toggles the full lockout status To lock unlock all options omit any P1 function code from your PLK set message Examples PLK CON 1 Lock the Contrast control PLK 1 Lock all possible options PLK BRT 0 Unlock the Brightness control PND Plug Disp...

Page 135: ...e defaults PPS PIP Swap Use PPS to swap the picture in picture window with the main window PPS is a toggle command with no parameters PSW Alternative Service Password Use PSW to find out the most recently defined password for accessing the service menu or to define an alternative service password range 0 32768 Note that defining an alternative PSW simply adds a password to projector memory so that...

Page 136: ...REM Remote Commands Allows arbitrary serial data to be sent out a specified port and the data can also be read from that port It is intended to be used in conjunction with the RTE commands to allow a single event to control other equipment connected to the projector Before being used a port must be configured After configuration the port cannot be used for standard Wolf Cinema protocol commands un...

Page 137: ... paths The first input path is Input 1 BNC connectors The second input path is one of Input 2 DVI A connector or Input 5 or Input 6 one of the analog option cards To leave one of the input values unaffected enter a value of 0 for the input If only one value is specified then both input paths will have the same value Examples ROG 130 135 Sets the BNC analog path to 130 the DVI option card path to 1...

Page 138: ...ount of delay P5 ASCII message Delayed event hh mm ss Any valid serial protocol This one time event is scheduled to occur at a certain point in the future How long to wait before starting the event Represents action taken during the event If P1 G or g Description P1 G or g GPIO port change This is a real time I O event P2 I O bit 1 255 depending on hardware in the case of masking this represents t...

Page 139: ...d Delete all pending events waiting because of a DLY command Number Delete the event with the given number from the list This parameter determines which events will be deleted Examples RTE g 7 H GIO 22 P 100 RTE g 7 H GIO 22 P 100 GIO 1 L RTE G 7 H GIO 22 P 100 GIO 1 L RTE T 2003 07 09 12 36 45 S PWR 1 S Single one time RTE T 2003 07 09 18 00 00 D PWR 0 D Daily RTE T 2003 07 09 05 00 00 W PWR 0 W ...

Page 140: ...posite 4 S Video 5 Option slot 1 6 Option slot 2 7 Option slot 1 its secondary input if present 8 Option slot 2 its secondary input if present SIZ Size Use SIZ to control image width and height in tandem maintaining the incoming aspect ratio 1000 no resizing SOR Screen Orientation Use SOR to specify the orientation of the projector in relation to the screen 0 Front 1 Rear 2 Ceiling Front 3 Ceiling...

Page 141: ...ry is a good way to establish exactly what status reports are available for your projector 2 SST X where X which Status Group 0 4 P1 This request obtains all results belonging to this status group 3 SST X Y where X which Status Group 0 4 P1 and Y which Detail 0 varies P2 This request obtains For all projectors listed on page 3 P1 Status Group 0 General Projector Model Information model serial reso...

Page 142: ...tint for video images The TNT value represents a percentage e g 1000 100 0 or 0505 50 5 USR User Message Use USR to load a user message for display in the Status menu Use the form USR text following the structure outlined in the following table to set the desired text to be displayed Parameter Name Description P1 Text The text may contain the following special characters all characters 0 255 that ...

Page 143: ...sition no stretching WFH Warp Prefilter H Use WFH to set or request the warp horizontal pre filter Requires Wolf WARP module WFV Warp Prefilter V Use WFV to set or request the warp vertical pre filter Requires Wolf WARP module WKC 2D Keystone Corners NOTE Requires Wolf WARP module Use WKC to set or request the x y coordinates for the four corners defining 2D keystone i e a 4 sided image shape P1 i...

Page 144: ...equest the warp latency Requires Wolf WARP module WPS Warp Select Use WPS to select which warp map to use or to disable warping Requires Wolf WARP module 0 Disable 1 2D Keystone 2 4 User defined maps WSH Warp Sharpness Set or request the warp sharpness ZOM Zoom The ZOM adjusts lens zoom image size on projectors having a motorized lens mount and requires keypad emulation Examples ZOM K3 Zoom in for...

Page 145: ...ernal device to respond to an action taken by the projector For example configure the pin as an output if you want the lighting in a room to automatically dim when the projector is turned on By using the GIO command you can also set the state of each pin as high or low By default the state of each pin is high The voltage applied to pins in the high state is 3 3V Example 1 Turn room lighting on whe...

Page 146: ...7 P3 Pin state 1 Character String H High L Low LHXXXHL Combine multiple inputs and trigger occurs when all conditions are met P4 Commands Any valid serial protocol command for the device Example 2 Projector powers up when a switch on the external device is turned on GIO C2 I Set pin 2 configuration as input RTE G 2 H PWR 1 Power on when pin 2 set to high RTE G 2 L PWR 0 Power off when pin 2 set to...

Page 147: ...puts are 75Ω terminated SDI Features Accepts serial digital 4 2 2 component video YCbCr Provides both a SERIAL IN and a SERIAL OUT BNC connector includes status LEDs for signal and error SMPTE 259M compatible The Dual SD HD SDI Module enables incoming serial digital SD or HD data to be tiled across multiple screen displays overlapped for extra bright displays or distributed to additional projector...

Page 148: ...Connections Options Board Reference Description Terminal Block T 4 100mm Wire W F TB1 pin1 Fan 14 24 AWG Screw Clamp 18 AWG Red L TB1 Fan 18 AWG Black L TB1 Line Power 18 AWG Black N TB1 Line Power 18 AWG White SRTN TB2 pin 1 Sensor return 18 AWG Brown S1 TB2 Sensor 1 18 AWG Orange Wiring Diagram ...

Page 149: ...Wolf Cinema 2431 Fifth Street Berkeley CA 94710 Ph 510 843 4500 Fax 510 843 7120 www wolfcinema com Rev 12 16 08 ...

Reviews: