


Stargate Developer’s Guide
Wireless Sensor Networks
Doc. # 7430-0317-13 Rev. B
Page 13
3
System Configuration
3.1 Networking
Setup
To use the Stargate effectively it needs to be connected to a network. There are many options
available to physically connect the Stargate to a network. The quickest and easiest way is to use the
Ethernet port built into the daughter card.
3.1.1
Ethernet LAN - DHCP
The Stargate is pre-configured to connect to a LAN via the Ethernet port. If there is a DHCP service
running on the LAN the Stargate will automatically be assigned an IP address, Gateway address and
DNS server entries. If the LAN is configured for workstation Internet access (via Gateway and DNS
entries) the Stargate will have Internet access.
The disadvantage to DHCP is you need to determine the IP address of the Stargate after it boots up -
it could be different each time. Using a terminal program open a Stargate session and issue the
following command:
$ ifconfig eth0
eth0 Link encap:Ethernet HWaddr 00:50:C2:2F:3B:31
inet addr:192.168.2.3 Bcast:192.168.2.255 Mask:255.255.255.0
UP BROADCAST RUNNING MTU:1500 Metric:1
RX packets:39931 errors:0 dropped:14 overruns:0 frame:0
TX packets:1646 errors:0 dropped:0 overruns:0 carrier:0
collisions:10 txqueuelen:100
RX bytes:12777054 (12.1 MiB) TX bytes:0 (0.0 b)
Interrupt:26
The
ifconfig
command shows the current configuration of the ethernet port: eth0. The response
shows the IP address to be 192.168.2.3. You can then connect to the Stargate remotely using this
address.
3.1.2
Ethernet LAN – Fixed IP Address
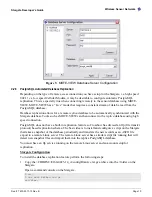
A more convenient way to configure the Stargate is to assign a fixed IP address. There is file named
networking
located in the /etc/init.d folder. To assign a fixed IP address on boot-up edit this file and
make sure the start section looks like the following:
start)
echo -n "Configuring network interfaces: "
ifup –a
# pump -i eth0
ifconfig eth0 192.168.2.3 up
route add default gw 192.168.2.1
ifconfig lo 127.0.0.1 up
echo "done."
;;
The key changes are to comment out the
pump
line and add the two additional lines below it – the
ifconfig
and
route
commands. The
pump
command was used previously to request the dynamic IP
Summary of Contents for Stargate
Page 1: ...Stargate Developer s Guide Rev B January 2006 Document 7430 0317 13 ...
Page 50: ......
Page 51: ......