


WireCrafters
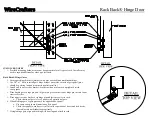
2” x 4” Horizontal Ceiling Tube
2” X 4” CEILING TUBE
1.
Note location(s) of 2” x 4” horizontal ceiling tube(s) (A).
2.
Center and attach one 3/16” x 1-3/4” x 3” Angle Bracket (B) to the top 2” side of 2”
x 4” Ceiling Tube with two self-drill screws so that bracket leg hangs over the tube’s
open end.
a.
Leave 1/4” gap between tube end and bracket leg per Fig 1.
3.
Center and attach a second 3/16” x 1-3/4” x 3” Angle Bracket (B) to the bottom side
of the 2” x 4” ceiling tube so that the bracket leg is flush with the end of the tube.
a.
Both bracket legs should be pointing in the same direction. See Fig 1.
4.
If opposite end of tube attaches to a post, repeat steps 2 & 3 for the opposite end of
tube.
a.
See detail page 23 if one end of ceiling tube mounts directly to building wall.
5.
Lift ceiling tube (A) above the partition wall post (D) and lower into place so that the
top bracket fits inside of wall post (D) Per Fig 2.
6.
Align ceiling tube(A) with wall post(D) and secure lower bracket to post using self
drilling screws see Fig.2
7.
Install slotted angle on top of wall panels per instruction page 19.
8.
Lift panels into place, face side up, and attach to slotted angle (C) with 3/8” x 1”
bolts (see Fig.3 page 20).
9.
Attach panels to ceiling Tube using 3/8” x 3” bolts.
a.
Position panels to eliminate any sag in ceiling before fastening in place.


