


WireCrafters
Tunnel Door
INSTALLER NOTES
1.
Component parts attach using self-drilling screws. Use variable speed
screw gun with adjustable clutch or depth locating nose piece. Use care
not to over tighten and strip threads. DO NOT USE IMPACT TYPE
GUNS. Securely clamp part in place before attaching with self drilling
screws.
2.
Partition wall should be set up and anchored to floor. It is CRITICAL that
posts are plumb and in line. Door opening should be square.
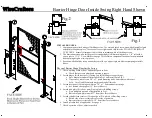
Tunnel Door
1.
Check that all posts are anchored and plumb.
2.
Place one four wheeled trolley truck in track (A).
3.
Using 3/8” x 1” bolt, attach Track Bracket (B) and Z-Bracket (C) to
leading end of track (A) see Fig.2.
4.
Attach second Track Bracket (B) to far end of track (A) using
3/8” x 1” bolt.
5.
Mount track assembly to Posts (D) and (E) with 3/8” x 3” bolts and nuts.
a.
If enclosure has ceiling use 3/8” x 1” bolts to attach track brackets.
6.
Assemble door panels if applicable.
a.
Bolt door panel (F) to door leaf (G). (Some doors have multiple
panels.)
b.
Bolt Angle Cover Bar (H) to bottom of door panels (F) & (G).
c.
Bolt Flat Cover Bar (I) to top of door panels (F) and (G).
7.
Install cylinder lock (if applicable). See page 11 for instructions.
8.
Mount casters (J) to caster plates (K), (two per door) with 5/16” x 1” bolts.
9.
Mount caster plate assemblies to door panel (F) using 3/8” x 1 1/2” bolts
(use 2 washers for each bolt) see Fig. 1.
10.
Bolt trailing end of door to trolley inside of track (A) so that door is level.
11.
Lag Door Guide (L) to floor using two 3/8” anchors.
12.
Mount receiver (N). See page 17 for details.
13.
Check door operation so that it rolls smoothly, and latch engages and locks
a.
Adjust caster plates and trolley bolt if necessary.
14.
Tighten upper jam nut on trolley truck
a.
Do not cock trolley in track when tightening jam nut. It may be
necessary to hold bolt while tightening.


