background image


19 

Winmate E430RM4L Rugged PDA User Guide 

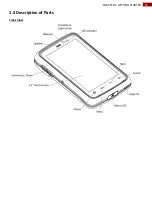
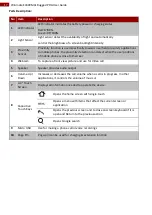
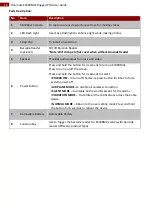
Parts Description: 


No 

Item 

Description 

5MP Rear Camera  

To capture a rear view picture and use for making videos. 

LED Flash Light 

Use it as a flashlight to enhance light while making photos. 

Strap Clip 

To install a hand strap 

Barcode Reader 
(optional) 

1D/2D Barcode Reader 

*Note: Will change to flat cover when without Barcode Reader


Speaker 

Provides audio output for music and video 

Power Button 

Press and hold the button for 3 seconds to turn on E430RM4L. 
Press to turn on/off the screen. 
Press and hold the button for 3 seconds to select: 

POWER OFF

 –to turn off the device press button for 8 Sec to force 

system power off 

AIRPLANE MODE

 –to disable all wireless connection 

SILENT MODE

 – to disable all the sounds except for the alarms 

VIBRATION MODE

 – to vibrate all the notifications across the entire 

device 

NORMAL MODE

 – Return to the user setting mode Press and hold 

the button for 8 seconds to reboot the device. 

Removable Battery 

Removable battery 

Function Key 

Use to trigger the barcode reader for E430RM4L series with barcode 
reader (differs by product type) 


Summary of Contents for E430RM4L Series

Page 1: ...ese instructions carefully before using this product and save this manual for future use 4 3 inch Rugged Mobile Computer E430RM4L Series ARM Cortex A53 Octa core 1 3 GHz Android 7 0 User Guide Documen...

Page 2: ...Off 26 1 8 RESETTING TO FACTORY DEFAULTS 27 CHAPTER 2 USING THE DEVICE 28 2 1 USING THE TOUCH SCREEN 28 2 2 WAKE UP THE PHONE 29 2 3 USING THE HOME SCREEN 29 2 3 1 Personalizing Home Screen 30 2 3 2 V...

Page 3: ...TOS OR VIDEO 55 5 1 1 Opening Camera 55 5 1 2 Taking Pictures 55 5 1 3 Switching Between Front and Rear Cameras 55 5 1 4 Viewing Pictures 56 5 1 5 Shooting videos 56 5 1 6 Opening the Gallery 57 CHAPT...

Page 4: ...30RM4L Rugged PDA User Guide 7 2 5 Soft Case Holder 70 7 2 6 Lanyard 70 APPENDIX A PRODUCT SPECIFICATIONS 71 APPENDIX B ORDER INFORMATION 73 APPENDIX C SOFTWARE DEVELOPMENT KIT 73 APPENDIX D OTA ONLIN...

Page 5: ...cations that are described in this manual are for illustration purposes only We make no representation or guarantee that such application will be suitable for the specified use without further testing...

Page 6: ...s every business day We are always ready to give advice on application requirements or specific information on the installation and operation of any of our products Advisory Conventions Four types of...

Page 7: ...the other A grounded connection has two blades and a third one that is grounded If the main plug provided cannot be inserted into your outlet consult an electrician to replace your obsolete outlet Ne...

Page 8: ...appareil lorsque certaines fonctions sont d fectueuses ou inactives Si le probl me persiste veuillez contacter votre revendeur ou votre agent Precaution on Battery Pack Pr caution avec le bloc pile Do...

Page 9: ...ation de chaleur l amor age ou la rupture de la pile Do Not Use the Battery Pack With Any Other Products The battery pack is rechargeable and is only designed for this specific product If it is used w...

Page 10: ...e government s requirement for exposure to radio waves This PDA is designed and manufactured not to exceed the emission limits for exposure to radio frequency RF energy set by the Federal Communicatio...

Page 11: ...ablet computer as this may damage the display Ne pas placer d objets lourds sur le dessus de l ordinateur tablette cela peut endommager l cran The screen surface can be easily scratched Use with care...

Page 12: ...particular area and gently wipe away using a soft cloth Utiliser un chiffon doux pour enlever la poussi re sur l cran La surface de l cran tactile a un rev tement protecteur sp cial emp chant la salet...

Page 13: ...complies with part 15 FCC rules Operation is subject to the following two conditions This device may not cause harmful interference This device must accept any interference received including interfer...

Page 14: ...r Specifications E430RM4L Standard E430RM4L 3BM 1D 2D Barcode Reader E430RM4L 3HF HF RFID Reader Chapter Descriptions Chapter 1 Safety Information provides important safety information for you to know...

Page 15: ...siness processes increasing productivity and improving customer service The E430RM4L packs WLAN Bluetooth GPS and WWAN function all into a single device With great multiple wireless communicate design...

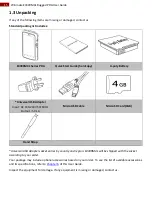
Page 16: ...0 240V 50 60 Hz Output 5V 1A Micro USB Cable Micro SD Card 4GB Hand Strap Universal USB Adapter socket varies by country and region E430RM4L will be shipped with the socket according to your order You...

Page 17: ...16 CHAPTER 1 GETTING STARTED 1 4 Description of Parts Front View...

Page 18: ...to their ear 4 Webcam To capture a front view picture and use for Video call 5 Speaker Speaker provides audio output 6 Volume Up Down Increases or decreases the call volume when a call is in progress...

Page 19: ...18 CHAPTER 1 GETTING STARTED Rear View...

Page 20: ...hold the button for 3 seconds to turn on E430RM4L Press to turn on off the screen Press and hold the button for 3 seconds to select POWER OFF to turn off the device press button for 8 Sec to force sy...

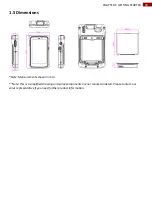
Page 21: ...TING STARTED 1 5 Dimensions Note Measurements shown in mm Note this is a simplified drawing and some components are not marked in detail Please contact our sales representative if you need further pro...

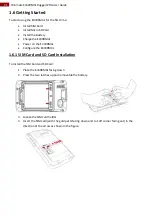
Page 22: ...430RM4L Power on the E430RM4L Configure the E430RM4L 1 6 1 SIM Card and SD Card Installation To Install the SIM Card and SD Card 1 Place the E430RM4L facing down 2 Press the two latches up and removab...

Page 23: ...6 Push the SD card holder in the direction of the arrow to unlock it 7 Pick and raise the SD card holder up in upright position and then put the SD Card into the socket 8 Close the SIM card holder and...

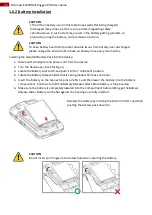
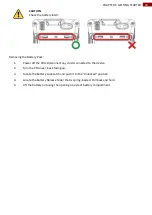
Page 24: ...t AC adapter and power cord from the device 2 Turn the device over back facing up 3 Locate the Battery Lock Latch and push it to the Unlocked position 4 Locate the Battery Release Slider that is sprin...

Page 25: ...PDA Disconnect any cords connected to the device 2 Turn the PDA over back facing up 3 Locate the Battery Lock Latch and push it to the Unlocked position 4 Locate the Battery Release Slider that is sp...

Page 26: ...d Red Battery charged 0 89 Solid Green Battery charged 90 100 1 6 3 1 Charging the battery using USB Cable 1 Connect the power supply output connector to the input power port on the DC Jack cable 2 Re...

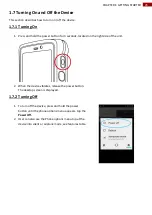
Page 27: ...3 seconds located on the right side of the unit 2 When the device vibrates release the power button The desktop screen is displayed 1 7 2 Turning Off 1 To turn off the device press and hold the power...

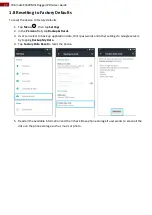
Page 28: ...e Personal tab tap Backup Reset 3 User can select to back up application data Wi Fi passwords and other settings to Google servers by tapping Backup My Data 4 Tap Factory Data Reset to reset the phone...

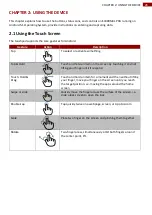
Page 29: ...tem on the screen by touching it and not lifting your finger until it respond Touch Hold Drag Touch and hold an item for a moment and then without lifting your finger move your finger on the screen un...

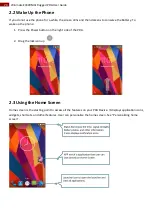
Page 30: ...he Battery To wake up the phone 1 Press the Power button on the right side of the PDA 2 Drag the lock icon up 2 3 Using the Home Screen Home screen is the starting point to access all the features on...

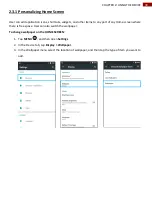
Page 31: ...er items to any part of any Home screen where there is free space User can also switch the wallpaper To change wallpaper on the HOME SCREEN 1 Tap MENU and then open Settings 2 In the Device tab tap Di...

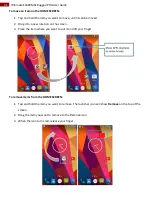
Page 32: ...Drag it to a new location on the screen 3 Place the item where you want to put it and lift your finger To remove items from the HOME SCREEN 1 Tap and hold the item you want to remove The launcher icon...

Page 33: ...ss the Home screen Extensions to the Home screen provide extra space for APPS shortcuts and other items 2 Tap the launcher icon to view the entire APPS of the device The status bar appears at the top...

Page 34: ...you have received notification 2 4 2 Status Icons Pull down from the right top of the screen to get the notifications area The following icons indicate the status of your device for example if users...

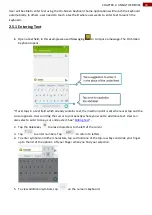
Page 35: ...t field which already contains text the insertion point is set where user tap and the cursor appears User can drag the cursor to pick exactly where you want to add more text User can also select a wor...

Page 36: ...ut or copy see the section above To select text 2 Tap or in the Edit text menu 3 If you select the selected text is removed from the text field it is stored in temporary area so that you can paste it...

Page 37: ...on the sleep mode after one minutes of inactivity Daydream to activate automatically when your device is docked or charging keeping your screen on and displaying information Daydream mode can give yo...

Page 38: ...37 Winmate E430RM4L Rugged PDA User Guide NOTE For the longest battery life between charges use the shortest Sleep time...

Page 39: ...ve a call receive a notification or an alarm sounds 2 7 1 Sounds Settings 1 Tap MENU and then tap Settings 2 In the Device tab tap Sound Notification and then user can select General Silent Meeting or...

Page 40: ...t is included with user s device o Android Keyboard AOSP the setting screen is available only if user s device has a physical keyboard Appearance layouts o Theme to select the theme of layout o Custom...

Page 41: ...is displayed on the Space key and user can switch languages 1 Tap and hold the space key 2 Without lifting the finger slide it to the left or right until the language you want to use appears in the c...

Page 42: ...9 1 To Make a Phone Call 1 Please make sure the SIM card is properly installed 2 Tap the Phone icon at the bottom of the Home screen or in the launcher or on the Home screen 3 Tap the numeric keys on...

Page 43: ...call screen opens with the caller ID and any additional information about the caller that you have entered in contacts Tap this button to answer calls Tap this button to reject calls 1 Tap the launch...

Page 44: ...sponding to Text Messages If you are working in a message window message that you receive are display in it Otherwise you receive a new message notification and a new message icon appears in the statu...

Page 45: ...tatus opens the status screen with a list of information about battery network signal strength and other details Legal Information lists details about the model number Android Version Baseband version...

Page 46: ...nly use one application assigned by the device manager 3 1 How to Lock Applications Step 1 In the main APPS window select the Home Manager APP and enable it Select Home Manager to start your settings...

Page 47: ...tep 6 System will ask to select Just once or Always to use this launcher please select Always The system will automatically start the application which you selected and lock it Any time you press home...

Page 48: ...w to Unlock Applications Step 1 Slide down the top bar and press Home Manager icon then you can find the menu and please enter the password to login The default password is 0000 Step 2 Go back to Home...

Page 49: ...48 CHAPTER 3 WINMATE HOME MANAGER Step 3 Restart the system and you will go back to the normal Launcher...

Page 50: ...certain networks NOTE To obtain faster networks configure the phone to 4G To extend the life of battery user can use 2G network 4 1 1 Checking the Network GPRS 3G 4G Connection 1 Tap and then tap Sys...

Page 51: ...ys the list of it Secured networks are indicated with a lock icon If the phone finds a network that you have connected previously it connects to it automatically 4 Tap a network to connect to it If th...

Page 52: ...n the Wi Fi settings screen tap icon at the bottom right of the list of discovered networks 2 Input the SSID name of the network if the network is secured tap the security menu and then tap the type o...

Page 53: ...th Device 1 Go to Settings 2 Tap Wireless networks and then tap Bluetooth settings 3 It will automatically scans and displays the IDs of all available Bluetooth devices in range Tap SEARCH FOR DEVICES...

Page 54: ...the E430RM4L cannot be charged via USB 4 4 1 USB Computer Connection 1 Connect PDA to the computer via USB connector 2 In the notifications area USB connected sign will appear 3 Pull down the notifica...

Page 55: ...cable 2 In the notifications area USB debugging connect sign will appear 3 Pull down the screen to open notification panel 4 Tap USB debugging connected 5 In the Developer options user can choose the...

Page 56: ...s can cause blurry pictures 5 1 2 Taking Pictures 1 Adjust the exposure flash and other necessary settings Or leave it automatic 2 Frame your subject object on screen User can set whether user want to...

Page 57: ...screen button to share a photo to delete a photo to view other photos and videos in the gallery 3 Swipe right or left to view more photos 5 1 5 Shooting videos 1 Tap the to start recording video 3 The...

Page 58: ...PDA User Guide 5 1 6 Opening the Gallery 1 Tap the launcher and then tap Gallery 2 Tap a folder to view the pictures or video inside in full screen mode 3 Flick the pictures left or right to view the...

Page 59: ...2D barcode reader WDC software invented by Winmate allow users to turn on the readers and set up the button to trigger the scan function 6 1 1 Where To Find WDC This chapter explains how to use Barco...

Page 60: ...Off the Power of Barcode Reader 1 Go to the WDC application 2 Tap Barcode Setting 3 Once the user entered the WDC application the device will automatically turn on the Barcode Reader And the user can...

Page 61: ...e WDC application 2 Tap Prefix Suffix 3 Enter special characters at the beginning prefix or end suffix of the scanned barcodes 4 Tap Set to add into the data The output will show the command that you...

Page 62: ...n Barcode Reader starts auto scanning once the user leaves the WDC application Single Scan Barcode Reader starts scanning only when user presses the trigger button Multiple Scan After pressing the tri...

Page 63: ...to Change Settings of the WDC or Reset Back to Default 1 Go to the WDC application 2 Tap Settings 3 Users can select the options to change the setting of the application 4 Users can reset to the defa...

Page 64: ...1 7 Scanning the Barcode How to scan the barcode 1 Press the function button to trigger the barcode 2 Aim the barcode 3 Ensure the entire barcode is within the rectangular area formed by the brackets...

Page 65: ...able as follows Symbology Density Min Distance Max Distance Code 39 0 100 mm 0 125 mm 0 500 mm 1 000 mm 9 5 cm 8 0 cm 6 5 cm 9 5 cm 11 5 cm 14 5 cm 50 cm 75 cm EAN UPS 100 0 33 mm 6 cm 34 cm DataMatri...

Page 66: ...B Cable Micro SD Card 4GB Handstrap Screen Protector Bluetooth Manager Universal USB Adapter socket varies by country and region E430RM4L will be shipped with the socket according to your order 7 1 1...

Page 67: ...SD Card Micro USB Card slot is located on the rear side of E430RM4L To access it press two latches up and remove the battery For Micro SD Card installation instructions refer to Chapter 1 SIM Card and...

Page 68: ...Rugged PDA User Guide 7 2 Optional Accessories E430RM4L Optional Accessories Two Slot Battery Charger Model name BD E430R Charging Dock Model name MD E430R Micro USB Host Cable OTG Cable Battery Lanya...

Page 69: ...battery using docking 7 2 2 Charging Dock The charging dock is ideal solution for quick charging multiple devices at once The design allows you to daisy chain multiple chargers together for ease of us...

Page 70: ...ile printer allows to print labels and stickers directly from E430RM4L Mobile thermal receipt printer Features Quick and efficient printing Rugged design withstands drop up to 1 2m Long lasting lithiu...

Page 71: ...f leather with vinyl screen protector and shoulder strap It keeps the device free of fingerprints and dirt 7 2 6 Lanyard Lanyard provides a secure feel when using your E430RM4L series Rugged PDA while...

Page 72: ...ensors Security Audio 1 x Built in Mic 1 x Front Receiver 1 x 1 2W Speaker External I O 1 x SIM card slots 1 x Micro SD card slot 1 x Micro USB Buttons 1 x Volume 1 x Power button 1 x Function button...

Page 73: ...e 20Hr Adapter 5V 1A Adapter Note Measured at dimming LCD brightness Varies depending on the usage conditions or when an external device is attached Note This is a simplified drawing and some componen...

Page 74: ...APPENDIX C SOFTWARE DEVELOPMENT KIT Winmate provides Software Development Kit SDK The table below lists SDK provided by Winmate Winmate SDK for E430RM4L Item Type Purpose 1 SDK Winmate Data Collection...

Page 75: ...l to update firmware version IMPORTANT Battery capacity must not be lower than 30 during update To update OTA 1 Select OTA firmware 2 Select Manual check 3 Check I agree to update and click UPDATE 4 W...

Page 76: ...Winmate Inc 9F No 111 6 Shing De Rd San Chung District New Taipei City 24158 Taiwan R O C www winmate com Copyright Winmate Inc All rights reserved...

Reviews: