background image


21 

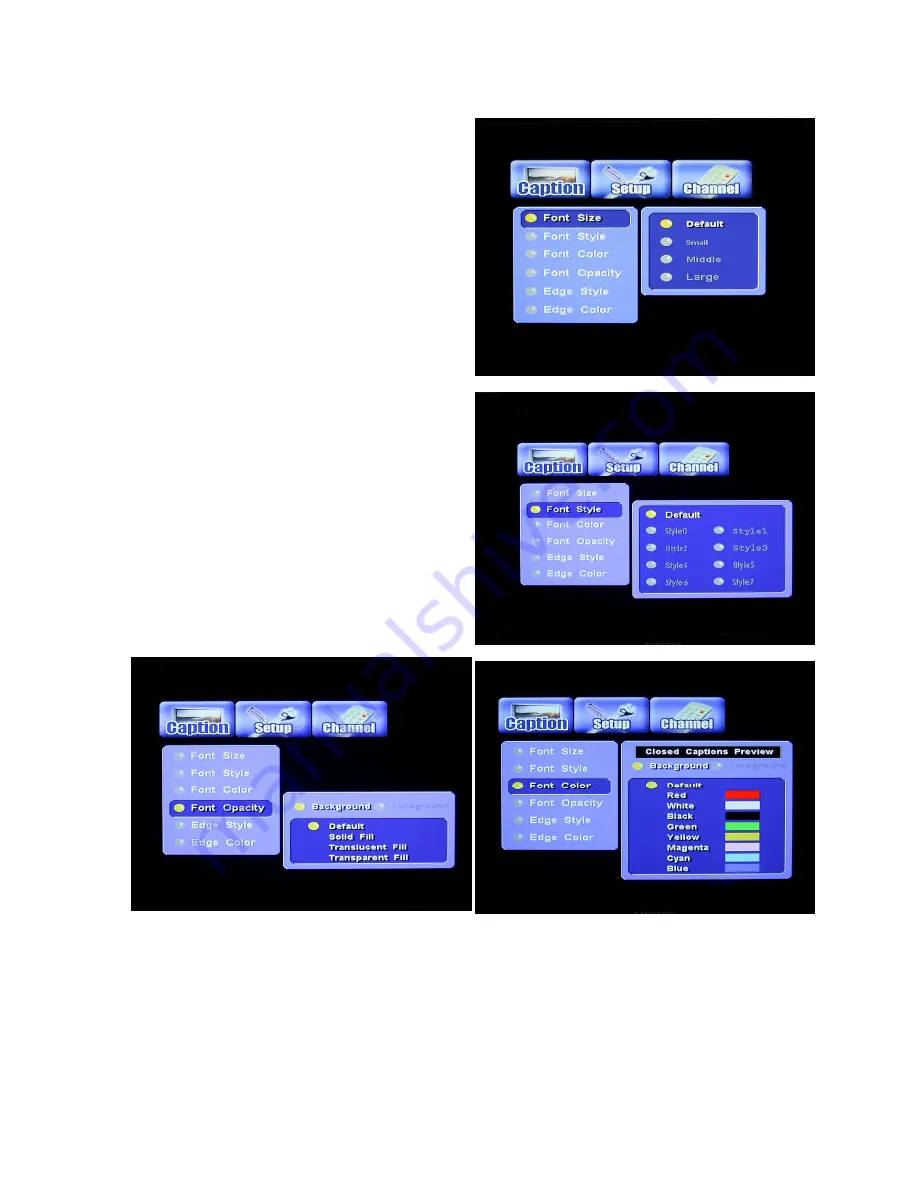
Caption (Closed-Caption Options) 

Press the MENU button on the remote control.


● Press 


buttons to highlight the “Caption” icon 

and press ENTER. 


Font Size: 

● Press 


 and 

▲▼


buttons and the ENTER button 

to select the desired Closed Caption font size. 


Font Style: 

● Press 


 and 

▲▼


buttons and the ENTER button 

to select the desired Closed Caption font style. 


Font Color: 
Closed Caption Preview --- Background: 

● Press 


 and 

▲▼


buttons and the ENTER button 

to select the desired Closed Caption background 
color. 

Closed Caption Preview --- Foreground: 

● Press 


 and 

▲▼


buttons and the ENTER button 

to select the desired Closed Caption foneground 
color. 

 
Font Opacity:


Background: 

● Press 


 and 

▲▼


buttons and the ENTER button 

to select the desired Closed Caption background 
opacity. 

Foreground: 

● Press 


 and 

▲▼


buttons and the ENTER button 

to select the desired Closed Caption foreground 
opacity. 


Summary of Contents for RC-1010

Page 1: ...the electrical outlet used to supply power to the receiver Only connect the power cord to a power source that operates between 120VAC 60Hz Power cord Be sure the power cord is routed so that it will not be stepped on or pinched by heavy items Power overloading Avoid overloading electrical outlets or extension cords which otherwise could result in electric shock or fire Lightning For protection fro...

Page 2: ...ial such as carpet or fabric Proper Connections Be sure all cables and equipment are connected to the receiver as described in this manual Object Entry To avoid electric shock never stick anything in the slots on the case or remove the cover Water Exposure To reduce the risk of fire or electric shock do not expose the receiver to rain or moisture Keep the tuner out of the reach of children or it m...

Page 3: ...14 Basic Operation 16 Select a Digital Channel 16 Using the Electronic Program Guide 16 Setting Up the RC 1010 17 Channel Menu 17 Auto Scan 18 Manual Scan 19 Edit Channel 20 Caption Options 21 Setup Menu 23 On Screen Displays and Information 27 Information Plate 27 Multi Language Audio 28 Electronic Program Guide 28 Closed Caption 29 Favorite Channels 29 Appendix 1 DTV Channel Table Information 30...

Page 4: ...ere are two important things to know about receiving a Digital broadcast 1 The Digital signal being broadcast is not on the same channel as the analog broadcast Back to our example WQAD broadcasts an analog signal on Channel 8 a VHF frequency WQAD broadcasts the DIGITAL signal on Channel 38 a UHF frequency This means that to receive the Digital broadcast you must have a UHF capable antenna and ori...

Page 5: ...ing these buttons on the front panel Remote Control The remote control provides access to the full range of system features In addition to providing access to TV programs with channel and volume controls it can be used to operate all the system menus You must use the remote control to configure the channel settings select the channels you want to include in the program list and access many other c...

Page 6: ...pgrade Examine all the items to ensure that nothing has been damaged during shipment If any of the items is damaged please contact your service provider or local distributor before continuing with installation RC 1010 HDTV Receiver Remote Control with 2 AAA batteries Audio Cable with RCA jacks Component Video cable Y Pb Pr Adapter This user s manual Description of Equipment The RC 1010 digital rec...

Page 7: ...ssing this button Left arrow button Move the cursor or field to the left Select one channel lower by pressing this button Up arrow button Move the cursor or field upward Increase volume by pressing this button Down arrow button Move the cursor or field downward Decrease volume by pressing this button Menu Displays the main menu on the screen and exits the menu Select It can select highlighted opti...

Page 8: ...1 channel audio S Video Out Connect to the TV monitors S Video input Composite Video Out Connect to the TV monitors Video input RCA jack Audio L R Out Connect to the TV monitors Audio L R input connector RCA jacks Y Pb Pr Out Connect to the HD or Wide screen TV Monitors Y Pb Pr video inputs DC IN Connect the adapter to a power input source that is 120VAC 60Hz RS 232 Contact with the PC for softwar...

Page 9: ...sconnect the receiver from the power source before connecting the cable to the UHF VHF antenna Before Connecting to other devices When the receiver is connected to an antenna that has a signal amplifier and power supply be sure that the amplifier doesn t have any leakage problems before connecting the coaxial cable to the receiver Connecting a Home Antenna Connect an antenna cable to the RF Input ...

Page 10: ...eiver VCR etc connected to your video switch you must tune your tv to the proper channel ie channel 3 or 4 to watch your component Hookup through wall plate power supply 1 Connect Coax From Antenna to Antenna Input on Power Supply 2 Connect Coax From Out to Tv on Power Supply to RF IN on Digital Receiver 3 Connect Digital Receiver to Television using desired connection See pages 11 and 12 Note If ...

Page 11: ...the Receiver S VIDEO OUT port to your TV S VIDEO IN port If S VIDEO is used the RCA type video connection is not necessary You must still connect the RCA type audio cables 3 Connect the Optical S P DIF port to your Dolby Digital compatible A V Receiver using a fiber cable if you have a Home Theater audio system 4 Connect supplied power adapter to DC In input on receiver Plug power adapter into a 1...

Page 12: ...nd AUDIO IN jacks on your TV using Y Pb Pr and Audio L R RCA type cables 3 Connect the Optical S P DIF port to your Dolby Digital compatible A V Receiver using a fiber cable if you have a Home Theater audio system 4 Connect supplied power adapter to DC In input on receiver Plug power adapter into a 120VAC Input source 5 Set your television to the input used to connect your digital receiver ...

Page 13: ... Press to call up the Closed Caption CC and Caption Service CS list You can select one to see Closed Caption INFO Press to display I Plate providing information about the current channel press twice could see the program extend information PAGE Select EPG channel page AUDIO Press to select multi lingual MENU Press to activate or close the On Screen Menu EXIT Press to back to the previous menu page...

Page 14: ...yle1 Style2 Style3 Style4 Style5 Style6 Font Style Style7 Default Red White Black Green Yellow Pink Light Blue Font Color Blue Default Solid Fill Translucent Fill Font Opacity Transparent Fill Default None Raised Depressed Uniform Drop_Shadow L Edge Style Drop_Shadow R Default Gray Blue Red Green Cyan Yellow Caption Edge Color Dark Background Foreground Background Foreground ...

Page 15: ... Full 480i 720X480 480p 720X480 720p 1280X720 Format 16 9 ratio 1080i 1920X1280 PillowBox Zoom Full PCM Sound DOLBY D Opacity 0 100 adjustment 2 sec 4 sec 6 sec I Plate OFF Daylight Saving ON OFF Time Zone Time Adjustment USA Map About HW SW version Setup Reset Box Confirm Reset Reset ...

Page 16: ...H on your remote control You may also directly select a channel using the Electronic Program Guide Using the Electronic Program Guide EPG The Electronic Program Guide is a listing of all channels currently scanned into your Digital Receiver and if available a schedule and information about programming on each channel Press the EPG button to display EPG window The current program will be highlighte...

Page 17: ...f the receiver or on the remote control Press the MENU button to see the Menu banner Channel Before you use any of the channel buttons CH FAV the available channels must first be scanned and memorized Initial Screen The first time the receiver is powered up you see the message Press Menu key and then select Channel to run Auto Manual Scan Press the MENU button to display the MENU banner Use the ar...

Page 18: ... window shows the SCAN status The receiver scans Off Air channels and searches ATSC digital signals from channel 2 to channel 69 The percentage bar shows the progress being made Once the digital TV signal is scanned the channel number and the program name are shown on the Scan List It takes about three minutes to complete the whole scanning process Scanning ends on channel 69 When it is complete y...

Page 19: ...e ATSC signal is found and locked the Status will show message Add No XX 8VSB channel successfully then you can press EXIT or MENU to leave the menu page and watch the program or go ahead scanning other channels If the signal is not locked the status will show No Channel No XX You can scan the signal again or refer to the signal level bar Signal for aligning the direction of the antenna to get the...

Page 20: ...press and to highlight the Edit and then press Enter Press and buttons to highlight the channel s FAV control column and press ENTER to copy channel into the favorite channel list After the edit setting press the EXIT button to leave ...

Page 21: ...ed Caption font style Font Color Closed Caption Preview Background Press and buttons and the ENTER button to select the desired Closed Caption background color Closed Caption Preview Foreground Press and buttons and the ENTER button to select the desired Closed Caption foneground color Font Opacity Background Press and buttons and the ENTER button to select the desired Closed Caption background op...

Page 22: ...the ENTER button to select the desired Closed Caption edge style Edge Color Press and buttons and the ENTER button to select the desired Closed Caption edge color Press EXIT button to go back to the main menu or press MENU button to leave ...

Page 23: ...ect ratio Press the EXIT button to go back to the main menu page or press MENU button to leave Note You can also change the aspect ratio by pressing the A RATIO button on the remote control Consult your television owner s manual to determine proper Resolution Non HD televisions should be set to 480i The 4 3 TV Type setting should be used for standard definition analog television sets The 4 3 ratio...

Page 24: ...illar box Select this when receiving a 4 3 source signal and you want to see the original 4 3 format Blank panels appear at the left and right of the screen 16 9 Zoom Select this pattern no blank panels will be added 16 9 Full Select this when receiving a 16 9 image and you want the wide movie format to fill the entire screen 4 3 TV or Monitor If you are using 4 3 TV or monitor you need to specify...

Page 25: ...IT or ENTER button to go back to the main menu or press MENU button to leave Opacity Changing Transparency of On Screen Display Press buttons to highlight the Opacity and press Enter Use the buttons to change the percentage of the On Screen Display s transparency Press EXIT or ENTER button to go back to the main menu or press MENU button to leave I Plate Changing Display time of the information Pl...

Page 26: ...ress or buttons to highlight About and press the ENTER button to see the information window Press the EXIT or Enter button to go back to the main menu or press the MENU button to leave Reset Box The Reset Box function allows you to reset your RC 1010 Receiver back to the factory default status On the Setup page press or buttons to highlight the Reset Box then press Enter The RESET confirmation mes...

Page 27: ...on Closed Caption Audio System Dolby 5 1 or PCM Signal Strength NEXT I Plate You can press the button the I Plate status will change to show the NEXT program s information Press the button could return to the Now status Extended Program Information When the Now or Next status I Plate is still on the TV screen Press the INFO button again will call up the extended program information of the current ...

Page 28: ... you want and press ENTER button to change it Press EXIT button to back to the main menu or press MENU button to leave EPG Electronic Program Guide Press the EPG button to display EPG window The current program will be highlighted yellow color automatically Press or buttons to roll program list and press or buttons to see maximum 12 hours program guide ...

Page 29: ...el the CC Options list then you can watch this Digital TV program with Closed Caption FAVORITE CHANNEL LIST When you are watching terrestrial or analog TV channels you can press FAV button on the remote control to call up the Favorite List Use and keys to navigate ALL Fav1 Res program lists Use or keys to browse through the selected program lists and highlight the program you like to watch then pr...

Page 30: ...s Angeles s website is http www kcet org However the most accurate method for locating the local station s website is through their parent Network For example to find WCBS New York check the CBS website You can also contact the network service center for detailed information about their local DTV program package Note a Using the Antenna Web site you can also get information about choosing the corr...

Page 31: ...ake sure the receiver is switched to the correct Audio mode AC 3 or PCM MPEG Analog Audio d Scan this channel again by using Manual Setup and see if the audio service is restored e Check with the local TV stations Sometimes they are just testing new services on their TV or Radio channels 5 No video a Check whether the receiver output and the TVs input are properly set b Check whether the Video con...

Page 32: ...IN port of the receiver b Check the digital channel whether it is out of service or not 2 Updating Channel Database The Receiver is updating the channel database 5 Press Menu key and then select Channel to run Auto Manual Scan This message appears when the receiver is turned on for the first time and must scan and memorize the available channels ...

Page 33: ...V broadcaster and select the desired services Frequency The property of a signal which is measured in cycles per second Hertz Letterbox The picture with aspect ratio 16 9 in a 4 3 TV screen with blank lines on top and bottom It is the means to watch a wide screen TV program on a 4 3 TV screen Megahertz MHz Millions of cycles per second which describes frequencies of radio wave or electric current ...

Page 34: ...34 APENDIX 4 Technical Specifications ...

Page 35: ...r to returning any product to Winegard Company or Winegard Warranty Services under this warranty policy Please call our Technical Services Department at 800 788 4417 or send an e mail to warranty winegard com to obtain the RMA number Please furnish the date of purchase when requesting an RMA number Enclose the product in a prepaid package and write the RMA number in large clear letters on the outs...

Page 36: ...36 ...

Reviews: