Failure to install in accordance with product
manufacturer’s installation and assembly
instructions could result in property damage,
personal injury, and/or death.
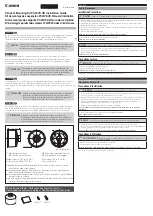
Step 1
Step 2
Step 3
Step 4
Electronics
Board
Hex Screws
Metal Washers
and Nylock Nuts
Assembling the Window Mount
To use with antenna models: PL-7000, PL7000R,
PL-8000, PL8000R, PL-8035, PL8035R, GM-9000,
GM-9035.
1. Align the hole in the clip with the press nut at
the top of the back support. The hole in the clip
should fit around the raised lip of the press nut.
Insert a 10-32 x 1/4
"
screw through the aligned
holes in the clip and back support, and tighten.
2. Push the two rubber bumpers through the two
holes in the bottom of the back support. Make
sure the rubber bumpers are fully installed
before proceeding, as these will prevent the
mount from scratching the vehicle.
3. Remove the antenna dome screws with T20 Torx/
Star screwdriver or bit.
DO NOT USE A DRILL.
Use caution on edge of reflector and gearing. The
reflector can be sharp. See
WARNING
below:
To discharge any built up static electricity after
removing the dome, touch the coax connection on
the base of the antenna.
DO NOT TOUCH
the electronics board or any
components. See Step 3 image.
4. Align the holes on the base plate of the mount
with the holes in antenna base and screw them
together with the two hex screws up from the
bottom and fastened inside the dome base with
the two metal washers and Nylock nuts. See
Step 4 images.
5. Carefully replace the dome on the antenna, and
secure with the dome screws. Align the back
of the base plate with the back support and
connect the two together with the remaining
two
10-32 x 1/4
”
screws
. See completed image
on opposite page.
After removing the dome, do not touch the
electronics board. Static discharge could
damage electronics and cause antenna to
become inoperable.


