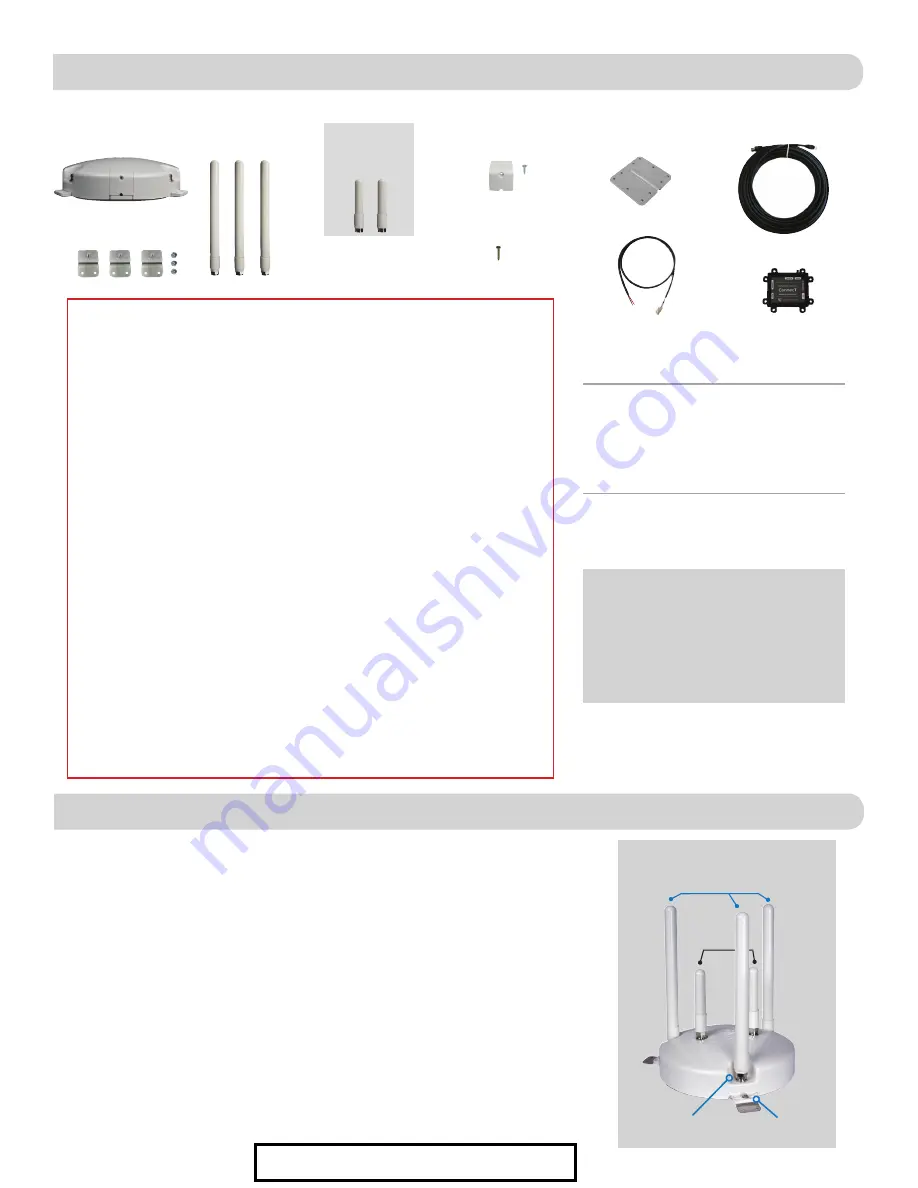
background image

1

PARTS LIST

ROOF INSTALLATION 

(Additional Mounts Sold Separately)

WARNINGS:

•  Read this manual carefully and completely before attempting to assemble, 

install or operate this product. Winegard recommends the installation of 
this equipment be done by a professional technician familiar with the 
vehicle in which it is installed. 

•  Winegard recommends wiring directly to a fused panel or fused box. 

However, if you are wiring to the battery, understand that batteries may 
expel explosive gases when not properly ventilated, therefore, special 
care and consideration is required. Consult your vehicle manufacturer for 
additional information on safely installing accessories.

•  Save these instructions.
•  Do not mount closer than 12 inches from the edge of the roof or any adjacent 

devices.

•  Do not paint any portion of the Winegard

®

 ConnecT

. Painting the system 

could damage the system and will void the warranty.

•  When first setting up the Winegard ConnecT it is recommended to check for 

software updates the first time the system is connected to an internet signal. 
It is also recommended to check for updates every couple months for fixes 
and added features.

•  Winegard 4G LTE service will not work in Mexico.
•  At the time this manual is written, ConnecT products will work with the 

Winegard Data Plan, AT&T

®

 and Verizon

®

 Wireless*. Consult your carrier to 

receive the correct SIM card and information on data plans (Mini/Standard 
SIM).

*Visit www.winegard.com/connect to see the updated approved cellular providers.

1) 

Remove each antenna from the protective bag and screw it into the correct 
open port on the outdoor unit (ODU). 

Figure 1.


2) 

Firmly tighten each antenna by hand. If using a wrench, do not overtighten 
the antenna as the antennas or housing may become damaged. The 
antennas should be tightened to 20–25 inch pounds of torque. 

3) 

Attach the mounting feet to the unit by threading the provided nuts to the 
post on the mounting feet. Tighten nuts using an 11/32” wrench. 

Figure 1

Maintenance:


Periodically check the ODU to 
ensure all connections are tight. 
As with all electronics, cycle power 
every few days to keep things 
running smoothly.

NOTE:

 Please register your product at 

http://www.winegard.com/myantenna. 
We will be able to pass along relevant 
information, as well as, inform you 
when software updates are available.

10’ Ethernet Cable

Mounting Feet  

with Nuts (3)

Cable Entry 

Plate

Outdoor Unit (ODU) w/

Impact Pad

Outdoor Unit Cable 

Entry Cover w/Screw

Power Inserter (PoE)

9.5” Power Cable

Outdoor 2.4ghz 

Antennas (3)

Mounting 

Screws (20)

4G LTE ONLY 

Outdoor 4G LTE 

Antennas (2)

Figure 1

Foot attached 

to ODU

Antenna secured 

to ODU

Antennas  

WiFi

  4G LTE

For Sales Information Please Contact RoadTrucker Inc (www.RoadTrucker.com) 

8312 Sidbury Rd.; Wilmington, NC 28411 - (800) 507-0482 / (910) 686-4281

Summary of Contents for ConnecT 4G1xT Series

Page 1: ... MOUNT OPTIONS SIMPLE SETUP WITH INCLUDED DISH RECEIVER www winegard com connect Manuel disponible en français au www winegard com connect Manual disponible en español en www winegard com connect For help email help winegard com or call 1 800 320 9992 2452392 Rev2 5 18 WF 200T WF 150T DESIGNED SPECIFICALLY FOR OVER THE ROAD TRUCKING For Sales Information Please Contact RoadTrucker Inc www RoadTruc...

Page 2: ...lan AT T and Verizon Wireless Consult your carrier to receive the correct SIM card and information on data plans Mini Standard SIM Visit www winegard com connect to see the updated approved cellular providers 1 Remove each antenna from the protective bag and screw it into the correct open port on the outdoor unit ODU Figure 1 2 Firmly tighten each antenna by hand If using a wrench do not overtight...

Page 3: ...d a bead of sealant around the hole for the cable Place the provided cable entry plate over the hole and cable Secure cable entry plate in place using the supplied screws Seal the plate and screws 10 with approved sealant 12 Secure the cable to the roof every 12 16 inches to eliminate excessive cable movement Seal the cable to the roof between the unit and cable entry plate Cable clamps not provid...

Page 4: ...irm the ON button is pressed in on the PoE power supply The LED should be on and green Turn on the WiFi enabled device s that you want to connect and scan for wireless networks It may take a few minutes for the network to appear 2 The label located on the front of this manual lists the unique default SSID and password Select this WiFi signal from the list of wireless networks and connect Once the ...

Page 5: ...l display available networks by signal strength Select the desired network and click CONTINUE Figure 9 7 Enter the network password if prompted Once the Winegard ConnecT connects to the internet the INTERNET STATUS will show connected this could take as long as two minutes You are now ready to use the WiFi WARNING Connecting to the internet through 4G LTE will use data from your Winegard Connect D...

Page 6: ...t least eight characters long You will need to log in using the new user name and password Security Type The Winegard ConnecT Security Type has been defaulted to WPA2 PSK AES Other options are available on this screen Guest Network The Winegard ConnecT provides a simple way to set up an extra network that doesn t have access to the Status Screen This allows you to provide guests with an easier pas...

Page 7: ...ecT to be connected to an internet source Figure 15 Figure 16 NOTE During this reset your device may switch to a local remembered WiFi network This will not allow you to return to the ConnecT setup screens If this happens simply reconnect manually to the ConnecT s SSID again from your device ADVANCED SETTINGS Connected Devices This displays the name of each device currently connected wirelessly to...

Page 8: ... Operation portion of this manual but they are subject to change at the provider s discretion When you contact your cellular provider you may be required to provide them with some information Type of connection Data only Type of device Mobile Hotspot IMEI Number This number will be located on the front of this manual along with on the outside of the outdoor antenna It can also be found in the ABOU...

Page 9: ...ovider s firmware Select WiFi Only and click the SELECT button 6 Click the SCAN FOR WIFI button and select one of the usable WiFi networks 7 Once connected to the internet under the NAVIGATE TO PAGE field click on the drop down menu and select Advanced Settings followed by clicking the SELECT button 8 In the Advance Settings screen click on the CHANGE PROVIDER button See Figure 19 9 Verify that th...

Page 10: ...ks Settings tab 2 Press and hold the reset button for 30 seconds located on the PoE Figure 4 This will restore the unit to the original factory settings Then you may log in using the factory SSID and password located on the front of this manual or on the ODU What do I do if 10 11 12 1 does not bring up the login screen One of several things has happened The first thing to check is the WiFi signal ...

Page 11: ...nce the unit is able to identify all of the signals they will be listed and you will be able to choose one Trying to Connect to Wifi XXXX You have selected a source signal and the Winegard ConnecT unit is attempting to connect to this source Once connected the message should change to Connect to Logging into WiFi XXXX The source signal is password protected This message will be displayed after you...

Page 12: ... prepaid package and write the RMA number in large clear letters on the outside of the package To avoid confusion or misunderstanding a shipment s without an RMA number s or an unauthorized return s will be refused and returned to Customer freight collect WINEGARD COMPANY DOES NOT ASSUME ANY LIABILITIES FOR ANY OTHER WARRANTIES EXPRESS OR IMPLIED MADE BY ANY OTHER PERSON ALL OTHER WARRANTIES WHETH...

Reviews: