background image

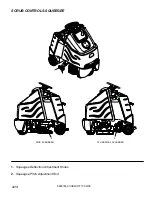
SCRUB CONTROLS-SQUEEGEE

86037660 CHARIOT 11/09/06 

3-14

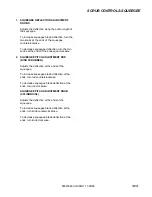
1.  SQUEEGEE DEFLECTION ADJUSTMENT 

KNOBS 

Adjusts the deflection along the entire length of 
the squeegee.   

To increase squeegee blade deflection, turn the 
two knobs at the ends of the squeegee 
counterclockwise.  

To decrease squeegee deflection, turn the two 
knobs at the ends of the squeegee clockwise. 

2.  SQUEEGEE PITCH ADJUSTMENT ROD  

(DISK SCRUBBER) 

Adjusts the deflection at the ends of the 
squeegee.   

To increase squeegee blade deflection at the 
ends, turn rod counterclockwise. 

To decrease squeegee blade deflection at the 
ends, turn rod clockwise. 

SQUEEGEE PITCH ADJUSTMENT KNOB 
(CYLINDRICAL) 

Adjusts the deflection at the ends of the 
squeegee.   

To increase squeegee blade deflection at the 
ends, turn knob counterclockwise. 

To decrease squeegee blade deflection at the 
ends, turn knob clockwise. 

Summary of Contents for chariot iSCRUB 10060210

Page 1: ...0210 CSE24 10060250 CS24SP 10060220 CSX24 10060270 CSXE24 10060290 CSE24SP 10060260 CSXEO24 10060300 iSCRUB Operating Instructions ENG Read these instructions before using the machine CP 86037660 05 27 08 PRV NO 980228 ...

Page 2: ...covery tank MODEL _______________________________________ DATE OF PURCHASE __________________________ SERIAL NUMBER ______________________________ SALES REPRESENTATIVE _____________________ YOUR DEALER Name __________________________________________________________________________________________________ Address ______________________________________________________________________________________...

Page 3: ...trol Panel Basic Cylindrical 5 3 Control Panel Deluxe 5 5 Control Panel Housing 5 7 Decal 5 9 Frame Lower 5 11 Frame Upper 5 13 Pedal Platform 5 15 Rear Cover 5 19 Scrub Brush Pad Driver 5 21 Scrub Deck Disk 5 23 Scrub Deck Cylindrical 5 25 Scrub Deck Aqua Mizer 5 27 Side Squeegee Cylindrical 5 29 Scrub deck Side Squeegee Cylindrical 5 31 Scrub Deck Skirts 5 33 Scrub Deck Lift 5 35 Scrub Deck Moun...

Page 4: ...led parts illustrations and corresponding parts list The parts lists include a number of columns of information MODEL _____________________________________ DATE OF PURCHASE ________________________ SERIAL NUMBER ____________________________ SALES REPRESENTATIVE ___________________ REF column refers to the reference number on the parts illustration PART NO column lists the part number for the part ...

Page 5: ... hotels schools hospitals factories shops and offices for more than normal housekeeping purposes Maintenance and repairs must be done by qualified personnel If foam or liquid comes out of machine switch off immediately Disconnect battery before cleaning or servicing Before the machine is discarded the batteries must be removed and properly disposed of Make sure all warning and caution labels are l...

Page 6: ...he equipment Read this information carefully Know when these conditions can exist Locate all safety devices on the machine Please take the necessary steps to train the machine operating personnel FOR SAFETY DO NOT OPERATE MACHINE Unless Trained and Authorized Unless Operation Guide is Read and understood In Flammable or Explosive areas In areas with possible falling objects WHEN SERVICING MACHINE ...

Page 7: ...HARIOT 11 09 06 2 3 NOTE These drawings indicate the location of safety labels on the machine If at any time the labels become illegible promptly replace them 86252520 86244300 WARNING LABEL PRV NO 500955 BATTERY CAUTION PRV NO 80885 ...

Page 8: ...eries 535 lbs 243 kg Solution Control 1 3 GPM pump fully variable with automatic shut off in neutral Solution capacity 25 gal 95 L Recovery capacity 25 gal 95 L Scrub brush diameter Disk Machine 12 inch 305 mm Scrub brush diameter Cylindrical Machine 6 inch 152 mm Scrub brush pressure 0 150lbs 0 667N Scrub brush speed Disk Machine 300 rpm Scrub brush speed Cylindrical Machine 800 rpm Tires 10 in 2...

Page 9: ...instruction concerning use of the appliance by a person responsible for their safety Children should be supervised to ensure that they do not play with the appliance SPECIAL NOTES The sound pressure level at the operator s ear was measured to be 68 dBA This was a nearfield broad band measurement taken in a typical industrial environment on a tile floor This appliance contains no possible source of...

Page 10: ... applied to the first scrubbing brush turning in a clockwise rotation when viewed from the right side of machine The first brush scrubs dirt and debris between the brushes The second scrubbing brush turning in a counter clockwise rotation picks up debris and throws it into a removable hopper Water is allowed to drain out the hopper into the squeegee path where it is recovered from the floor The sc...

Page 11: ...anel Drive 2 Control Panel Scrub 3 Control Housing 4 Pedal Platform 5 Rear Cover 6 Tank 7 Recovery Dome 8 Recovery Drain Hose 9 Scrub Deck Aqua Mizer 10 Scrub Deck Skirts Side Squeegees 11 Solution Cover 12 Solution Drain Hose 2 3 4 6 7 8 9 10 11 12 5 1 ...

Page 12: ...DRIVE CONTROLS 86037660 CHARIOT 11 09 06 3 5 11 Basic 10 Basic 9 8 7 6 5 4 3 2 1 ...

Page 13: ...o the machine at any time and apply parking brake To shut the machine power off push the Emergency Stop Switch this will also engage the parking brake and cause the machine to stop immediately To reset the machine rotate the switch clockwise 3 DIRECTIONAL CONTROL SWITCH Controls the direction of travel of the vehicle The position of the switch indicates direction of travel To travel forward press ...

Page 14: ...e position of the switch indicates speed setting Deluxe The display indicates speed setting When the key is turned on the controller will automatically adjust the speed to setting 2 7 DRIVE RESET SWITCH This safety feature is designed to ensure safe engagement of propel drive Each time the machine power is turned on and each time an operator steps on to the platform the Drive Reset Switch must be ...

Page 15: ...information screen 1 or information screen 2 The level of battery charge is indicated by the horizontal bars in the battery meter box When the batteries require charging the icon will flash and a battery inhibit icon will appear on the right side of either information screen Scrub and solution functions that are running when the battery inhibit icon appears will be automatically shut off It is not...

Page 16: ...SCRUB CONTROLS BASIC AND CYLINDRICAL 86037660 CHARIOT 11 09 06 3 9 1 Squeegee Lift Lever 3 Brush Pressure Indicator 2 Scrub Deck Actuator Switch 4 Solution Control Knob 4 3 2 1 ...

Page 17: ...ure press the top of the switch 3 BRUSH PRESSURE INDICATOR The brush pressure indicator corresponds to the amp draw of the scrub brush motors to tell how hard the motors are working The blue zone indicates medium or proper brush pressure The red zone indicates heavy or excessive brush pressure Operating in the red zone may cause the brush circuit breakers to trip 4 SOLUTION CONTROL KNOB Controls s...

Page 18: ...uum will turn on The information display window will show which functions are operating If the throttle pedal is in the neutral position for more than two seconds the brushes and solution flow will stop If the one touch switch is activated without brushes installed the brush motors will stop the scrub deck will rise and the brush pressure indicator will display error code 9000 To stop scrubbing pr...

Page 19: ...he amount of pressure There are 4 different pressure settings To decrease the amount of down pressure press the top of the brush pressure switch To increase the amount of down pressure press the bottom of the brush pressure switch 4 VACUUM SQUEEGEE SWITCH This switch independently controls the vacuum motor and squeegee position To start the vacuum motor and lower the squeegee to the floor press th...

Page 20: ...SCRUB CONTROLS SQUEEGEE 86037660 CHARIOT 11 09 06 3 13 1 Squeegee Deflection Adjustment Knobs 2 Squeegee Pitch Adjustment Rod DISK SCRUBBER CYLINDRICAL SCRUBBER 2 2 1 ...

Page 21: ...he ends of the squeegee clockwise 2 SQUEEGEE PITCH ADJUSTMENT ROD DISK SCRUBBER Adjusts the deflection at the ends of the squeegee To increase squeegee blade deflection at the ends turn rod counterclockwise To decrease squeegee blade deflection at the ends turn rod clockwise SQUEEGEE PITCH ADJUSTMENT KNOB CYLINDRICAL Adjusts the deflection at the ends of the squeegee To increase squeegee blade def...

Page 22: ...ould be on the pedal platform with their left foot on the operator presence pedal The throttle pedal must be in the neutral position 2 Turn the machine power on by turning key switch clockwise to the ON position 3 Check the position of the Directional Control Switch to make sure the machine will travel in the direction intended 4 Press the Drive Reset Switch 5 Press lightly on the throttle pedal w...

Page 23: ...nded proportion instructions 5 Replace solution tank cover Flammable materials can cause an explosion or fire Do not use flammable materials in the tanks NORMAL SCRUBBING Plan the scrubbing pattern in advance The longest track is around the perimeter of the area to be cleaned For efficient operation the runs should be the longest possible without turning stopping or raising or lowering scrub deck ...

Page 24: ...ubbing NOTE Shut machine off immediately if water or foam is expelled from the machine 7 Adjust the speed of the machine solution flow and scrub brush pressure as necessary NOTE Once solution flow rate is set it is not necessary to shut off solution when stopping scrubbing Solution flow is automatically shut off when brush motors stop When brush motors are activated flow automatically resumes PRIM...

Page 25: ...ily soiled or have thick accumulations of floor finish may not clean sufficiently with one pass In these cases it will be necessary to double scrub To double scrub make the first pass over the surface being cleaned with the squeegee up vacuum off the solution on Aqua Mizer removed and brushes down This allows the solution to stay in contact with the soil while loosening the surface accumulation wi...

Page 26: ...at shut off system is located in the rear of the recovery tank 5 Replace the drain cap and secure drain hose under tank 6 If machine is to be stored leave the recovery tank dome off SOLUTION TANK 1 Pull recovery drain hose out to expose the solution drain hose 2 Pull the solution drain hose from under front of the tank Unscrew the T handle on plug enough to loosen plug then lower hose in direction...

Page 27: ...NOTES 86037660 CHARIOT 11 09 06 3 20 ...

Page 28: ...nspect solution filter strainer Run vacuum motors to dry Clean brushes or pads and check wear Clean squeegee blades and check wear Clean outside of tanks check for damage Store with dome off tank Charge batteries Clean off top of batteries Check battery cells with hydrometer Wet cell only Inspect scrub deck skirts and Aqua Mizers Clean solution strainer inside tank Check battery connections are ti...

Page 29: ...MAINTENANCE BATTERIES 86037660 CHARIOT 11 09 06 4 2 1 Rear Cover Retainer Knob 2 Rear Cover 3 Battery Connector Machine 4 Batteries 5 Battery Tray 6 Battery Tray Latch 1 2 3 4 5 6 ...

Page 30: ...trolyte level in each battery cell before and after charging the batteries Never add acid to the batteries use distilled water Do not allow water level to fall below the battery plates Portions of plates exposed to air will be destroyed Do not overfill Keep plugs firmly in place at all times When servicing machine avoid contact with battery acid Batteries emit hydrogen gas Explosion or fire can re...

Page 31: ...h battery acid Batteries emit hydrogen gas Explosion or fire can result Keep sparks and open flame away Keep covers open when charging Wear eye protection and protective clothing when working with batteries Charge batteries in a well ventilated area Use a 36 volt 20 amp maximum output DC charger which will automatically shut off when the batteries are fully charged 1 Stop the machine in a clean we...

Page 32: ...d be up to the indicator ring If necessary add distilled water 11 Install the rear cover CHANGING BATTERIES Stop the machine in a clean area next to the charger Turn off machine FOR SAFETY Before leaving or servicing the machine stop on level surface turn off machine and remove key 1 Remove the rear cover 2 Disconnect battery pack from machine 3 Unlatch battery tray from machine and pull out to ex...

Page 33: ...06 4 6 1 Squeegee 2 Squeegee Deflection Adjustment Knobs 3 Squeegee Level Indicator 4 Squeegee Pitch Adjustment Rod Cylindrical Knob 5 Squeegee Pitch Adjustment Lock Nut 6 Squeegee Retainer Knob DISK SCRUBBER CYLINDRICAL SCRUBBER 5 6 4 6 4 3 2 1 ...

Page 34: ...th the squeegee in the up position turn key switch OFF 2 Disconnect vacuum hose from squeegee and loosen knob on left side of squeegee lifting carrier 3 Pull squeegee assembly from the lifting carrier 4 Inspect or repair as necessary and reinstall TO REPLACE OR ROTATE REAR SQUEEGEE BLADES 1 With the squeegee in the up position turn key switch OFF FOR SAFETY Before leaving or servicing machine stop...

Page 35: ... knob 5 Check the deflection of the squeegee blades again Repeat steps 1 through 4 until the deflection is equal across the entire rear squeegee blade Tighten wing nut TO ADJUST AMOUNT OF REAR SQUEEGEE DEFLECTION 1 Choose a smooth level surface Lower the squeegee and drive forward at least 2 feet 60cm 2 With the squeegee down stop the machine Do not allow machine to roll back FOR SAFETY Before lea...

Page 36: ... Polypropylene works well for maintaining concrete wood and tile floors FINISHED FLOORS Nylon bristles are used in a variety of applications on coated or uncoated surfaces White Pads Polishing are used for dry polishing to achieve a high gloss appearance or surface washing on highly polished or burnished floors Red Pads Buffing are used for light duty scrubbing When used with a mild detergent they...

Page 37: ...ENANCE SCRUB DECK DISK 86037660 CHARIOT 11 09 06 4 10 1 Scrub deck Aqua Mizer 2 Aqua Mizer retainer knob 3 Scrub deck skirt 4 Scrub deck skirt stop 5 Scrub brush motor 6 Scrub deck lift actuator 6 5 4 3 2 1 ...

Page 38: ... motor cap Remove two bolts 2 Remove end cap from motor NOTE Motors contain two wave washers in cap Do not lose these 3 Release brush from spring tension Remove screw connecting brush wire lead to brush holder Clean brush holder to insure free movement 4 Retract spring and install new brush Install connector screw and lead 5 When all new brushes are installed Place all in retracted position held i...

Page 39: ... the actuator such that it is fully extended Positive power to white wire and negative ground to black Limit switch within actuator will stop it 2 Turn barrel out one or more full turns to assure that when it is retracted it will not bind against itself 3 While holding actuator barrel to prevent it from spinning apply power to the actuator such that it is fully retracted Positive power to black wi...

Page 40: ... DECK CYLINDRICAL 86037660 CHARIOT 11 09 06 4 13 4 13 1 Hopper 2 Blade side squeegee 3 Side squeegee adjustment knob 4 Scrub brush motor 5 Scrub deck lift actuator 6 Side squeegee removal knob 7 Brush door 2 4 3 5 1 6 7 ...

Page 41: ...rom the right side and the rear is removed from the left side 1 Unscrew the knob and swing side squeegee out about 90 2 Unscrew knob on side door but do not remove 3 Pull out on top of door until lip on door clears brush head 4 Push down on door until hooks on bottom of door are free of scrub head side 5 Pull out on door with a rocking motion to free idler door from end of brush 6 Pull brush out w...

Page 42: ...ad to floor Allow brushes to run until automatic shut off occurs It may be necessary to repeat this step in the same location until a good mark can be seen on the floor This can be accomplished by touching lightly the throttle pedal to restart the scrub deck without moving the machine 3 Raise the scrub deck and note the brush patterns on the floor There should be two rectangles with parallel sides...

Page 43: ...from motor NOTE Motors contain two wave washers in cap Do not lose these 3 Release brush from spring tension Remove screw connecting brush wire lead to brush holder Clean brush holder to insure free movement 4 Retract spring and install new brush Install connector screw and lead 5 When all new brushes are installed Place all in retracted position held into brush holder by spring tension 6 Carefull...

Page 44: ... to be adjusted when replaced To adjust the actuator 1 While holding actuator barrel to prevent it from spinning apply power to the actuator such that it is fully extended Positive power to white wire and negative ground to black Limit switch within actuator will stop it 2 Turn barrel out one or more full turns to assure that when it is retracted it will not bind against itself 3 While holding act...

Page 45: ...ould be found and corrected 18 Amp Protects the left scrub brush motor 18 Amp Protects the right scrub brush motor 30 Amp Protects the vacuum motor Basic only 30 Amp Cylindrical 25 Amp Disk Protects the propel motor 3 Amp Protects the machine controls Basic only 3 Amp Protects the pump Basic only 2 FUSE DELUXE ONLY The fuse is a one time circuit protection device designed to stop the flow of elect...

Page 46: ...AINTENANCE SOLUTION STRAINER PUMP DISK MODELS 86037660 CHARIOT 01 03 08 4 19 1 Solution Strainer Coarse 2 Solution Strainer Fine 3 Pump 4 Pump Mounting Plate 5 Solenoid Valve 6 Shut off Valve 5 4 3 1 6 2 ...

Page 47: ...MAINTENANCE SOLUTION STRAINER PUMP CYLINDRICAL MODELS 86037660 CHARIOT 01 03 08 4 20 1 Solution Strainer Coarse 2 Solution Strainer Fine 3 Pump 4 Solenoid Valve 5 Jets 6 Shut off Valve 3 1 5 4 2 6 ...

Page 48: ...se until the bottom is separated Clean out the debris from the wire mesh and re assemble Make sure the O ring gasket is in place when re assembled To resume flow turn the shut off valve to the open position 3 PUMP The pump is located under the tank on the right side of machine The pump delivers solution from the tank to the scrub deck To repair or replace pump 1 Remove scrub deck skirts Aqua Mizer...

Page 49: ...MAINTENANCE VACUUM FLOAT SHUT OFF 86037660 CHARIOT 11 09 06 4 22 1 Recovery tank float shut off 2 Vacuum motor 1 2 ...

Page 50: ...servicing machine stop on a level surface turn off machine and disconnect power TO REPAIR OR REPLACE VACUUM MOTOR 1 Remove rear cover from machine 2 Remove two screws from top of control panel and four screws from sides of control housing 3 Slide control housing back from tank to expose vacuum motor 4 Disconnect electrical connector from the vacuum motor 5 Remove three nuts that secure vacuum moto...

Page 51: ...MAINTENANCE DRIVE MOTOR BRAKE 86037660 CHARIOT 11 05 07 4 24 1 Drive motor 2 Parking brake 3 Drive chain ...

Page 52: ... operator steps off the platform or when emergency stop is engaged The brake has a mechanical over ride that can be engaged so machine can be pushed or towed slowly When the mechanical over ride is engaged the machine cannot be driven To engage brake 1 Mechanical over ride engaged Machine can be pushed or towed slowly 2 Push lever firmly in direction of arrow Note There is an intermediate stop Mak...

Page 53: ...that the roll pin be left partially in the hex hub 5 Remove brush cap 6 Release brush from spring tension Remove screw connecting brush wire lead to brush holder Clean brush holder to insure free movement 5 Install new brush and reinstall connecting screw and lead 6 When all new brushes are installed Place all in retracted position held into brush holder by spring tension 7 Carefully replace brush...

Page 54: ...aside 6 Remove clamps and set aside 7 Pull mandrel from bottom of tank Access can either be from the dirty water side or the clean water side or both When replacing bag with new one be sure to save mandrel REPLACING BAG 1 Install mandrel in bottom of bag 2 Place new bag in tank making sure hole for strainer basket is oriented properly 3 Angle mandrel and bag into tank fitting toward front of machi...

Page 55: ...weight of the machine Tie downs must be positioned to prevent the machine from moving forward backward or either side to side Use all four corners of the machine with the tie downs running out opposite directions Tie downs must be attached to the transporting vehicle securely PREPARATION FOR LOADING UNLOADING TRAILER Before loading or unloading machine from trailer remove squeegee scrub deck side ...

Page 56: ...tch Faulty operator presence pedal circuit or switch Check wires connections and switch Faulty platform circuit or switch Check wires connections and switch Brake over ride engaged Disengage brake over ride Little or no propel Faulty brake circuit or over ride switch Check wires connections and switch Machine does not change speeds Faulty speed control circuit or switch Check wires connections and...

Page 57: ...r plugged Clean solution strainer Solution system plumbing obstructed Clear obstruction from plumbing Pump obstructed Clean or replace pump Solution solenoid valve obstructed or stuck Clean or replace valve Solution shut off valve is closed Open shut off valve Faulty pump circuit or pump Check wiring connections control broad Basic and pump Little or no solution flow to the floor Faulty solenoid C...

Page 58: ...CD module communications timeout Wiring fault on 6 way serial link between controller and display 7501 LCD module settings corrupt Disconnect batteries and wait 1 minute before re applying power All 760_ Codes Brush motor or brush circuit fault Check for short or open circuits in brush motors or wiring All 770_ Codes Vacuum motor or vacuum circuit fault Check for short or open circuits in vacuum m...

Page 59: ...h followed by a pause then 4 LED flashes and then repeats LED CODE PROGRAMMER LCD DISPLAY EXPLANATION POSSIBLE CAUSE 1 1 THERMAL CUTBACK over under temperature cutback 1 Temperature 92 C or 25 C 2 Excessive load on vehicle 3 Operation in extreme environments 4 Electromagnetic brake not releasing 1 2 THROTTLE FAULT 1 throttle fault 1 Throttle input wire open or shorted 2 Throttle pot defective 3 Wr...

Page 60: ...KE OFF FAULT brake Off fault 1 Electromagnetic brake driver open 2 Electromagnetic brake coil shorted 3 5 HPD HPD High Pedal Disable fault 1 Improper sequence of throttle and KSI push or inhibit inputs 2 Misadjusted throttle pot 4 1 CURRENT SENSE FAULT current sense fault 1 Short in motor or in motor wiring 2 Controller failure 4 2 HW FAILSAFE motor voltage fault hardware 1 Motor voltage does not ...

Page 61: ...NOTES 86037660 CHARIOT 11 09 06 4 32 ...

Reviews: