background image

Storage Media 

01900xxxxx                                  iPOS plus Advanced – User Manual                                      45    


Secure the bracket with the 
screws provided. 


Assemble the guide rails to the 
hard disk drive. 


Summary of Contents for iPOS plus Advanced

Page 1: ...iPOS plus Advanced User Manual ...

Page 2: ...ge if you have any constructive criticism We would like to thank you in advance for your comments With kind regards Wincor Nixdorf International GmbH Technical Documentation R D SAT22 Wohlrabedamm 31 D 13629 Berlin E Mail retail documentation wincor nixdorf com Order No xxxxx Your opinion ...

Page 3: ...cor Nixdorf International GmbH 2017 The reproduction transmission or use of this document or its contents is not permitted without express authority Offenders will be liable for damages All rights including rights created by patent grant or registration of a utility model or design are reserved Delivery subject to availability technical modifications possible ...

Page 4: ...Unpacking And Checking the Delivery Unit 11 Basic settings 12 Highlights 12 Processors Type 12 RAM 12 Mass Storage Options 12 Display 12 New Interface Ports 13 Setting Up the Device 14 Ergonomic Terminal Workplace 14 Overview 16 Front View with Stand 16 Back View with Stand 17 18 AC Power Adapter 19 Front Panel 20 Projected Capacitive Touch Screen 21 General Information 21 Instructions for Using t...

Page 5: ...g to the stand 30 Connector panel 34 Connecting cables 36 Disconnecting cables 38 Storage Media 40 Replacement of the Hard Disk Drive 40 Second Hard Disk Drive 43 Installing the second hard disk drive 43 Replacement of the RAM 48 lnstalling to a wall 50 Things you need 50 Preparation 52 Connecting the display 52 Mounting height 53 Mounting location 53 Installation 54 Fix wall mount back plate to t...

Page 6: ...al 58 Installing peripherals 59 Starting Up the System 62 Error reporting 63 Technical Data 64 AC Power Adapter 65 NFC Module 66 I O Hub 67 Total Available Power 69 Appendix 70 Approved Printers List 70 Abbreviations 71 ...

Page 7: ... against harmful interference when the equipment is operated in a commercial environment This equip ment generates uses and can radiate radio frequency energy and if not installed and used in accordance with the instruction manual may cause harmful interference to radio communications Operation ofthis equipment in a residential area is likely to cause harmful interference in which case the user wi...

Page 8: ...rmit erklärt Wincor Nixdorf dass sich das Gerät in Übereinstimmung mit den grundlegenden Anforderungen und den übrigen einschlägigen Bestimmungen der Richt linie 2014 53 EG befindet Eesti Estonian Käesolevaga kinnitab Wincor Nixdorf seadme vastavust direktiivi 2014 53 EÜ põhinõuetele ja nimetatud dire ktiivist tulenevatele teistele asjakohastele sätetele English Hereby Wincor Nixdorf declares that...

Page 9: ...a vonatkozó alapvetõ követelményeknek és az 2014 53 EC irányelv egyéb elõírásainak Polski Polish Niniejszym Wincor Nioxdorf oświadcza że urządzenie jest zgodny z zasadniczymi wymogami oraz pozostałymi sto sownymi postanowieniami Dyrektywy 2014 53 EC Português Portu guese Wincor Nixdorf declara que este dispositivo está con forme com os requisitos essenciais e outras disposições da Directiva 2014 5...

Page 10: ...Advanced User Manual 4 Norsk Norwegian Wincor Nixdorf erklærer herved at utstyret enhet er i samsvar med de grunnleggende krav og øvrige relevante krav i direktiv 2014 53 EF The declaration of conformity may be consulted at http www wincor nixdorf com ...

Page 11: ...safety of the user but also can cel all warranty and liability agreements Expansion cards with electrostatically sensitive devices ESD may be marked with this sticker When opening the device or handling modules fitted with ESD please ob serve the following instructions which pertain to all electrostatic sensitive devices ESDs Always use the antistatic kit Statically discharge yourself for example ...

Page 12: ...act power socket are easily accessible Whenever work of any kind is done on the device as well as when data cables are plugged and or unplugged the device must be com pletely disconnected from the line voltage To do so turn the device off and unplug the power cord To disconnect the device from the supply voltage completely switch off the device and disconnect the power plug of the system Never plu...

Page 13: ...own as TN S network Do not use PEN conductors Please also observe the recommendations of the norm DIN VDE 0100 Part 540 Appendix C2 as well as EN50174 2 5 4 3 Thus you can help to avoid possible mal functions If you replace a storage medium make sure that you only use the stor age medium recommended or approved by Wincor Nixdorf You can connect or disconnect USB devices during operation of your iP...

Page 14: ...s The type and scope of application programs depend on the customer s own selection therefore software will not be discussed further in this manual Care of the iPOS plus Advanced Clean your system s housing at regular intervals with a dry lint free cloth If this does not suffice please use a suitable plastic surface cleaner which you can order from Wincor Nixdorf For more information about cleanin...

Page 15: ...help us to reuse components and material But there are still some parts that are not reusable Wincor Nixdorf guaran tees the environmentally safe disposal of these parts in a Recycling Center which is certified pursuant to ISO 9001 and ISO 14001 You can protect our environment by only switching on your equipment when it is actually needed If possible even avoid the stand by mode as this wastes ene...

Page 16: ... the prod uct inadequate location or surroundings will not be covered by the warranty For further information on the stipulation consult your contract All parts of the product which are subject to wear and tear are not included in the warranty engagement For detailed warranty arrangements please consult your contract documents Please order spare parts at the Wincor Nixdorf customer service ...

Page 17: ...he plus pole must be on top Always make sure that the system is switched off and the power cable disconnected from the system before you replace the battery Unpacking And Checking the Delivery Unit Unpack the parts and check to see whether the delivery matches the information on the delivery note The delivery comprises the respective screen module Data cables necessary for operation can be ordered...

Page 18: ...ration is the last of the Intel Core Processor series that sup ports Windows 7 If the application environment is not restricted by the Windows Editions there is on a project basis an optional 7th Generation Core Processor to choose from Highlights Processors Type Celeron G3900TE Intel Core i3 6100TE Intel Core i5 6500TE Intel Core i3 7101TE Intel Core i5 7500T RAM 2 x DDR4 SODIMM socket DDR4 SODIM...

Page 19: ...Basic settings 01900xxxxx iPOS plus Advanced User Manual 13 New Interface Ports USB Type C Alternate DP PD Q170 variant only 24V Powered USB ...

Page 20: ...anced system where it will not be exposed to ex treme environmental conditions Protect the device from vibrations dust moisture heat and strong magnetic fields Ergonomic Terminal Workplace Please observe the following when setting up your terminal workplace Avoid direct glaring and reflective glaring Use the screen only in a controlled luminance surounding Install the device with a viewing directi...

Page 21: ...1900xxxxx iPOS plus Advanced User Manual 15 Position the screen within a preferred and permit ted range of vision so that you can look onto the screen from above 30 30 40 0 Permitted range of vision Preferred range of vision ...

Page 22: ...Overview 01900xxxxx iPOS plus Advanced User Manual 16 Overview Front View with Stand 1 iPOS plus Advanced 2 Desktop Stand 3 Touch buttons and Activities Indicator 4 Power status indicator ...

Page 23: ... Advanced User Manual 17 Back View with Stand 1 Stand 2 Base cover of stand 3 Hinge Cover 4 VESA mount Cove 5 Access Cover 6 Side attach peripheral connection cover 7 Side attach peripheral connection cover 8 Cable connection cover ...

Page 24: ...xx iPOS plus Advanced User Manual 18 Observe the safety precaution mentioned on the next page when you remove the back cover of stand To avoid damage to the back cover of the stand be careful of how you would remove it ...

Page 25: ...nual 19 AC Power Adapter 1 AC Power Cord 2 DC Power Out 3 Power Indicator The external power supply is applicable for common line voltage It automatically adjusts itself to the particular voltage for grid input voltage and power supply see appendix ...

Page 26: ...Overview 01900xxxxx iPOS plus Advanced User Manual 20 Front Panel On Off ...

Page 27: ...erent from common capacitive touch screens which were used until now is located on the back side of the touch screen Thus the active touch surface is not touched directly anymore and therefore will not wear off by normal use As most of the surface contaminations do not cause an interference of the touch screen this technology can be used in public or under severe environmental conditions Instructi...

Page 28: ...ly available glass cleaning product All pH neutral materials pH 6 to 8 are good for cleaning Cleaners with pH values 9 to 10 are not recommended Cleaning with water and isopropyl alcohol is possible as well Do not use solvents con taining acetic acid Use a soft fine meshed cloth to clean the surface Dampen the cloth slightly and then clean the screen A wrong maintenance may cause damages to the sc...

Page 29: ... the screen the top sheet compresses into contact with the glass layer and current flows to the four corners in proportion to the distance from the edge The controller then calculates the position of the finger or stylus based on the current flow Because the controller derives both the X and Y touch coordinates from the stable glass layer the accuracy and operation of the touch screen is unaffecte...

Page 30: ...ded material for a stylus is polyacetal The stylus should have a minimum spherical radius of 0 8 mm and contain no sharp edges or burrs that may cause damage to the top sheet Cleaning Instructions Always turn off the system before cleaning The surface of your Touch Screen should be cleaned with a water based solvent or a non abrasive cleaner Do not use sol vents con taining acetic acid or methylen...

Page 31: ...chapter provides you with the information you need to prepare for the installation of the system Dimensions Please refer to the drawings below for dimensions of the desktop and wall mount versions All dimensions are specified in millimetres The views of the systems are not drawn to scale Desktop version ...

Page 32: ...nstallation 01900xxxxx iPOS plus Advanced User Manual 26 Wall mount version Required operation space Maintain at least 50 mm from the side of the system to ensure proper ventilation during the operation of the system ...

Page 33: ...nto the system location such as walkway areas hallways areas or crowded areas are not recommended Make sure that all applicable building and electric codes and accessibil ity requirements are followed The mounting area must have adequate viewing area and ventilation as well as access to an AC power outlet The mounting method must be able to support the combined weight of the system and the suspend...

Page 34: ...lnstalling to a stand Take the stand and the monitor out of the packaging For installation you will need a Torx screwdriver to loosen and tighten the Torx screws Preparing the stand From the stand 1 Remove the base cover 2 Remove the back cover 3 Remove the frame cover ...

Page 35: ... into the four screw holes as marked with the red circles and tighten them only half way through Remove the cable connection cover at the bottom of the display as illustrated with the green arrow Plug in the cables Place back the cable connection cover and pull the cables through the cover opening as illustrated ...

Page 36: ...he four half tightened Torx screws found on the display onto the four U shaped grooves found on the frame of the stand 1 Place the I O hub onto the base of the stand 2 Stick on the cable clamps to the surface of the I O hub 3 Then route cable through the cable clamps Connect the power supply unit to the power socket of the I O hub 4 ...

Page 37: ... 01900xxxxx iPOS plus Advanced User Manual 31 Connect the USB cable from the I O hub to the USB3 a or b port on the connector panel And connect the power cable from the I O hub to the power socket c on the con nector panel ...

Page 38: ...lnstalling to a stand 01900xxxxx iPOS plus Advanced User Manual 32 Tighten the four Torx screws to secure the display to the stand Place in the frame cover ...

Page 39: ...cover routing the cables through the bottom Place in the base cover The installation is now complete To uninstall follow the same steps in reverse order When uninstalling the stand always make sure that all cables are disconnected Never connect data cables when the system is switched on ...

Page 40: ...nder the cable connection cover of the display 1 PLINK2 DVI D 2 LAN RJ45 3 USB 3 0 USB1 4 USB 3 0 USB2 5 USB 2 0 USB3 6 eSATA 7 USB 2 0 USB4 8 PUSB24V 9 USB C with DP 10 Standard RS232C COM1 DB9 male 11 Mass storage HDD SSD 12 Powered RS232C COM2 DB9 female 13 RJ12 Cash drawer 14 Connection to power 24V DC Input ...

Page 41: ...5 Make sure that all additional devices have an CE certificate Please note that MAX 70W load is allowed for any combination of the inter face connectors The iPOS plus Advanced has 2 variants of motherboard The Q170 variant sup ports USB C but the H110 does not ...

Page 42: ...bles All devices belonging to the modular iPOS plus Advanced that have a sepa rate power cable must be connected to the same electric circuit Connect the system as described below Tilt the system to the back Pull down the cable connection cover to uncover the connector panel ...

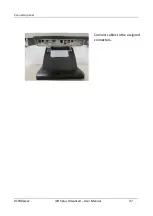
Page 43: ...Connector panel 01900xxxxx iPOS plus Advanced User Manual 37 Connect cables to the assigned connectors ...

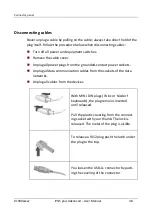
Page 44: ...r plugs from the grounded contact power sockets Unplug all data communication cables from the sockets of the data networks Unplug all cables from the devices With MINI DIN plugs Wincor Nixdorf keyboards the plug remains inserted until released Pull the plastic covering from the connect ing socket with your thumb The lock is released The metal of the plug is visible To release a RJ12 plug push the ...

Page 45: ...s Advanced User Manual 39 The P USB connector is disengaged by pressing the spring that is marked by an ar row Manually loosen the knurled screws of the COM or DVI interface connector To release a RJ45 plug push down the latch see arrow ...

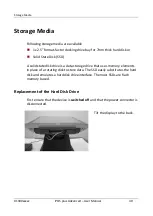
Page 46: ... SSD A solid state disk drive is a data storage drive that uses memory elements in place of a rotating disk to store data The SSD easily substitutes the hard disk and emulates a hard disk drive interface The most SSDs are flash memory based Replacement of the Hard Disk Drive First ensure that the device is switched off and that the power connector is disconnected Tilt the display to the back ...

Page 47: ...d User Manual 41 Pull down the cable connection cover to uncover the connector panel The HDD or SDD is in the drive carrier located on the left Remove both screws that fix the drive carrier to the con nector panel and pull out the drive carrier ...

Page 48: ... hard disk Handle the hard disk with care while removing or installing it Do not touch the exposed elec tronics Replace with the new hard disk and fix it back to the drive car rier Insert the disk carrier into the connector panel Fix it with the two screw that were removed previously The replacement is now com plete ...

Page 49: ...POS plus Advanced This is available in a kit Please contact your local repre sentatives for details Installing the second hard disk drive Unpack the parts and check whether the delivery matches the details of the delivery note The kit contains the following parts 1 HDD bracket with docking cables 2 Guide rails 3 Hard disk drive 4 Protective layer 5 Screws ...

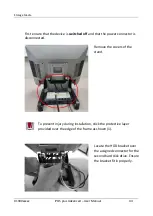
Page 50: ... and that the power connector is disconnected Remove the covers of the stand To prevent injury during installation stick the protective layer provided over the edge of the frame as shown 1 Locate the HDD bracket over the assigned connector for the second hard disk drive Ensure the bracket fit in properly ...

Page 51: ...Storage Media 01900xxxxx iPOS plus Advanced User Manual 45 Secure the bracket with the screws provided Assemble the guide rails to the hard disk drive ...

Page 52: ...x iPOS plus Advanced User Manual 46 Slide the hard disk drive as sembly into the HDD bracket Apply a slight pressure to en sure that the hard disk drive assembly is engaged with the docking cables Tilt the display to the back ...

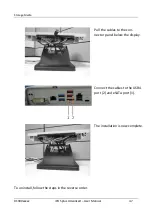
Page 53: ...OS plus Advanced User Manual 47 Pull the cables to the con nector panel below the display Connect the cables to the USB4 port 2 and eSATA port 1 The installation is now complete To uninstall follow the steps in the reverse order ...

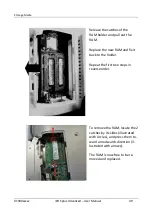
Page 54: ...lus Advanced User Manual 48 Replacement of the RAM First ensure that the device is switched off and that the power connector is disconnected Remove the flap using a screw driver Remove the screw that fixes the RAM cover to the system ...

Page 55: ...ull out the RAM Replace the new RAM and fix it back to the holder Repeat the first two steps in reverse order To remove the RAM locate the 2 catches by its sides illustrated with circles and press them to ward an outwards direction il lustrated with arrows The RAM is now free to be re moved and replaced ...

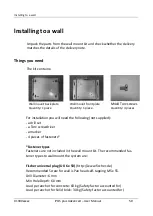
Page 56: ...y 4 pieces For installation you will need the following not supplied a drill set a Torx screwdriver a marker 4 pieces of fasteners Fastener types Fasteners are not included in the wall mount kit The recommended fas tener types to wall mount the system are Fischer universal plug UX 6 x 50 http www fischer de Recommended Screw for wall is Pan head self tapping M5 x 55 Drill Diameter 6 mm Min Hole De...

Page 57: ...Manual 51 Thorsman wall plug TP 6 x 30 http www thorsman com Recommended Screw for wall is Pan head Wood Screw TGS C3 4 8 x 38L Drill Diameter 6 mm Min Hole Depth 40 mm Load per anchor for concrete 40 kg Load per anchor for Solid brick 30 kg Safety factor 6 ...

Page 58: ... screws into the four screw holes as marked with the red circles and tighten them only half way through Remove the cable connection cover at the bottom of the dis play as illustrated with the green arrow Plug in cables Place back the cable connec tion cover and pull the cables through the cover opening as illustrated ...

Page 59: ...rican Disability Association it is recommended that the highest point of the display should not exceed 1370mm height It is also recommended that the system is approximately 122cm 48 in from the floor to the centre of the display when the user is in the standing position Mounting location Once you have determine the mounting height with the help of the wall mount back plate mark the location of the...

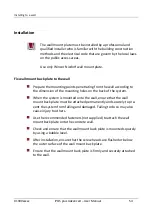
Page 60: ...on of the mounting holes on the back of the system When the system is mounted onto the wall ensure that the wall mount back plate must be attached permanently and securely to pre vent the system from falling and damaged Failing to do so may also cause injury to others Use the recommended fasteners not supplied to attach the wall mount back plate onto the concrete wall Check and ensure that the wal...

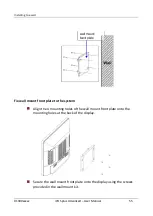
Page 61: ...Manual 55 Fix wall mount front plate to the system Align the 4 mounting holes of the wall mount front plate onto the mounting holes at the back of the display Secure the wall mount front plate onto the display using the screws provided in the wall mount kit ...

Page 62: ... installed onto the wall mount back plate that has been mounted on the wall Ensure that the hooks at both sides of the wall mount back plate are securely locked on the slots of the wall mount front plate Tighten the thumb screw on the top of the wall mount front plate to secure the hooks of the wall mount plates Dress the cables routing according to the store set up or the overall in stallation si...

Page 63: ...it of the swipe card reader from top to bottom in a quick and steady movement Make sure that the magnetic strip is to the right When using swipe cards the following should be observed Swipe cards should never be allowed to come into contact with liquids Swipe cards should not be bent or folded in any way Swipe cards should not be allowed to come into close contact with a magnetic field Swipe cards...

Page 64: ...ing the magnetic key The magnetic keys are available in 10 different col ors The magnet keys are waterproof shatter proof and by the 16 digit key number also safe for clear identification The operation of the system is very simple the key is placed onto the magnetic probe see fig ure The key is held magnetically to the probe and transmits the data by an electrical USB in terface The readout of the...

Page 65: ...pe Card Reader MSR with holder or the Waiter Lock with holder and two screws Magnetic Swipe Card Reader kit Waiter Lock kit The Magnetic Swipe Card Reader and Waiter Lock can be installed on ei ther the right or the left side of the screen You will find a flap at the rear side of the system at the position for the peripherals Remove the flap using a screw driver exposing one end of a connecting ca...

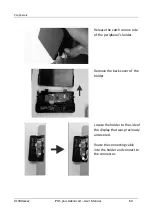
Page 66: ...Manual 60 Release the catch on one side of the peripheral s holder Remove the back cover of the holder Locate the holder to the side of the display that was previously uncovered Route the connecting cable into the holder and connect to the connector ...

Page 67: ...Peripherals 01900xxxxx iPOS plus Advanced User Manual 61 Use the two screws supplied to secure the holder to the dis play Place in the back cover of the peripheral The mounting is now com plete ...

Page 68: ... For example you may see the following message irrespective of processor type on the monitor WN ID xx xx Date xx xx is the placeholder of the BIOS version number Following the completion of the BIOS boot up the BIOS will attempt to boot up an operating system from a bootable media The BIOS default boot order from highest priority is 1 HDD SSD 2 USB Key 3 USB HDD 4 USB ODD 5 LAN PXE ROM Network If ...

Page 69: ...rain of blinking red LED Decode by counting the number of blinks in a train and check against the error code table below Number of pulses Error description 1 Hard Disk 1 failed internal hard disk 2 Hard Disk 2 failed external hard disk 3 Processor Hot 4 Processor fan is faulty 5 Capacitive Sense board is faulty 6 ALS PS board is faulty 7 PCH Hot ...

Page 70: ...y 1g m3 to 25g m3 Condensation is not permitted Display Characteristics Pixels 1024 x 768 Pixel format 0 30 x 0 30 mm Colour depth Up to 16 7M Brightness typical 220 cd m2 Resistive 250 cd m2 Projected capacitive Viewing angles 80 80 User Accessible I O PLINK2 DVI D 2x USB 2 0 2x USB 3 0 1x 24V Powered USB 1x Standard COM 1x Powered COM cash drawer LAN eSATA USB C Q170 version only Expansion Optio...

Page 71: ...The PSU has to comply with the following minimal requirements and com mon standards Rated input voltage 100 240VAC Rated input current 2 0A Input frequency range 47 63 Hz Rated output voltage 24V 5 Rated output current 5 0A Max output power 120W at ambient of 45 degree C 100W at ambient of 55 degree C Approvals and Certification UL Listed TÜV GS CE ...

Page 72: ...65 F0h RF Operating Frequency 13 56 MHz Host Interface USB 2 0 Full speed HID 1 11 Usage Page 0xFF45 Usage 0X2200 Rated Voltage 5 0 V Rated Current 250 mA RF Output Power 230mW Operating Temperature 0 º C to 40 º C Device Firmware Upgrade Firmware upgradable via DFU inter face Middleware support JavaPOS 1 13 Operating Systems Windows 7 Linux Certification CE Height x Width x Depth 125 mm x 72 8 mm...

Page 73: ...V power supply User interface COM5 Rated voltage 12V 5V COM6 Rated current 1A combined each sup ply PSUB12V 2x powered USB rated 3A PSUB24V 1x powered USB rated 3A Power output DC24 V Out 24V DC connect to iPOS plus Advanced USB Upstream USB Type B connect to eSATA port of iPOS plus Advanced 2nd HDD Power For optional second hard disk Please note that MAX 70W load is allowed for any combination of...

Page 74: ...Technical Data 01900xxxxx iPOS plus Advanced User Manual 68 ...

Page 75: ...ower Con sumption W Display PL2 12V 2 5A Depends on the power adapter used See above table for the applicable total power available 5V 1 1A USB 3 0 USB1 5V 0 5A USB2 5V 0 5A USB 2 0 USB3 5V 0 5A USB4 5V 0 5A PUSB24V 5V 0 5A 24V 3A USB Type C USB C 5V 2A 12V 2A Powered COM COM2 5V 0 5A 12V 0 5A Before connecting additional peripherals to these ports the service engi neer or trained technician must ...

Page 76: ...ixdorf 2 TH230 series Wincor Nixdorf 3 TH320 series Wincor Nixdorf 4 TH420 series Wincor Nixdorf 5 ND77 series Wincor Nixdorf 6 ND210 series Wincor Nixdorf 7 ND220 series Wincor Nixdorf 8 TH200 series Wincor Nixdorf 9 TH250 series Wincor Nixdorf Connecting printer that are not in the above approved list to the 24Vdc Powered USB port may cause safety hazard and endanger the user and the nearby peop...

Page 77: ...e for Standards D Sub D Shaped Sub miniature ESD Electronically Sensitive Devices HDD Hard Disk Drive IEC International Electrotechnical Commission ISO International Organization for Standardization LAN Local Area Network LED Light Emitting Diode PEN Protective Earth Neutral Conductor RAM Random Access Memory SSD Solid State Disk flash medium TN S Terre Neutre Separé UL Underwriters Laboratory sta...

Page 78: ...Wincor Nixdorf 151 Lorong Chuan New Tech Park 05 01A B Singapore 556741 Order No 01900xxxxx ...

Reviews: