S
e C T i O n
3 – A
S S e m b l i n g
y
O u r
W A T T / P
u P P y S
W i l s o n A u d i o S p e c i a l t i e s
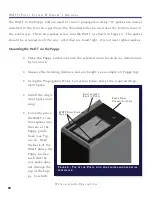
slide the WATT forward, keeping the WATT elevated in the rear, until the
front spikes rest securely in the front receptacle. Be careful not to damage
the painted edges of the WATT or Puppy.
• Grasping the handle and top of WATT, slide the WATT forward until the
spikes slide into the spike receptacle (see Figure 5 above). The two front
spikes will now be resting in the holes of the receptacle atop the Puppy.
f
igure
5 - S
liDe
the
WAtt’
S
front
SPikeS
Along
the
guiDeS
in
the
toP
of
the
P
uPPY
,
keePing
reAr
of
the
WAtt
eleVAteD
to
AVoiD
ScrAtching
the
P
uPPY
�
Summary of Contents for WATT System 8
Page 1: ...WAT T P u p p y S y s t e m 8 O w n e r s M a n u a l...
Page 6: ...Wi l s o n A u d i o S p e c i a l t i e s...
Page 7: ...S e c t i o n 1 I n Yo u r R o o m...
Page 8: ...WAT T P u pp y S y st e m 8 O w n e r s M a n u a l Wi l s o n A u d i o S p e c i a l t i e s...
Page 22: ...Wi l s o n A u d i o S p e c i a l t i e s...
Page 23: ...S e c t i o n 2 U n c r a t i n g y o u r WAT T P u p p y s...
Page 29: ...S e c t i o n 3 A s s e m b l i n g Yo u r WAT T P u p p y s...
Page 36: ...Wi l s o n A u d i o S p e c i a l t i e s...
Page 37: ...S e c t i o n 4 F i n i s h i n g U p...
Page 44: ...Wi l s o n A u d i o S p e c i a l t i e s...
Page 45: ...S e c t i o n 5 C a r e o f WAT T P u p p y S y s t e m 8...
Page 52: ...Wi l s o n A u d i o S p e c i a l t i e s...
Page 53: ...S e c t i o n 6 T r o u b l e s h o o t i n g...
Page 58: ...Wi l s o n A u d i o S p e c i a l t i e s 58...
Page 59: ...S e c t i o n 7 S y s t e m S p e c i f i c a t i o n s...
Page 64: ...Wi l s o n A u d i o S p e c i a l t i e s...
Page 65: ...S e c t i o n 8 P r o pa g a t i o n D e l a y Ta b l e s...
Page 68: ...Wi l s o n A u d i o S p e c i a l t i e s...
Page 69: ...S e c t i o n 9 Wa r r a n t y I n f o r m a t i o n...

