background image

W i l s o n   A u d i o   S p e c i a l t i e s

Puppy Tail Connection

The correct connection of the Puppy Tail in the WATT/Puppy System 8 is:

•  Connect the RED lug at the load end of the tail to the RED terminal on the 

WATT.

•  Connect the BLACK lug at the load end of the tail to the BLACK terminal 

on the WATT.

Note: Please ensure that you do not invert the polarity of the Puppy Tail in the WATT/
Puppy System 8.  Such an inversion will produce entertaining ambient effects, but de-
stroys the linearity and harmonic structure of the system.


S

e C T i O n

  3   –   A

S S e m b l i n g

  y

O u r

  W A T T / P

u P P y S

Summary of Contents for WATT System 8

Page 1: ...WAT T P u p p y S y s t e m 8 O w n e r s M a n u a l...

Page 2: ...n Audio Engineering and the Sales and Market ing Department The information contained herein is subject to change without notice Current Revision 1 8 If you are in need of a more recent manual please...

Page 3: ...s o n a n c e 1 6 S e c t i o n 1 4 Y o u r R o o m 1 7 R o o m S h a p e s 1 7 W ATT P u p p y S y s t e m 8 I n A D e d i c a t e d H o m e T h e a t e r 1 9 S p e a k e r P l a c e m e n t V e r s...

Page 4: ...e v e l i n g t h e W ATT P u p p y 4 1 R e m o v i n g t h e P r o t e c t i v e F i l m 4 2 S e c t i o n 5 C a r e o f W ATT P u ppy S ys t e m 8 4 5 S e c t i o n 5 0 C a r e o f t h e F i n i s...

Page 5: ...n f o r m a t i o n 6 9 S e c t i o n 9 0 W a r r a n t y I n f o r m a t i o n 7 1 L i m i t e d W a rr a n t y 7 1 C o n d i t i o n s 7 1 R e m e d y 7 2 W a rr a n t y L i m i t e d t o O r i g i...

Page 6: ...Wi l s o n A u d i o S p e c i a l t i e s...

Page 7: ...S e c t i o n 1 I n Yo u r R o o m...

Page 8: ...WAT T P u pp y S y st e m 8 O w n e r s M a n u a l Wi l s o n A u d i o S p e c i a l t i e s...

Page 9: ...aker Therefore we offer the following section which will present some guidelines on room acoustics and their interactions with loudspeakers While we will also outline some detailed suggestions on the...

Page 10: ...y localize the exact origin of your voice When you hear this transition you have entered the inner edge of the Zone of Neutrality Place a piece of tape on the floor to mark this location Although it w...

Page 11: ...ter edge of the Zone of Neutrality moves closer to the wall and becomes wider If you were to extend the inner and outer boundaries of the Zone for the sidewalls and the front wall behind the speakers...

Page 12: ...ity of a stereo system in two ways It adds harshness to the upper midrange and treble by storing time domain smearing energy It destroys the delicate phase relationships which help to establish an ac...

Page 13: ...ometimes also used to very good subjective effect particularly in quite large rooms Sound absorbent materials such as described above will alter the tonal characteristic of the room by making it sound...

Page 14: ...w level detail Soundstaging Standing waves are more difficult to correct than slap echo because they tend to occur at a lower frequency Absorbent materials such as Illbruck Sonex are ineffec tive at c...

Page 15: ...m a distance The first sound to reach the microphone is the direct sound followed by a delayed reflected sound At certain frequencies cancellation occurs because the reflected sound lags in phase rela...

Page 16: ...exhibit mid bass boom when struck The loudspeaker playing in the room also ex cites these resonances To give you an idea of what the perfect wall would sound like imagine rapping your hand against the...

Page 17: ...coloration Custom designed bass traps such as perforated Helmholtz resonators provide the greatest degree of low frequency control Section 1 4 Your Room Room Shapes Standing waves are pressure waves...

Page 18: ...orced and will dissipate more quickly than in a square room In these rooms the preferred speaker position for spa tial placement and midrange resolu tion would be on the longer walls Bass response wou...

Page 19: ...ers of chairs arranged in rows work best as this will allow a single chair to be positioned in the center This approach will also provide the best overall sound for the greatest number of seats Speake...

Page 20: ...about 18 from each wall and if you need to move them relative to the side wall move them away from the wall not closer A very important aspect of speaker placement is how far from the back wall to pla...

Page 21: ...should be positioned out into the room slightly asymmetrically vis a vis the side and rear walls The speakers should be toed in toward the listener preferably so that the listener at his seated positi...

Page 22: ...Wi l s o n A u d i o S p e c i a l t i e s...

Page 23: ...S e c t i o n 2 U n c r a t i n g y o u r WAT T P u p p y s...

Page 24: ...WAT T P u pp y S y st e m 8 O w n e r s M a n u a l 24 Wi l s o n A u d i o S p e c i a l t i e s...

Page 25: ...ion The following items are recommended for this procedure Electric Screwdriver Phillips head drive bit Masking tape for use in speaker setup Uncrating the Puppy A minimum of two strong adults is requ...

Page 26: ...own er s manual Remove the grilles or the owner s manual and the foam that is between the WATT and the crate lid 3 Firmly grasp the handle on the back of the WATT with one hand Care fully so as not t...

Page 27: ...8 Allen Wrench 1 1 2 Nut Driver 1 Polishing Cloth Puppy 8 2 Pin Style Grilles 1 per enclosure 8 Spikes with Nut 8 Puppy Paws with conical diode 8 Brass Spike Floor Protectors 16 Round Diode Spacers 1...

Page 28: ...Wrench 1 Polishing Cloth Note After set up of the system keep the shipping crates in case of future shipping needs WAT T P u pp y S y st e m 8 O w n e r s M a n u a l 28 Wi l s o n A u d i o S p e c...

Page 29: ...S e c t i o n 3 A s s e m b l i n g Yo u r WAT T P u p p y s...

Page 30: ...WAT T P u pp y S y st e m 8 O w n e r s M a n u a l 30 Wi l s o n A u d i o S p e c i a l t i e s...

Page 31: ...ms Supplied hardware kit Tape measure Propagation Delay Correction Tables Section 8 Known listening position Take a moment to familiarize yourself with the top of the Puppy It contains information tha...

Page 32: ...easure the listening distance and ear height see example on Puppy top Using the Propagation Delay Correction Table select the required Align ment Spike Install the Align ment Spike until snug Carefull...

Page 33: ...cle Be careful not to damage the painted edges of the WATT or Puppy Grasping the handle and top of WATT slide the WATT forward until the spikes slide into the spike receptacle see Figure 5 above The t...

Page 34: ...Ensure that the two front spikes are properly in their receptacles and that the WATT is not skewed atop the Puppy The WATT sides should be parallel to the sides of the Puppy This will ensure correct p...

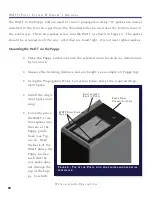
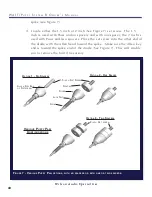
Page 35: ...ED terminal on the WATT Connect the BLACK lug at the load end of the tail to the BLACK terminal on the WATT Note Please ensure that you do not invert the polarity of the Puppy Tail in the WATT Puppy S...

Page 36: ...Wi l s o n A u d i o S p e c i a l t i e s...

Page 37: ...S e c t i o n 4 F i n i s h i n g U p...

Page 38: ...WAT T P u pp y S y st e m 8 O w n e r s M a n u a l 38 Wi l s o n A u d i o S p e c i a l t i e s...

Page 39: ...stening room and personal tastes Wilson generally recommends no spacers for simplicity and rigidity However the addition of spacers changes the driver to floor dimension and can sometimes be used to r...

Page 40: ...into the other end of the diode with the Allen head toward the spike Make sure the Allen key end is toward the spike end of the diode See Figure 7 This will enable you to remove the bolt if necessary...

Page 41: ...arefully lay the Puppy on its side Insert the diode spike assemblies into the four holes located on the bot tom of each Puppy Tighten until the top surface fo the Puppy Paw or spacer touches the botto...

Page 42: ...front or rear of the Puppy until the WATT Puppy is level To find out which spike to lower grasp the WATT Puppy channel and gen tly rock it back and forth This will identify the spike that is out of le...

Page 43: ...ective film near edges and corners to pre vent paint damage in these areas 4 The protective film should not be left on the painted surface for extended periods of time nor exposed to heat sources and...

Page 44: ...Wi l s o n A u d i o S p e c i a l t i e s...

Page 45: ...S e c t i o n 5 C a r e o f WAT T P u p p y S y s t e m 8...

Page 46: ...WAT T P u pp y S y st e m 8 O w n e r s M a n u a l 46 Wi l s o n A u d i o S p e c i a l t i e s...

Page 47: ...he System 8 be dusted carefully with the dust cloth which has been provided We recommend that the following procedure be observed when dusting the speakers Blow off all loose dust Using the special du...

Page 48: ...attachment could cause the grille ma terial to tear especially in the corners Often Wilson speaker owners desire to change the look of their listening room by changing the color of their speaker gril...

Page 49: ...ructed using non resonant high density composites which are then cross braced to further reduce cabinet resonance Each of these composites meets and exceeds the highest of ANSI test standards for its...

Page 50: ...per formance The use of these materials in System 8 results in an enclosure that is inherently inert and non resonant All of these structural aspects are combined allowing Wilson Audio to deliver a p...

Page 51: ...51 Wi l s o n A u d i o S p e c i a l t i e s S e ct i o n 5 C a r e o f WAT T P u pp y S y st e m 8 51...

Page 52: ...Wi l s o n A u d i o S p e c i a l t i e s...

Page 53: ...S e c t i o n 6 T r o u b l e s h o o t i n g...

Page 54: ...WAT T P u pp y S y st e m 8 O w n e r s M a n u a l 54 Wi l s o n A u d i o S p e c i a l t i e s...

Page 55: ...t w o r k i n g o r i s o u t o f p h a s e t h e WAT T P u p p y w i l l n o t i m a g e p r o p e r l y D o u b l e c h e c k y o u r c o n n e c t i o n s f o r r e d t o r e d a n d b l a c k t o...

Page 56: ...c a r e f u l l y c h o s e n f o r t h e o v e r a l l s o n i c a n d t h e r m a l p e r f o r m a n c e P l u g y o u r a m p l i f i e r i n t o t h e w a l l a n d t u r n i t o n L i s t e n t...

Page 57: ...o n t i n u e t o t h e n e x t s t e p Tu r n t h e a m p l i f i e r o f f a n d d i s c o n n e c t i t f r o m t h e AC w a l l o u t l e t D i s c o n n e c t t h e s p e a k e r c a b l e l e a...

Page 58: ...Wi l s o n A u d i o S p e c i a l t i e s 58...

Page 59: ...S e c t i o n 7 S y s t e m S p e c i f i c a t i o n s...

Page 60: ...WAT T P u pp y S y st e m 8 O w n e r s M a n u a l 60 Wi l s o n A u d i o S p e c i a l t i e s...

Page 61: ...With Spikes System Weight Per Channel System Shipping Weight approx Rear Ported Midrange Rear Ported Woofer Two 8 inch 20 32 cm One 7 inch 17 78 cm One 1 inch Inverted titanium dome 2 54 cm 92 dB 1 w...

Page 62: ...WAT T P u pp y S y st e m 8 O w n e r s M a n u a l 62 Wi l s o n A u d i o S p e c i a l t i e s 62 WATT Puppy System 8 Dimensions Figure 9...

Page 63: ...63 Wi l s o n A u d i o S p e c i a l t i e s S e ct i o n 7 S y st e m S p e c i f i cat i o n s 63...

Page 64: ...Wi l s o n A u d i o S p e c i a l t i e s...

Page 65: ...S e c t i o n 8 P r o pa g a t i o n D e l a y Ta b l e s...

Page 66: ...A A A A 2 2 2 3 3 3 3 3 3 3 4 4 48 A A A A A 2 2 2 2 3 3 3 3 3 3 3 Table Calculated for use with Puppy Paws and no spacers Listening Distance feet 5 6 7 8 9 10 11 12 13 14 15 16 17 18 19 20 34 4 4 4...

Page 67: ...4 4 4 4 4 4 4 4 4 4 4 4 4 36 4 4 4 4 4 4 4 4 4 4 4 4 4 4 4 4 38 3 3 3 4 4 4 4 4 4 4 4 4 4 4 4 4 40 2 3 3 3 3 4 4 4 4 4 4 4 4 4 4 4 42 A 2 2 3 3 3 3 3 3 4 4 4 4 4 4 4 44 A A 2 2 2 3 3 3 3 3 3 4 4 4 4 4...

Page 68: ...Wi l s o n A u d i o S p e c i a l t i e s...

Page 69: ...S e c t i o n 9 Wa r r a n t y I n f o r m a t i o n...

Page 70: ...WAT T P u pp y S y st e m 8 O w n e r s M a n u a l 70 Wi l s o n A u d i o S p e c i a l t i e s...

Page 71: ...lly installed by the Wilson Audio dealer that sold the product to the customer FAILURE TO COMPLY WITH EITHER REQUIREMENT NO 1 OR REQUIREMENT NO 2 WILL RESULT IN THE WARRANTY PERIOD BEING LIMITED TO A...

Page 72: ...Audio Dealer within the Warranty Period for service or repair of the product without charge for parts or labor which service or repair at the Dealer s option shall take place either at the location wh...

Page 73: ...p for the same time peri ods as if the product had originally been bought for immediate resale to the retail cus tomer Wilson Audio products are warranted for a period of 90 days unless extended to 5...

Page 74: ...WAT T P u pp y S y st e m 8 O w n e r s M a n u a l 74 Wi l s o n A u d i o S p e c i a l t i e s...

Reviews: