background image

English

34

WILO SE 03/2011

8 Commissioning 

It is recommended to have commissioning performed by Wilo's customer service.

8.1 Inspection of the unit

CAUTION! Risk of property damage!
Dirt and solids as well as incorrect commissioning can cause damage to the unit or indi-
vidual components during operation.

• Clean the entire unit to remove any dirt, in particular solids, prior to commissioning.
• Observe the installation and operating instructions for the switchgear and the acces-

sories.

Commissioning may be carried out only if the relevant safety regulations, VDE regulations 
as well as regional regulations are met.

• Check for the presence of and proper versions of all required components and connections 

(inlets, discharge pipe with check valve, ventilation via the roof, floor fixation, electrical 
connection).

• Check the position of the venting screw on the non-return valve to make sure the flap can 

move freely in its seat and for the sealing position of the sealing nut. 

8.2 Initial commissioning

• Plug in the mains plug.
• Check or make the settings acc. to sections 8.2.1, 8.2.2 and 8.2.3.
• Open the check valves.
• Fill the system via the connected inlet until each pump has pumped out at least once and 

the pressure pipeline is completely filled.
The filling level in the tank must not rise when the discharge piping is filled and the inlet 
closed. If the filling level continues to rise, the flap of the non-return valve is leaky (must 
check the flap and the position of the venting screw). 
For a test start-up, the “manual mode” button on the switchgear can also be pressed 
before reaching the switch-on level in the tank.

• Check the unit and pipe joints for impermeability and perfect function (switch the pump 

on and off).

• Fill the unit with a maximum possible inlet and check whether the unit is working perfectly. 

Observe in particular:
• Correct position of switching points.
• Adequate volume flow of the pumps at maximum flow whilst the pump is running (level 

must fall).

• Vibration-free operation of the pumps without air inclusions in the fluid.

CAUTION! Risk of property damage!
Air in the fluid causes considerable vibrations which can destroy the pumps and the 
entire unit, depending on the respective operating conditions of the pumps. The mini-
mum water level in the tank for the “Pump ON level switching point” (see technical 
data) must be guaranteed.

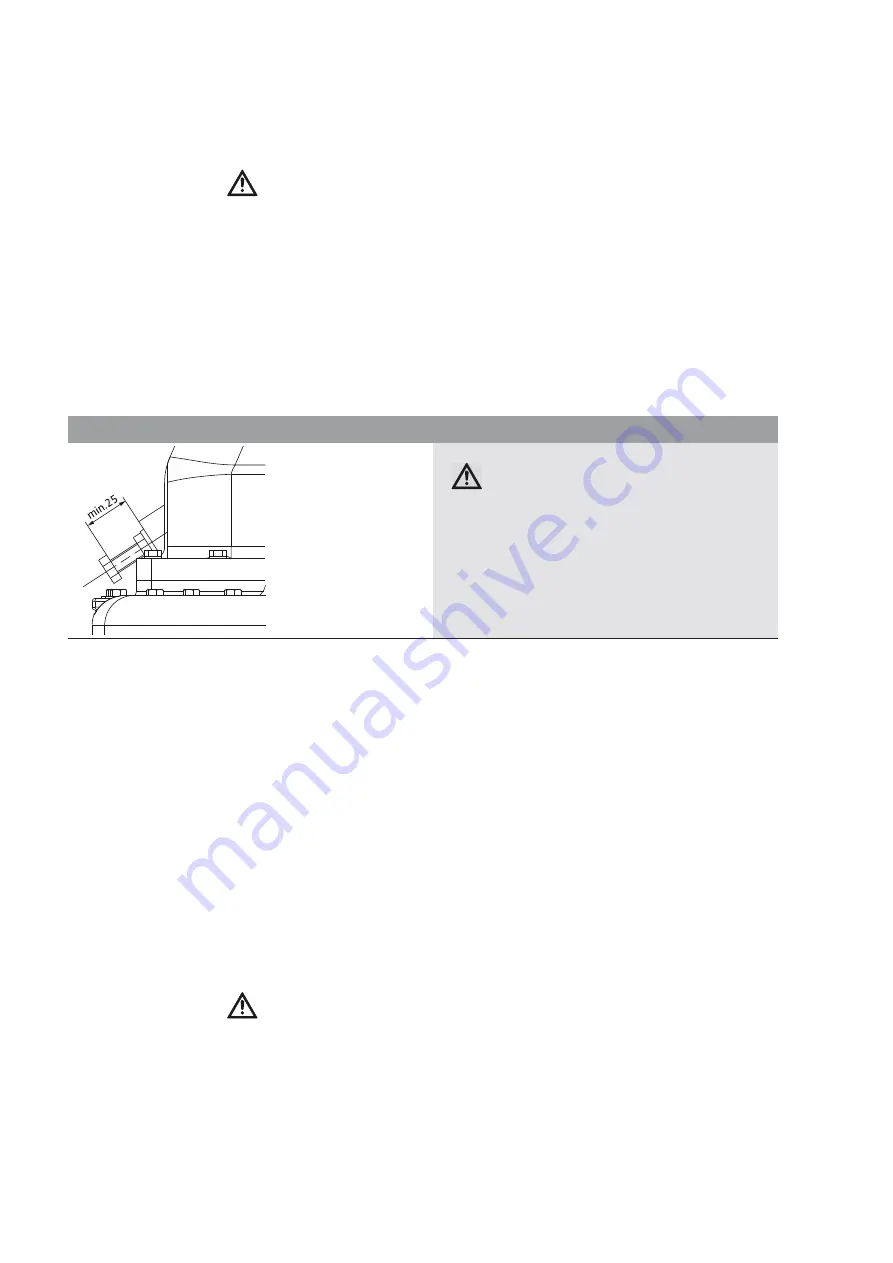
Fig. 12: Position of the venting screw while the unit is in operation

CAUTION! Risk of property damage!
If the venting screw with sealing nut is not in 
the required position, this can lead to damage 
on the flap and unit, as well as to high noise 
development (Fig. 12).

Summary of Contents for DrainLift XL

Page 1: ...edieningsvoorschriften E Instrucciones de instalaci n y funcionamiento I Istruzioni di montaggio uso e manutenzione GR TR Montaj ve kullanma k lavuzu H Be p t si s zemeltet si utas t s PL Instrukcja m...

Page 2: ...Fig 10...

Page 3: ...Fig 11...

Page 4: ...etechnicianandthe responsible specialist operator before installation and commissioning It is not only the general safety instructions listed under the main point safety that must be adhered to but al...

Page 5: ...ilst the product is in operation Leakages e g from the shaft seals of hazardous fluids which are explosive toxic or hot must be led away so that no danger to persons or to the environment arises Natio...

Page 6: ...s such as heavy metals biocides pesticides acids bases salts cleaning agents and disinfectants dish washing or laundry detergents and such which have a high degree of foam formation or swimming pool w...

Page 7: ...ons Any use going over and beyond the intended use is considered to be improper 5 Product information 5 1 Type key Example DrainLift XL 2 25 3 DrainLift Sewage lifting unit XL Size 2 2 double pump sys...

Page 8: ...detailed list and description see the cata logue price list The following accessories are available Flange piece DN 80 DN 80 100 1 pc DN 80 100 already included in scope of delivery DN 100 DN 150 for...

Page 9: ...the tank is switched on and the collected sewage is automatically pumped into the connected exter nal sewage line If the water level continues to rise the second pump is activated When the high water...

Page 10: ...Make sure the installation location is ventilated sufficiently 7 1 Preparing for installation CAUTION Risk of property damage Incorrect installation can result in damage to the product Only use qualif...

Page 11: ...not be subjected to any pipeline forces or torques The pipes including valves are to be fastened and supported in such a manner that neither tensile nor compressive forces are applied to the unit All...

Page 12: ...surge like water entry and strong air entry are avoided as much as possible It is possible to connect the inlet pipe into the vertical surface above the horizontal con nection surface Leave out the a...

Page 13: ...ightness of the pipe connection depends on this decisively Fig 6 Setting up the inlet port DN 150 DN 100 1 1 Define the position of the middle of the inlet and mark it Cut the hole using the keyhole s...

Page 14: ...Secure the venting pipe against slipping out using clamps and always install with a downward incline toward the unit 7 3 4 Emergency drain connection diaphragm hand pump It is always recommended to i...

Page 15: ...5 A slow DrainLift XL 2 15 25 A slow DrainLift XL 2 20 25 A slow DrainLift XL 2 25 25 A slow NOTE To increase the operational reliability it is mandatory for an automatic circuit breaker which disconn...

Page 16: ...arrier and the switchgear and tighten the housing screws DANGER Danger of explosion If a level sensor is used in potentially explosive areas there is a danger of explosion Always use a breakdown barri...

Page 17: ...e pressure pipeline is completely filled The filling level in the tank must not rise when the discharge piping is filled and the inlet closed If the filling level continues to rise the flap of the non...

Page 18: ...owing points in particularin case of deviations from the recommended settings The filling level probe must be in contact with the base of the tank According to EN 12056 4 the switching volume should b...

Page 19: ...ime of the pumps 8 3 Decommissioning The unit must be decommissioned prior to maintenance or dismantling work WARNING Risk of burns Depending on the operating status of the system the entire pump can...

Page 20: ...subjected to maintenance by experts in accordance with EN 12056 4 The intervals must not exceed year in the case of commercial companies year for units in multi family houses 1 year for units in singl...

Page 21: ...eposits in the pump and or tank 2 Incorrect direction of rotation Swap two phases of the current feed 3 Wear to inner parts impeller bearing Replace worn parts 4 Operating voltage too low 5 Running on...

Page 22: ...ion de la directive basse tension 2006 95 CE sont respect es conform ment appendice I no 1 5 1 de la directive CE relatives aux machines 2006 42 CE Elektromagnetische Vertr glichkeit Richtlinie 2004 1...

Page 23: ...nast puj cymi dokumentami Sm rnice ES pro strojn za zen 2006 42 ES dyrektyw maszynow WE 2006 42 WE EC 2006 42 EG C le t kaj c se bezpe nosti stanoven ve sm rnici o elektrick ch za zen ch n zk ho nap...

Page 24: ...Mather and Platt Pumps Ltd Pune 411019 T 91 20 27442100 service pun matherplatt co in Indonesia WILO Pumps Indonesia Jakarta Selatan 12140 T 62 21 7247676 citrawilo cbn net id Ireland WILO Engineering...

Page 25: ...henstra e 100 44263 Dortmund T 0231 4102 7900 T 01805 W I L O K D 9 4 5 6 5 3 F 0231 4102 7126 kundendienst wilo com T glich 7 18 Uhr erreichbar 24 Stunden Technische Notfallunterst tzung Kundendienst...

Reviews: