1100W DEMOLITION BREAKER ENG
receptacle while the power switch is in the on position, the power tool will start operating
immediately, which could cause a serious accident.
6. CHIPPING / SCALING / DEMOLITION
Hold the tool firmly with both hands. Turn the tool on and apply slight pressure on the tool so that
the tool will not bounce around, uncontrolled. Pressing very hard on the tool will not increase the
efficiency.
7. LUBRICATION
This tool requires no hourly or daily lubrication because it has a grease-packed lubrication system.
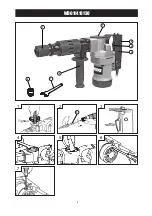
Lubricate the tool when impact energy is weak. To lubricate remove the crank case cap at the top of
the tool using the spanner provided (see Fig 4). Wipe out the old grease inside and replace with
fresh grease (approx. 30g). Use only the grease provided with your tool (See Fig 5). Reinstall the
crank case cap and tighten with the spanner. Run the tool for several minutes to warm it up. Switch
off and unplug the tool.
NOTE:
Do not tighten the crank case cap excessively. It is made of plastic and is subject to
breakage.
8. REPLACING CARBON BRUSHES
When the carbon brushes need be replaced, Use a screwdriver to remove the rear cover (See Fig 6).
Then use a screwdriver to remove the brush holder caps again (See Fig 7). Take out the worn carbon
brushes, insert new ones and secure the brush holder caps.
Both carbon brushes should be replaced
at the same time. Use only identical carbon brushes.
MAINTENANCE
WARNING:
Remove the plug from the socket before carrying out any adjustment, servicing
or maintenance.
1 Regularly inspect all mounting screws and ensure that they are properly tightened. Should any
of the screws be loose, retighten them immediately. Failure to do so could result in serious hazard.
2 Never use water or chemical cleaners to clean your power tool. Wipe clean with a dry cloth.
3 Always store your power tool in a dry place.
4 Keep the motor ventilation slots clean.
5 If the supply cord is damaged, it must be replaced by the manufacturer, its service agent or
similarly qualified persons in order to avoid a hazard.
ENVIRONMENT PROTECTION
Waste electrical products should not be disposed of with household waste. Please recycle
where facilities exist. Check with your Local Authority or retailer for recycling advice.
10
Summary of Contents for WD011410130
Page 1: ...1100W Demolition breaker WD011410130...
Page 2: ......
Page 4: ...WD011410130 2 3 5 6 7 8 4 1 Tighten 1 2 3 4 5 6 7 9 4...
Page 14: ......
Page 15: ......
Page 16: ...www widopt com MADE IN CHINA Copyright WIDO Machinery Co Ltd All rights reserved...


