background image


1100W DEMOLITION BREAKER                                              ENG


TECHNICAL DATA: 


OPERATING INSTRUCTIONS 


NOTE: Before using the tool, read the instruction manual carefully. 


1.  INTENDED USE 

This tool is intended for break in concrete, brick and stone as well as for chiseling work.   


2.  BEFORE USING YOUR TOOL 

1)  Always be sure that the tool is switched off and unplugged before carrying out any work on the 
tool.   
2)  Always use the correct voltage. The voltage of the power source must agree with the values on 
the nameplate of the tool. 


3.  INSTALLING AUXILIARY HANDLE 

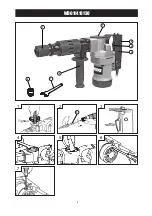
The auxiliary handle swings to either side, allowing easy handling of the tool in any position. Loosen 
the auxiliary handle by turning it anticlockwise, swing it to the desired position and then tighten it by 
turning clockwise (See Fig 1). 
 

4.  INSTALLING OR REMOVING THE BIT 

1)  The tool is equipped with an SDS-hex attachment system. Clean the bit shank before installing 
the  SDS-hex  bit.  Grip  and  pull  back  the  fastening  sleeve  and  insert  the  bit  (See  Fig  2).  Push 
inwards until a resistance is felt. It may be necessary to spin the bit until the shaft drops completely 
into place. Once you are satisfied it has seated release the black fastening sleeve. Pull on the bit to 
check if it is properly locked. 
2)  To remove the bit, pull back fastening sleeve, hold and remove bit.   
 

5.  OPERATING THE SWITCH 

1)  To start the tool, simply depress the switch trigger. Release the switch trigger to stop your tool 
(See Fig 3). 
2)  For continuous operation, depress switch trigger then push in the lock button, release switch 
trigger first and lock-on button second. Your switch is now locked on for continuous use. To switch 
off your tool just depress and release the switch trigger. 

CAUTIONS: 

Ensure  that  the  power  switch  is  in  the  off  position.  If  the  plug  is  connected  to  a 

Model 

WD011410130 

Voltage 

110-120V AC   

220-240V AC 

Frequency 

50-60Hz 

50-60Hz 

Power input 

1100W 

1100W 

Impact rate 

2900/min 

2900/min 

Impact force 

13J 

13J 

Double insulation 


Machine weight 

7Kg 

.


7Kg

Summary of Contents for WD011410130

Page 1: ...1100W Demolition breaker WD011410130...

Page 2: ......

Page 3: ...e confident that you will appreciate the quality of the product and you will be entirely satisfied with your purchase Please read carefully the user safety and operating instruction on how to operate...

Page 4: ...WD011410130 2 3 5 6 7 8 4 1 Tighten 1 2 3 4 5 6 7 9 4...

Page 5: ...andle 1pc 2 Spanner 1pc 3 Grease tube 1pc 4 Hex chisels 2pcs 5 Carbon brushes 2pcs We recommend that you purchase your accessories from the same store that sold you the tool Use good quality accessori...

Page 6: ...he cord for carrying pulling or unplugging the power tool Keep cord away from heat oil sharp edges or moving parts Damaged or entangled cords increase the risk of electric shock e When operating a pow...

Page 7: ...have the power tool repaired before use Many accidents are caused by poorly maintained power tools f Keep cutting tools sharp and clean Properly maintained cutting tools with sharp cutting edges are l...

Page 8: ...have a firm footing Be sure no one is below when using the tool in high locations 11 Do not touch the bit or parts close to the bit immediately after operation They may be extremely hot and could burn...

Page 9: ...talling the SDS hex bit Grip and pull back the fastening sleeve and insert the bit See Fig 2 Push inwards until a resistance is felt It may be necessary to spin the bit until the shaft drops completel...

Page 10: ...ect to breakage 8 REPLACING CARBON BRUSHES When the carbon brushes need be replaced Use a screwdriver to remove the rear cover See Fig 6 Then use a screwdriver to remove the brush holder caps again Se...

Page 11: ...IEW 1 5 3 4 6 7 8 9 10 11 12 13 14 15 16 17 18 19 20 21 22 23 25 36 35 33 32 31 30 29 28 27 26 37 38 39 40 41 43 44 45 46 47 48 49 50 51 53 54 55 58 85 86 87 88 2 34 24 52 59 68 70 71 69 72 81 82 83 7...

Page 12: ...k shaft 1 57 Rear cover 1 17 Circlip 1 58 Spring washer 2 18 Ball bearing 1 59 Screw 2 19 O ring 1 60 Soft mat 1 20 Crank case 1 61 Handle shaft pin 1 21 Oil seal 1 62 Screw 1 22 Gear 1 63 Capacitor 1...

Page 13: ...1100W DEMOLITION BREAKER ENG 83 Screw 2 87 Holder of handle 1 84 Left handle 1 88 Clip band 1 85 Auxiliary handle 1 89 Grease box 1 86 Auxiliary handle nut 1 90 Spanner 1 13...

Page 14: ......

Page 15: ......

Page 16: ...www widopt com MADE IN CHINA Copyright WIDO Machinery Co Ltd All rights reserved...

Reviews: