Whirlpool WEC310S0LB Control Manual Download Page 4

4

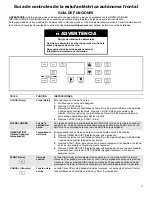
Cooktop On Indicator Light

The Cooktop On indicator light is located on the console panel.
When any control knob/cooktop element on the console panel is
turned on, the Cooktop On indicator light will glow.

Hot Surface Indicator Light

On ceramic glass models, the Hot Surface indicator light is
located on the display panel.

The Hot Surface indicator light will glow as long as any surface
cooking area is too hot to touch, even after the surface cooking
area is turned off.

The control lock cannot be turned on or off while the Hot Surface
indicator is on. Wait for the Hot Surface indicator to turn off before
turning the control lock on or off.

Coil Elements and Burner Bowls (on some
models)

Coil elements should be level for optimal cooking results. Burner
bowls, when clean, reflect heat back to the cookware. They also
help catch spills.

Cookware should not extend more than 1/2" (1.3 cm) over the coil
element. If cookware is uneven or too large, it can produce excess
heat, causing the burner bowl to change color.

Weight of the Cookware to be no Lighter than 1 lb.

Discoloration of Medallion of the Coil Element is expected over
time.

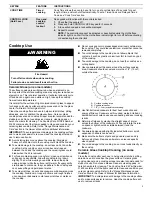
Dual Zone Cooking Element

The Dual Zone cooking element offers flexibility depending on the
size of the cookware. Single size can be used in the same way as
a regular element. The dual size combines both the single and
outer elements and is recommended for larger size cookware.

A.

Dual

B.

Single

Cookware

IMPORTANT:

Do not leave empty cookware on a hot surface

cooking area, element or surface burner.

Ideal cookware should have a flat bottom, straight sides and a
well-fitting lid, and the material should be of medium-to-heavy
thickness.

Rough finishes may scratch the cooktop. Aluminum and copper
may be used as a core or base in cookware. However, when used
as a base, they can leave permanent marks on the surfaces.

Cookware material is a factor in how quickly and evenly heat is
transferred, which affects cooking results. A nonstick finish has
the same characteristics as its base material. For example,
aluminum cookware with a nonstick finish will take on the
properties of aluminum.

Cookware with nonstick surfaces should not be used under the
broiler.

Check for flatness by placing the straight edge of a ruler across
the bottom of the cookware. While you rotate the ruler, no space
or light should be visible between it and the cookware.

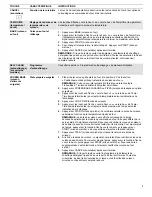
Use the following chart as a guide for cookware material
characteristics.

COOKWARE

CHARACTERISTICS

Aluminum

Heats quickly and evenly.

Suitable for all types of cooking.

Medium or heavy thickness is best for
most cooking tasks.

May leave aluminum residues, which
may be diminished if cleaned
immediately after cooking.

Cast iron

Heats slowly and evenly.

Good for browning and frying.

Maintains heat for slow cooking.

Rough edges or burrs may scratch the
cooktop.

Ceramic or
Ceramic glass

Follow manufacturer’s instructions.

Heats slowly, but unevenly.

Ideal results on low to medium heat
settings.

May scratch the cooktop.

Copper

Heats very quickly and evenly.

May leave copper residues, which may
be diminished if cleaned immediately
after cooking

Can leave a permanent stain or bond to
the cooktop if overheated.

Earthenware

Follow manufacturer’s instructions.

Use on low heat settings.

May scratch the cooktop.

Porcelain
enamel-on-
steel or cast
iron

See stainless steel or cast iron.

Porcelain enamel bakeware without the
metal base may bond to the cooktop if
overheated.

Stainless steel

Heats quickly, but unevenly.

A core or base of aluminum or copper
on stainless steel provides even
heating.

Summary of Contents for WEC310S0LB

Page 1: ...IGHT Oven cavity light While the oven door is closed press OVEN LIGHT to turn the light on and off The oven light will come on when the oven door is opened The oven light will not come on during the Self Cleaning cycle TIMER SET OFF Oven timer The Timer can be set in hours or minutes up to 9 hours and 59 minutes 1 Press TIMER SET OFF 2 Press the Temp Time up or down arrow keypad to set the length ...

Page 2: ...lated time 8 At the end of the cook time a beep will alert you to check the food s doneness To add more time press the up arrow keypad and press START Unless more time is selected the bake element turns off 9 Press CANCEL when finished NOTE If the oven door remains open for too long the heating elements will shut off until the oven door is closed All timers including any active Cook Time or Timed ...

Page 3: ...s could break when the lid is removed For foods containing sugar in any form clean up all spills and soils as soon as possible Allow the cooktop to cool down slightly Then while wearing oven mitts remove the spills using a scraper while the surface is still warm If sugary spills are allowed to cool down they can adhere to the cooktop and can cause pitting and permanent marks To avoid scratches do ...

Page 4: ...inishes may scratch the cooktop Aluminum and copper may be used as a core or base in cookware However when used as a base they can leave permanent marks on the surfaces Cookware material is a factor in how quickly and evenly heat is transferred which affects cooking results A nonstick finish has the same characteristics as its base material For example aluminum cookware with a nonstick finish will...

Page 5: ... 120 V power connection and permits the control features to be demonstrated without heating elements turning on If this feature is activated the oven will not work To change Press CANCEL CANCEL Temp Time up arrow keypad TIMER SET OFF Repeat to change back and end Demo mode Tones Tones are audible signals indicating the following Basic Functions One Tone Valid keypad press Oven is preheated long to...

Page 6: ...the one displayed 3 Press COOK TIME The Cook Time oven indicator light will light up 4 Press the Temp Time up or down arrow keypad to enter a cook time length 5 Press DELAY The Delay indicator light will light up 6 Press the Temp Time up or down arrow keypad to enter a start time 7 Press START 8 Press and hold the Timer Set Off keypad for 5 seconds SAb will flash in the display 9 Press START while...

Page 7: ...nly shaped pieces of meat fish and poultry may cook better at lower broil settings Use rack 4 or 5 for broiling Refer to the Positioning Racks and Bakeware section for more information On lower settings the broil element will cycle on and off to maintain the proper temperature For best results use a broiler pan and grid It is designed to drain juices and help avoid spatter and smoke If you would l...

Page 8: ...ur régler les minutes 4 Appuyer sur CLOCK horloge ou START mise en marche OVEN LIGHT lampe du four Lampe de la cavité du four Alors que la porte du four est fermée appuyer sur OVEN LIGHT lampe du four pour allumer ou éteindre la lampe La lampe du four s allume à l ouverture de la porte La lampe du four ne s allume pas durant le programme d autonettoyage TIMER SET OFF réglage arrêt de la minuterie ...

Page 9: ...zen Bake cuisson d aliments surgelés est utilisée 2 Appuyer sur FROZEN BAKE LASAGNA ou PIZZA cuisson de lasagnes ou pizza surgelées 3 Appuyer sur les touches à flèche vers le haut ou vers le bas de Temp Time température durée pour régler la température selon les indications de l emballage 4 Appuyer sur COOK TIME durée de cuisson 5 Appuyer sur les touches à flèche vers le haut ou vers le bas de Tem...

Page 10: ...éléments de chauffage s éteignent jusqu à ce que la porte du four soit fermée Toutes les minuteries incluant les minuteries de cuisson ou les fonctions de cuisson minutée continuent leur compte à rebours DELAY START mise en marche différée Delayed start mise en marche différée La touche Delay Start mise en marche différée sert à entrer l heure de mise en marche pour un four équipé de mise en march...

Page 11: ...e cuisson pourraient laisser des égratignures ou des marques sur la table de cuisson Ne pas faire cuire de maïs à éclater dans son emballage en aluminium d origine sur la table de cuisson Il pourrait rester des traces d aluminium qui ne peuvent être complètement enlevées Afin d éviter d endommager la table de cuisson ne pas laisser d objets qui pourraient fondre comme du plastique ou du papier d a...

Page 12: ...uvent laisser des marques permanentes sur la surface de cuisson Le matériau d un ustensile a une influence sur la rapidité et l uniformité de la transmission de la chaleur lesquelles contribuent aux résultats de cuisson Un fini antiadhésif a les mêmes caractéristiques que son matériau de base Par exemple un ustensile de cuisson en aluminium avec un fini antiadhésif aura les propriétés de l alumini...

Page 13: ...egrés Celsius Pour modifier Appuyer sur la touche vers le haut de Temp Time température durée pendant 5 secondes C ou F apparaît sur l afficheur Répéter l opération pour permuter à nouveau Pour sortir du mode appuyer sur CANCEL annulation Son des touches Active ou désactive les signaux sonores lorsqu on appuie sur une touche Pour modifier Appuyer sur LIGHT lampe ou OVEN LIGHT lampe du four pendant...

Page 14: ...bbath Sabbat et respecte les modalités du mode Sabbath Sabbat Si on appuie sur la touche Off Cancel arrêt annulation à tout moment le four revient au mode de cuisson normal ne présente plus les modalités du mode Sabbath Sabbat Pour régler une cuisson au four minutée avec le mode Sabbath Sabbat sur certains modèles 1 Appuyer sur BAKE cuisson au four 2 Appuyer sur les touches à flèche vers le haut o...

Page 15: ...gnent jusqu à ce que la porte du four soit fermée Toutes les minuteries incluant les minuteries de cuisson ou les fonctions de cuisson minutée continuent leur compte à rebours ACCUBAKE Système de gestion de la température Le système ACCUBAKE contrôle électroniquement les niveaux de chaleur du four durant le préchauffage et la cuisson afin de maintenir une gamme précise de températures pour des rés...

Page 16: ...our 2 Appuyer sur les touches à flèche vers le haut ou vers le bas de Temp Time température durée pour entrer une température autre que celle qui est affichée 3 Appuyer sur COOK TIME temps de cuisson Le témoin lumineux de la durée de cuisson du four s allume 4 Appuyer sur la touche à flèche vers le haut ou vers le bas de Temp Time température durée pour entrer la durée de cuisson 5 Appuyer sur DEL...

Page 17: ... la cavidad del horno Con la puerta del horno cerrada presione OVEN LIGHT Luz de horno para encender y apagar la luz La luz del horno se encenderá cuando se abra la puerta del horno La luz del horno no se enciende durante el ciclo de Self Clean autolimpieza TIMER SET OFF Ajustar Apagar el temporizador Temporizador del horno El temporizador puede fijarse en horas o minutos hasta 9 horas y 59 minuto...

Page 18: ...a calculará el tiempo de cocción óptimo con base en la temperatura real del horno NOTA El tiempo de cocción que aparece en la pantalla es el tiempo de cocción requerido estimado según lo calcula el control del horno Puede ser diferente del tiempo que usted haya introducido Un pitido le indicará que debe revisar si los alimentos están cocidos al menos 2 minutos antes de que se agote el tiempo del t...

Page 19: ...queo de controles Uso de la superficie de cocción ADVERTENCIA Peligro de incendio Apague todos los controles cuando haya terminado de cocinar No seguir esta instrucción puede ocasionar la muerte o incendios Vitrocerámica en algunos modelos El área de cocción se iluminará de color rojo cuando esté encendido un elemento Es posible que algunas partes del área de la superficie de cocción no se pongan ...

Page 20: ... Consulte la sección Mantenimiento y cuidado de la estufa en el Manual del propietario para obtener información adicional IMPORTANTE Para evitar daños permanentes en la superficie de cocción y para poder quitar la suciedad con más facilidad límpiela después de cada uso Luz indicadora Cooktop On Superficie de cocción encendida La luz indicadora Cooktop On Superficie de cocción encendida está en el ...

Page 21: ...e a la superficie de cocción si se calientan en exceso Acero inoxidable Se calienta de manera rápida pero irregular Un centro o una base de aluminio o cobre sobre acero inoxidable proporciona un calor uniforme Use utensilios de cocina con fondo plano para lograr los mejores resultados de cocción y un uso eficiente de energía El recipiente de cocción deberá ser aproximadamente del mismo tamaño que ...

Page 22: ...spacio que su horno anterior de manera que se puede ajustar la temperatura para adecuarla a sus necesidades de cocción Puede cambiarse a Fahrenheit o a Celsius Para ajustar la temperatura del horno 1 Mantenga presionada la tecla de flecha abajo de Temp Time 5 segundos hasta que la pantalla del horno muestre el ajuste actual por ejemplo 0 F CAL o 00 2 Presione la tecla de flecha arriba o abajo de T...

Page 23: ...mperatura Tiempo para ingresar una temperatura distinta de la que muestra la pantalla 3 Presione COOK TIME Tiempo de cocción La luz indicadora de tiempo de cocción del horno se iluminará 4 Presione las teclas de flecha arriba o abajo de Temp Time Temperatura Tiempo para ingresar un tiempo de cocción 5 Presione DELAY Inicio diferido Se encenderá la luz indicadora de Delay 6 Presione las flechas hac...

Page 24: ... el alimento sobre la rejilla en un recipiente para asar y sitúela en el centro de la parrilla del horno IMPORTANTE Cierre la puerta para garantizar una temperatura adecuada para asar a la parrilla Para obtener un control más preciso al cocinar cambie la temperatura según sea necesario Cuanto más bajo sea el ajuste de temperatura más lenta será la cocción Los cortes más gruesos y las piezas de car...

Reviews: