34
:UDSWKHLQGRRUSLSHDQGMRLQWRI
FRQQHFWLRQSLSHZLWKLQVXODWLQJ
SLSHDQGWKHQZUDSLWZLWKWDSH
LQVXODWLQJSLSH
,QVWDOODWLRQRILQGRRUXQLW
WRUTXHZUHQFK
RSHQHQG
ZUHQFK
LQGRRUSLSH
SLSH
XQLRQQXW
Step six: install drain hose
Step seven: connect wire of indoor unit
1. Connect the drain hose to the outlet pipe of
indoor unit.
Z
Note:
£=
drain hose in order to prevent
condensation.
£ # &
are not provided.
1. Open the panel, remove the screw
on the wiring cover and then take
down the cover.
A
C
V09000R
A
C
V12000R
A
CH0
9
000R
A
CH1
2000R
´
\_]
´
\_]
´
\_]
´
\_]
1.5~2
1.5~2
1.5~2
1.5~2
17mm
17mm
17mm
17mm
0.6mm
0.6mm
0.6mm
0.6mm
´
\_]
´
\_]
3.1~3.5
3.1~3.5
22mm
22mm
22mm
22mm
0.71mm
0.71mm
0.71mm
0.71mm
Model
Liquid Pipe
Torque Nut
Min.
Gas Pipe
Torque
Nut
Min.
size
(kg.m)
width
thickness
size
(N.m)
width
thickness
3.1~3.5
3.1~3.5
´
\_]
´
\_]
Summary of Contents for ACH09000R
Page 20: ...17 K QQ ć K D K Z D D ʝ DQG ʞ K D ...
Page 23: ...20 K 45oC to c dry ...
Page 28: ...25 DEQRUPDO RU VWUDQJH VPHOO ...
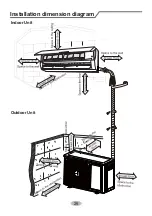
Page 29: ...26 Installation dimension diagram Indoor Unit Outdoor Unit ...
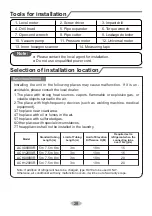
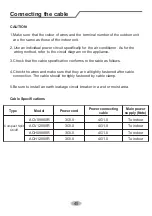
Page 35: ... J J Q ACV09000R ACH09000R ACV12000R ACH12000R 32 ...
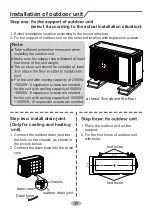
Page 40: ...37 Q chassis outdoor drain joint drain vent Drain hose foot holes foot holes ...
Page 45: ...42 P 39 AF YX_ KAF AQ AFF KAF K 0 1 0 0 ...
Page 96: ... ෮iΣɻʼ خ τ Є א ᘩֶɺ ޚ ଲɾ୮cȹล ߜʼ ݯ خ ๅe 66129924622 ...

