background image


12 

Start-Up and Operation

Voltage Detector 

1.  Slide the selecting switch (9) to “Leitung”. 

2.  Make sure no live wire or appliances are close to the unit and 

switch on the detector by turning the sensitivity setting wheel (8). 

3.  A short beep can be heard and the green LED (3) turns on. Turn 

the sensitivity setting wheel furthermore until the beep sounds 
continuously and the LED remains on. 

4.  Turn the sensitivity setting wheel slowly back until the beep 

becomes silent and the LED turns off. 

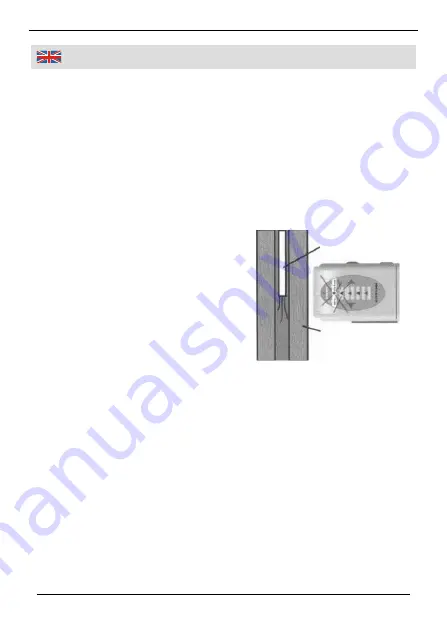
5.  Hold the unit horizontally and 

move it slowly along the wall. 

6.  If a live wire is detected, a beep 

can be heard and the green LED 
starts flashing. If the detector is 
close to a live wire you will hear a 
continuous sound and the LED 
remains on. Turn the sensitivity 
setting wheel slowly back, until 
you can precisely locate the ob-
ject. 

General Hints 

ƒ

  If the detector shows false reactions (e. g. the LED slowly turns off 

or the beep slowly becomes silent), replace the battery. 

ƒ

 Observe the safety regulations applying for construction sites. 

Among other things, all wires which are accessible must be discon-
nected. Use the metal detector function to locate them. 

ƒ

  If the wall contains metallised panels, e. g. fireproofing, the unit may 

not work with full sensitivity. Placing your free hand against the wall 
will reduce the effect and increase the effective efficiency of the unit. 

ƒ

  Do not use pressure when moving the unit along the wall. Friction 

between the unit and the wall can lead to the build-up of static 
electricity and cause incorrect results. 

Wire 

Stud 

Summary of Contents for 92 23 77

Page 1: ...Westfalia Bedienungsanleitung Nr 105116...

Page 2: ...Metall Leitungs und Balkenfinder Artikel Nr 92 23 77 Metal Voltage and Stud Detector Article No 92 23 77 Bedienungsanleitung Instruction Manual...

Page 3: ...m en Umgang erleichtern und Ihnen helfen Missverst ndnissen und Sch den vorzubeugen Sehr geehrte Damen und Herren This combination instrument enables you to find metal objects and live wires in masonr...

Page 4: ...III 2 3 4 9 6 5 8 7 1 Ger tebeschreibung Operating Elements...

Page 5: ...t 4 Stud Indicator red Drucktaste f r Balkenfinder 5 Button for Stud Detector Batteriefach Abdeckung 6 Battery Compartment Cover Suchfl che f r Balken 7 Detecting Surface for Studs Ein Aus Schalter un...

Page 6: ...atteriewechsel Seite 3 Balkenfinder Seite 4 Metallfinder Seite 5 Technische Daten Seite 12 Table of Contents Safety Notes Page 7 Features Page 8 Inserting the Battery Page 8 Changing the Battery Page...

Page 7: ...ichst aus dem Ger t und ersetzen Sie diese durch eine neue Eine auslaufende Batterie kann zur Zerst rung der elektronischen Schaltkreise f hren Nehmen Sie die Batterie bei l ngerem Nichtgebrauch aus d...

Page 8: ...ptische und akustische Signale Batterie einsetzen 1 Dr cken Sie etwas auf den Batteriefachdeckel 6 und schieben Sie die Abdeckung nach unten 2 Schlie en Sie eine 9 V Block batterie 6LR61 an den Batte...

Page 9: ...es Balkens erreicht leuchtet die oberste LED auf 3 Markieren Sie diese Kante auf der Wand Bewegen Sie das Ger t weiter bis die oberste LED erlischt und die darunter liegenden LEDs aufleuchten Markiere...

Page 10: ...e den Auswahl schalter 9 auf Metall 2 Kontrollieren Sie dass sich in unmittelbarer N he des Ger tes kein Metall befindet und schalten Sie den Detektor durch Drehen des Empfindlichkeitseinstellers 8 ei...

Page 11: ...on aussetzt und die LED erlischt 5 Halten Sie das Ger t senkrecht gegen die Wand und bewegen Sie es langsam ber den Suchbereich 6 Detektiert das Ger t eine stromf hrende Leitung so ert nt der Piepton...

Page 12: ...Sie niemals das Pr fger t in direkten Kontakt mit stromf h renden unisolierten Leitungen Es besteht Unfallgefahr durch elektrischen Schlag Das Ger t kann keine Leitungen orten die in Abschirmungen unt...

Page 13: ...he unit as soon as possible and replace it with a new one Leaking batteries can cause damage to the electronic circuits If you do not plan to use the unit for some time remove the battery Do not disas...

Page 14: ...and acoustic signals Inserting the Battery Lightly press on the battery compartment cover 6 and slide the cover down Connect a 9 V battery 6LR61 to the battery clip in the compart ment Place the batte...

Page 15: ...ud the top LED lights up 3 Mark this edge on the wall Move the unit until the top LED turns off and the other LEDs light up Now mark the second edge of the stud on the wall 4 To locate horizontally ly...

Page 16: ...to the unit and switch on the detector by turning the sensitivity setting wheel 8 3 A short beep can be heard and the green LED 3 lights up Turn the sensitivity setting wheel furthermore until the bee...

Page 17: ...wire you will hear a continuous sound and the LED remains on Turn the sensitivity setting wheel slowly back until you can precisely locate the ob ject General Hints If the detector shows false reactio...

Page 18: ...wires these must be located with the metal detector function Poorly insulated wires and damp walls will lead to residual currents and the build up of static electricity This can make detection with t...

Page 19: ...olz 13 mm Measuring Depth Wood Messtiefe Metall 40 mm Measuring Depth Metal Messtiefe Spannung 40 mm Meas Depth Voltage Stromaufnahme 85 mA Power Consumption Arbeitstemperaturbereich 10 C bis 40 C Tem...

Page 20: ...15...

Page 21: ...16...

Page 22: ...N 55024 1998 A1 A2 Hagen den 29 Oktober 2008 Thomas Klingbeil Qualit tsbeauftragter We the Westfalia Werkzeugcompany Werkzeugstra e 1 D 58093 Hagen declare by our own responsibility that the product M...

Page 23: ...westfalia net Kundenbetreuung Customer Services Werter Kunde bitte helfen Sie mit Abfall zu vermeiden Sollten Sie sich einmal von diesem Artikel trennen wollen so bedenken Sie bitte dass viele seiner...

Reviews: