background image


13 

Operating

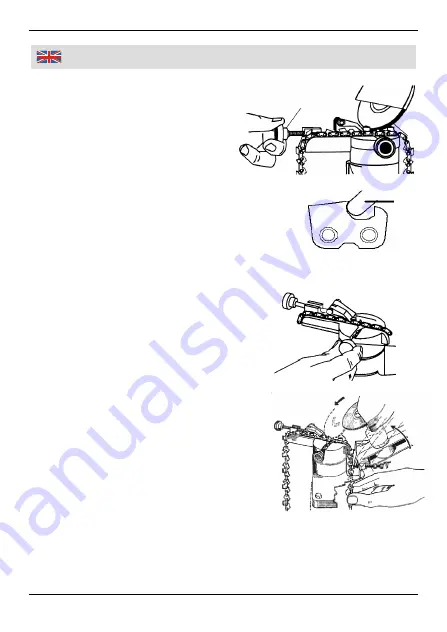
6.  Position the tooth to be sharpened in 

the correct position with respect to 
the grinding disc. First adjust ap-
proximately. Put the adjustment 
wedge (G) down and move the tooth 
forward with the adjusting screw (

I

), 

until the bottom of the grinding disc is 
positioned inside the cutting edge of 
the tooth.  

Common chainsaw chains have a cutting-teeth 
angle  of  25° or  30°. The cutting-teeth angle is  
usually  printed  on the package of a new chain.  
If you do not know the exact cutting-teeth angle  
of  your  chainsaw chain, it is normally sufficient  
to estimate it by sight. Position the grinding disc 
(E), as shown in the drawing. 

7.  Fasten the chainsaw chain in this position by 

tightening the fastening screw (F). Make sure 
the chainsaw chain is between both press 
boards (M). 

8.  Start grinding with the most worn-out tooth. 

Adjust the depth limiter (N) that way to en-
sure that all teeth are sharpened to the same 
depth.  

Successive teeth of chainsaw chains are 
always at opposite angles. First sharpen all 
teeth in one direction i. e. every second 
tooth, before changing the sharpening angle 
to the opposite direction. Make sure that all 
teeth are sharpened as evenly as possible. 
Only sharpen the teeth, never the chain 
links. 

E

F

N

Summary of Contents for ZIJ-J2-16TH-D

Page 1: ...Westfalia Bedienungsanleitung Nr 105696...

Page 2: ...S gekettensch rfger t ZIJ J2 16TH D Artikel Nr 92 79 39 Chain Saw Sharpener ZIJ J2 16TH D Article No 92 79 39 Bedienungsanleitung Instruction Manual...

Page 3: ...g Page 14 Technical Data Page 14 Drawing Page 15 Part List Page 16 Sicherheitshinweise Seite 1 Hinweise Seite 2 Vor der ersten Benutzung Seite 3 Zusammenbau Seite 3 Inbetriebnahme Seite 5 Austausch de...

Page 4: ...III A B M F E I G J D C H L K N bersicht Overview...

Page 5: ...be Fastening Screw G Anschlagskeil Adjustment Wedge H Handgriff mit Schutzhaube Handle with Protective Cover I Einstellschraube Adjusting Screw J S gekettenaufnahme Chain Holder Assembly K Gradskala R...

Page 6: ...er t zu benutzen ist Benutzen Sie das Ger t nur zum sch rfen handels blicher S geketten Verwenden Sie das Ger t nicht f r andere Zwecke Sch rfen Sie niemals besch digte S geketten Betreiben Sie das Ge...

Page 7: ...ssen Sie die Kette sch rfen Sch rfen Sie alle Glieder gleichm ig um einen geraden Schnitt bei minimalen Vibrationen sicherzustellen Stumpfe oder durch Steine besch digte Schneidglieder k nnen beim Arb...

Page 8: ...ine ebene und waagerechte Unterlage wie z B eine Werkbank Achten Sie darauf dass die Grundplatte A weit genug bersteht damit genug Abstand f r die Bohrmaschi ne bleibt So kann die S gekette frei he ru...

Page 9: ...nd den Muttern von unten 5 Montieren Sie die Schleifscheibe wie abgebildet und befestigen Sie die gesamte Einheit im Bohrfutter der Bohrmaschine Benutzen Sie nur Schleifscheiben der Gr e 100 x 3 2 x 1...

Page 10: ...alten Sie Ihre Bohrmaschine ein Dr cken Sie zum Schleifen den Handgriff H leicht nach unten Tragen Sie beim Schleifen immer eine Schutzbrille 4 Drehen Sie die S gekettenaufnahme J nur bei stillstehend...

Page 11: ...es nach Augenma einzustellen Positionieren Sie die Schleifscheibe E wie in der Abbildung gezeigt 7 Fixieren Sie die S gekette in dieser Position durch Anziehen des Feststellschraube F Stellen Sie sich...

Page 12: ...chleifscheiben mit einem Durchmesser von 100 mm Wartung und Reinigung Reinigen Sie das Ger t von Zeit zu Zeit mit einem trockenen Pinsel oder einer B rste von Schleifr ckst nden Reinigen Sie das Ger t...

Page 13: ...espon sible person how to use the unit The unit is designed for sharpening of most common saw chains Do not modify it for any other purpose Do not sharpen damaged chainsaw chains Do not operate the un...

Page 14: ...not pull anymore You have to sharpen all cutting teeth as uniformly as possible This will ensure smooth operation of the sharpened chainsaw chain with a minimum of vibration Blunt cutting teeth or pa...

Page 15: ...level surface e g a work bench Ensure that the base plate A extends out far enough over the edge of the work bench so that the chainsaw chain can hang down freely and you can easily access the angle a...

Page 16: ...unt the grinding disc as shown and place the assembled grinding disc on the chuck of the drill machine Use grinding disc with the dimensions 100 x 3 2 x 10 mm Left hand thread 6 Mount the handle with...

Page 17: ...ening press the handle H lightly down When sharpening always wear protection goggles 4 Rotate the chain holder assembly J only when the grinding disc is not moving Before forwarding the chainsaw chain...

Page 18: ...hainsaw chain it is normally sufficient to estimate it by sight Position the grinding disc E as shown in the drawing 7 Fasten the chainsaw chain in this position by tightening the fastening screw F Ma...

Page 19: ...with a diameter of 100 mm Maintenance and Cleaning Clean the unit from time to time with a dry paint brush or a brush in order to remove grinding residues Do not clean the unit with aggressive deterge...

Page 20: ...15 Zeichnung Drawing...

Page 21: ...lse Plastic Sleeves 9 Steckachse 10 x 102 mm Metal Rod 10 Schraube 17x60 Screw 17x60 11 Schraube 10x40 Screw 10x40 12 Mutter M10 Nut M10 13 Schleifscheibe 100 x 3 2 Grinding Disc 100 x 3 2 14 Festste...

Page 22: ...r M6 Nut M6 27 Feder Spring 28 Klemmplatte Press Board 29 Schraube 8x40 Screw 8x40 30 Linker Klemmblock Left Press Board 31 Rechter Klemmblock Right Press Board 33 Schraube 5x35 Screw 5x35 34 Schraube...

Page 23: ...efon 07723 21 4 21 Telefax 0180 5 30 31 30 Telefax 07723 21 4 21 40 Internet www westfalia de Internet www westfalia versand at Schweiz UK Westfalia Westfalia Utzenstorfstra e 39 Freepost SWB 40531 CH...

Reviews: