


13
English
WK403040
►
To avoid wasting paint, use small amounts
of the product for viscosity testing, and use the
viscometer once you have obtained the correct
degree of viscosity for the paint.
►
Remember that some paints may contain
solid particles, and will have to be filtered before
filling the cup with paint to prevent damaging
the
HVLP turbine paint spray gun
.
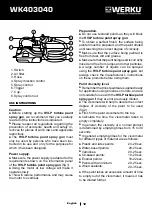
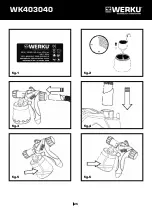
Adjustment of the hose.
►
Insert the hose with pressure into the connec-
tors (fig.3, fig.4).
►
The connectors can be positioned as desired.
Tank filling and assembly.
►
Unscrew the tank of the
HVLP turbine paint
spray gun
.
►
Align the suction tube so that the gun can ab-
sorb all the liquid.
►
When the spray gun works horizontally, place
the suction tube forward (fig.5).
►
If you need to use the spray gun pointing
upwards, the suction tube should be placed po-
inting backwards (fig.6).
►
Place the tank on a paper.
►
Then, load the paint and thread the tank to
the gun adjusting it well.
►
Place the gun in the housing of the
HVLP tur-
bine paint spray gun
(fig.7).
WARNING! put the HVLP turbine paint spray
gun
only on clean, firm and leveled surfaces
.
►
Otherwise, it could aspire dirt or dust.
Operation.
►
Take the gun and point it to the object to be
painted.
►
Start the engine by operating the switch.
►
Adjust the deflector nozzle acording the job
to do.
►
You can choose between three types of spray
patterns, depending on the application and ob-
ject type (fig.8).
►
Select the pattern type
►
Vertical oval to paint vertical surfaces (fig.8-A).
►
Horizontal oval to paint horizontal surfaces
(fig.8-B).
►
Circular pattern for corners, edges and pla-
ces dificult to reach (fig.8-C).
WARNING! never pull the trigger while
you are adjusting in the deflectors.
►
You can only turn the selector into one direc-
tion during adjustment.
►
Do not force as you could damage the system.
►
Change the horizontal pattern by turning the
selector to the vertical direction 90° clockwise.
►
Change from vertical to horizontal pattern by
turning the selector 90º in the opposite cloc-
kwise direction.
►
Changes can only be made in one direction.
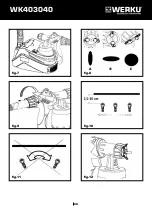
Adjusting the volume of sprayed material.
►
Adjust the volume by turning the selector which
is in the rear of the trigger sprayer (fig.9).
►
Turning clockwise increases the volume of
the sprayed material.
►
Turning to the left decreases the volume of
the sprayed material.
Spray technique.
►
The final result of the spraying depends on the
cleanliness and smoothness of the paint surface.
►
Therefore, the surface must be carefully pre-
pared and kept free of dust.
►
Cover all surfaces that should not be sprayed
as well as the threads or others that require to
be kept clean.
►
It is recommended to test spray on cardboard
or similar surface to find the right fit.
►
Start spraying outside of the surface to be
painted and continue spraying till outside of it
without interruption during the pass.
►
Advance in parallel while maintaining the same
distance, between 2,5 and 30 cm (fig.10).
Summary of Contents for WK403040
Page 26: ...25 WK403040 fig 1 fig 2 fig 3 fig 4 fig 5 fig 6...
Page 27: ...26 WK403040 fig 7 fig 8 fig 9 fig 10 fig 11 fig 12...
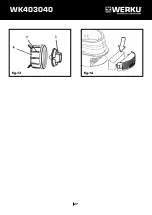
Page 28: ...27 WK403040 fig 13 fig 14...
Page 29: ...28 WK403040...
Page 30: ...29 WK403040...
Page 31: ...30 WK403040...


