background image

Printing UDF Wise, User wise, Ratewise and Tax Report

¨

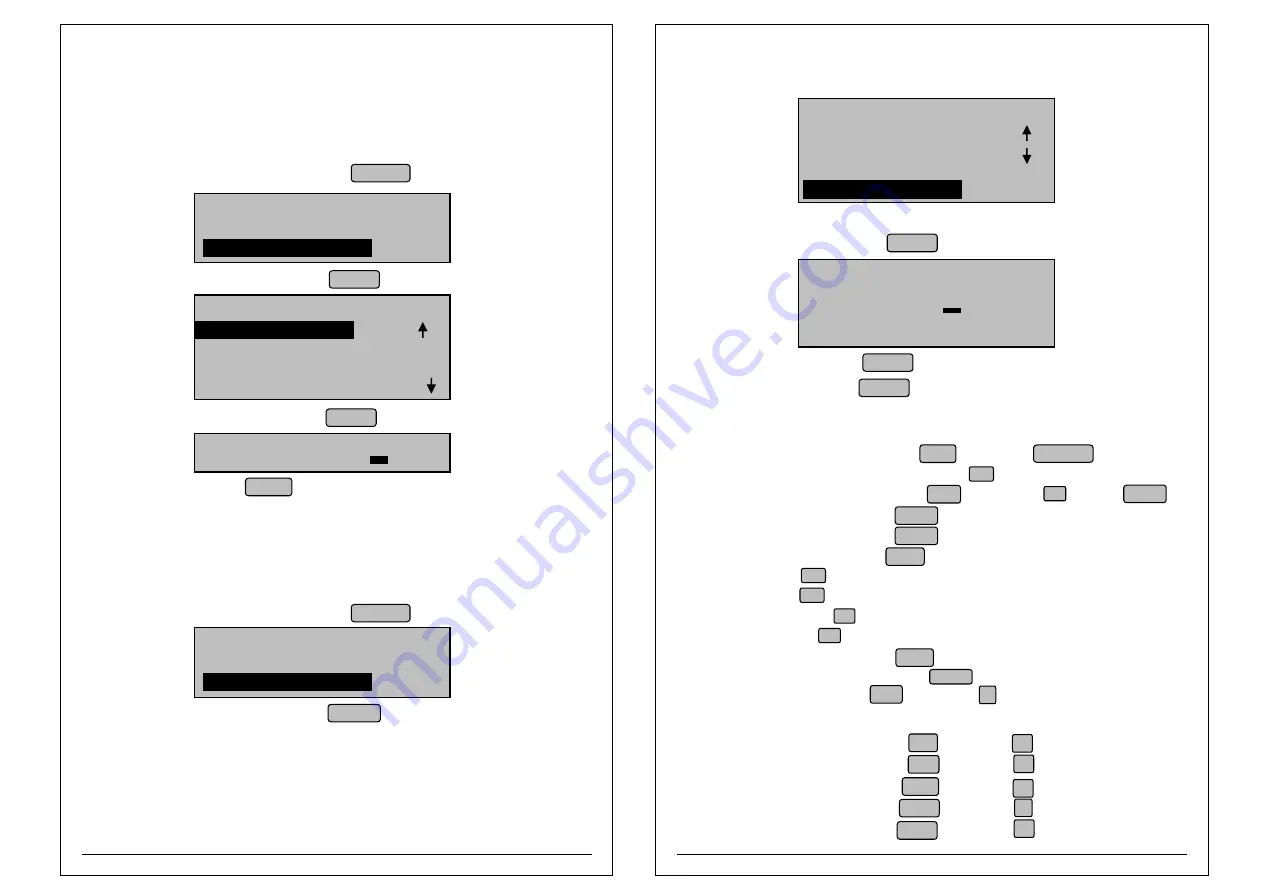
 When Control is at billing mode press  REPORT   LCD will display like 

  REPORT SELECTION MODE 
1. DETAILED REPORT

2. SUMMARY REPORT

     SUMMARY REPORTS 

5.USER WISE REPORT 

6.RATE WISE REPORT
7.TAX REPORT 

4.UDF WISE REPORT

¨

Select Summary report and press   ENTER   LCD Will display like 

¨

Select Required report and press   ENTER  LCD will display like

          REPORT
  

DATE    : DD/MM/YY

¨

Type “Date” and press  ENTER (Initially present date will displayed) for the report 

NOTE 1: 

 UDF wise, Rate wise and User wise  report available for 1 year.

NOTE 2: 

 TAX report available for Present and Previous month.

NOTE 3: 

 For TAX report input will be month and Year (MM/YY).

Bill Data

  REPORT SELECTION MODE 
1. DETAILED REPORT

2. SUMMARY REPORT

¨

Select Summary report and press   ENTER   LCD Will display like 

¨

 When Control is at billing mode press  REPORT   LCD will display like 

¨

Select Bill Data Report press   ENTER  LCD will display like                                                                                      

¨

Type “From date” and press  ENTER  (Initially present DATE will be displayed).

¨

Type “TO date” and press   ENTER  (Initially present DATE will be displayed)

         BILL DATA 

  
DATE  : DD/MM/YY
TO      : DD/MM/YY   


NOTE 3:

   While taking year wise report only year should be entered.

NOTE 4: 

  After 365 days' Detailed Report Data will be erased.

 printing. 

     SUMMARY REPORTS 
5.USER WISE REPORT 

6.RATE WISE REPORT
7.TAX REPORT 

8.BILL DATA

¨

Attach pen drive with Printer(through USB) port. 

8.0 Shortcut Keys :

Calculator Mode  : In billing mode, Press  Shift     key and then User/Calc   key. 

Calculator  Rechecking : In calculator mode, Press F1   key, then Up & down for scrolling.

Data Downloading : In Login Mode, Press   Shift    Key and then  F2  key, Press  Enter    key 

Duplicate Bill : In billing mode, press   Print    key

Bill Voiding :    In billing mode, press   Void     key 

Save bill without printing :    Press   Save  key after Items entry .

Print KOT :  Press  F1  key after items entry    

Save KOT : Press   F2   key after items entry 

Delete KOT item : Press  F3  key after UDF1 entry

Print KOT bill :  Press  F4  key after UDF1 entry 

Rupee Billing : In billing mode Press   Shift   key after item entry. 

Return Merchandise : In billing mode press   Shift   and R key after UDF1 entry 


Add ITEM : In idle mode, Press  Shift   key and then  A   key 

 Above two shortcuts works only for Manager Login 

Billwise Report :   In idle mode, Press   Shift  key and then   C  key 

Itemwise Report : In idle mode, Press   Shift   key and then  D  key 

Void Bill Report : In idle mode, Press   Shift   key and then   E   key 

User Bill Report : In idle mode, Press   Shift   key and then   F  key 

Item Bill Report : In idle mode, Press   Shift   key and then   G   key 

62

63

Summary of Contents for BP 1100 JOY

Page 1: ...U S E R M A N U A L BP 1100 JOY C0000XXX Vr 1 0 0 Dec 21 C0000XXX...

Page 2: ...foreign objects may lead to fire or electric shock 7 If water or other liquid spills into this equipment turn off the power supply switch and unplug the power cable immediately Continued usage may lea...

Page 3: ...5 2 User login mode 5 3 How to operate 5 3 1 Billing options Return Merchandise Item Search Browse Edit Through Kot printing Kot Bill Printing 6 0 Menu Options 6 1 Item database 6 2 Bill settings 6 3...

Page 4: ...are allowed and configured through USER ID 1 Stock management option Return merchandise option during billing Table splitting option for KOT Barcode reader interface Malacrity 2806 Posiflex CD 3860 Re...

Page 5: ...Voltage to your product 2 3 2 Product used with Battery Pack Product can be used with the battery Pack alone When mains off automatically control will switch to battery mode Battery backup time 90 Min...

Page 6: ...eric function keys required for item customer entries modification and other special functions KEY Functionality Use to print bill or report Hold PRINT BUTTON and switch on the printer for self test p...

Page 7: ...operation in the Calculator mode To go back to previous mode screen Back Space Back CASH DRAWER TOTAL NOTE Above shortcuts only for manager login NOTE Hot key configuration mode provided in the Machin...

Page 8: ...ii Data bits 8 iv Parity None v Stop bits 1 vi Flow control None NOTE Works only with Windows 8 above Caution Do not switch off the printer while Firmware downloading 10 11 WAITING FOR DATA RESTART MA...

Page 9: ...e real value For item with price 10Rs Discount 10 and VAT 10 if we billed for 1 Qty it will display amount 10 Rupee only but TOTAL amount it will show value including TAX and discount 4 Enter amount i...

Page 10: ...20 TABLE NO 1 Enter the table number you want to give kitchen order token KOT eg 1 Press ENTER and type item number you want to give KOT eg 1 IDLI Press ENTER to choose quantity and type quantity and...

Page 11: ...in the billing window it will print the Engaged UDF report ITEM DATABASE Add Item Edit Item Stock Management v o New Stock o Add Stock o Delete Stock o Print Stock Report o View Stock Print Item Data...

Page 12: ...press Menu Button LCD will display like Select Item data base and Press ENTER LCD will display like Select ADD ITEM option and Press ENTER LCD will display like ITEM DATABASE 2 EDIT ITEM 3 STOCK MANA...

Page 13: ...rate2 Max 999999 99 and press ENTER Cursor will shift Item rate3 entry mode Edit Item rate3 Max 999999 99 and press ENTER Cursor will shift Tax entry mode Edit Item TAX CESS Max 99 99 325 respectively...

Page 14: ...hen select Itemwise stock report option STOCK MANAGEMENT SELECT YOUR OPTION 3 DELETE STOCK 4 PRINT STOCK RPT 1 NEW STOCK 2 ADD STOCK 5 VIEW STOCK press ENTER for Stock report printing Or Select view S...

Page 15: ...RTS FOR CLERKS 1 ROUND OFF OPTION BILL SETTING 6 CASH RECEPTION 3 PRICE CHANGE OPTION 4 OTHER CHARGES 5 ITEM NAME PRINT OPTION 7 REPORTS FOR CLERKS 1 ROUND OFF OPTION BILL SETTING 6 CASH RECEPTION 2 D...

Page 16: ...quired other charge value Max 99 99 and press ENTER to save the setting 3 PRICE CHANGE OPTION 5 ITEM NAME PRINT OPTION 7 REPORTS FOR CLERKS 1 ROUND OFF OPTION BILL SETTING 6 CASH RECEPTION 2 DISCOUNT...

Page 17: ...ITEM DATABASE 3 MACHINE SETTINGS 4 HEADER FOOTER 2 BILL SETTINGS Select Bill setting and Press ENTER LCD will display like MENU 1 ITEM DATABASE 3 MACHINE SETTINGS 4 HEADER FOOTER 2 BILL SETTINGS Selec...

Page 18: ...option is for restaurant billing OPTION ENABLE SELECT YOUR OPTION KOT OPTION Enable Disable STOCK OPTION through Panel When control is at billing mode press Menu Button LCD will display like Select Bi...

Page 19: ...elect UDF2 option and press ENTER LCD will display like After selecting Enable options press ENTER Control will shift to Name entry mode Configure the required name and press ENTER Cursor will shift t...

Page 20: ...tion and press ENTER LCD will display like TIME ON BILL OPTION OPTION SELECT YOUR OPTION ENABLE Enable or Disable the option by up and down arrow key and press ENTER to activate the setting Select BAS...

Page 21: ...BILL SETTINGS BILLSETTINGS 18 BASE PRICE OPTION 19 SUB UDF OPTION 20 VIEW TOTAL OPTION 17 TIME PRINT OPTION 16 TAX TYPE OPTION MENU 1 ITEM DATABASE 3 MACHINE SETTINGS 4 HEADER FOOTER 2 BILL SETTINGS...

Page 22: ...BLE 24 POS ENABLE BILL MENU 1 ITEM DATABASE 3 MACHINE SETTINGS 4 HEADER FOOTER 2 BILL SETTINGS Select the POS ENABLE OPTION printing option and press ENTER POS OPTION 1 ENABLE You can Enable Disable P...

Page 23: ...TER 2 BILL SETTINGS 25 PAYMENT MODE OPTION BILL SETTING 26 CALC BILL OPTION 28 UTGST OPTION 27 BILL STYLE OPTION Select the Bill settings option and press the ENTER LCD will display like UTGST OPTION...

Page 24: ...s after Decimal option through Panel MENU 1 ITEM DATABASE 3 MACHINE SETTINGS 4 HEADER FOOTER 2 BILL SETTINGS Select the Bill settings option and press the ENTER LCD will display like Select the Digit...

Page 25: ...GIT AFTER DECIMAL 33 CUMULATIVE ITEM OPTION 34 TAX TABLE OPTION Select the Discount Print Option press ENTER LCD will display like Select the Enable or Disable option by using the Down or UP key and p...

Page 26: ...BAUDRATE Configure MACHINE ID through Panel Select Machine setting and Press ENTER LCD will display like When control is at Retail billing mode press Menu Button LCD will display like MACHINE 1 TIME D...

Page 27: ...FACTORY SETTINGS 7 RESTORE DEFAULTS SETTINGS 5 BUZZER BUZZER 1 BUZZER ON 2 BUZZER OFF SELECT YOUR OPTION SETTING FACTORY SETTINGS When control is at billing mode press Menu Button LCD will display li...

Page 28: ...key press ENTER or Shift alphabet A Z can be configured as Hot key Cursor will shift to item no entry mode Select SAVE CONT option to configure more HOT keys Select SAVE EXIT option to save exit from...

Page 29: ...ift to Justification selection mode Select required justification Left Right Center justification by up and down arrow key and press ENTER Cursor will shift to FONT selection mode Select required font...

Page 30: ...LCD will display like 1 DETAILED REPORT 2 SUMMARY REPORT DATA TRANSFER NEW FOLDER CREATED DATA TRANSFER After selecting any type of report give required inputs Eg Date User id etc and press ENTER LCD...

Page 31: ...press ENTER LCD Will display like Select required report and press ENTER LCD Will display like REPORT SELETION MODE 2 SUMMARY REPORT SELECT YOUR OPTION 1 DETAILED REPORT Type date and press ENTER Init...

Page 32: ...PORT 5 ITEM BILL REPORT 6 HOURLY REPORT Select User billed report and press ENTER LCD Will display like Type date and press ENTER Initially date will be present date Cursor will shift to USER ID entry...

Page 33: ...ed Type TO date and press ENTER Initially present DATE will be displayed DAY WISE REPORT FROM DD MM YY TO DD MM YY Printing Monthly Report When Control is at billing mode press REPORT LCD will display...

Page 34: ...year should be entered NOTE 4 After 365 days Detailed Report Data will be erased printing SUMMARY REPORTS 5 USER WISE REPORT 6 RATE WISE REPORT 7 TAX REPORT 8 BILL DATA Attach pen drive with Printer...

Page 35: ...de Press Shift key and then X key Paper path curved paper path Paper type thermal roll paper Paper width 58 1 mm Paper thickness 0 06 5 microns Paper entry rear in and top out Paper roll size Max Dia...

Page 36: ...cles Loose connection Due to power failure noise During downloading Database or header footer Port setting is not proper Paper cover may not be Closed properly Paper roll may be exhausted Print head i...

Reviews: