


WARNING:
To prevent serious injury from accidental operation, make sure the power cord is discon-
nected from the power source and the tool is turned OFF before assembly or making any adjustments.
ASSEMBLY & ADJUSTMENTS
Fig. 3
10
INSTALLING/CHANGING THE SANDING DISC
Your sander comes with a 60-Grit PSA (pressure sensitive adhesive) sanding disc. This is a coarse sanding disc that
is good for quick stock removal. For finish sanding, you will need a finer-grit sanding disc. Additional sanding discs
can be purchased from wenproducts.com by searching 65812SD. Follow the steps below to replace a sanding disc:
NOTE:
Only 12-inch sanding discs with pressure sensitive adhesive (PSA) can be used. Hook & loop sanding
discs or sanding discs of different size cannot be used on this sander.
1. Remove the disc guard and dust cover to expose the sanding disc plate.
2. Peel the used sanding disc from the metal disc plate.
TIP
: a putty knife and hair dryer may help with this process.
3. Wipe clean the disc plate to make sure it is clean of any residue. You can use mineral spirits to soften the PSA
adhesives to remove any residue from the plate. Rotate the disc by hand to get access to all of the disc surface.
4. Peel the protective backing from the new PSA 12-inch sanding disc. Align the sanding disc with the plate, and
press the disc firmly onto the plate, leaving no loose edges.
5. Re-install the disc guard on the right side of the sanding disc, and secure with Phillips head screws and washers.
Re-install the dust cover against the bottom of the disc, and fasten with Phillips head screws.
NOTE:
It is important to install the disc guard, as it prevents you from sanding on the wrong side of the disc.
ONLY sand on the left side of the disc, where the disc is rotating downwards (toward the table).
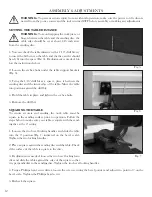
USING DUST COLLECTION
Sanding operations are dusty and can produce particles that
are harmful to your health. Always wear a dust mask and use
an adequate dust collection system.
Connect the included dust hose to the sander’s dust port
(Fig. 3), and connect the other end to the dust collection sys-
tem of your choice. A dust port adapter may be needed (not
included), depending on the inlet size of your dust extractor.
Summary of Contents for 65812
Page 16: ...EXPLODED VIEW PARTS LIST 16 ...
Page 20: ...THANKS FOR REMEMBERING ...


