background image

7.4 Menu Setup

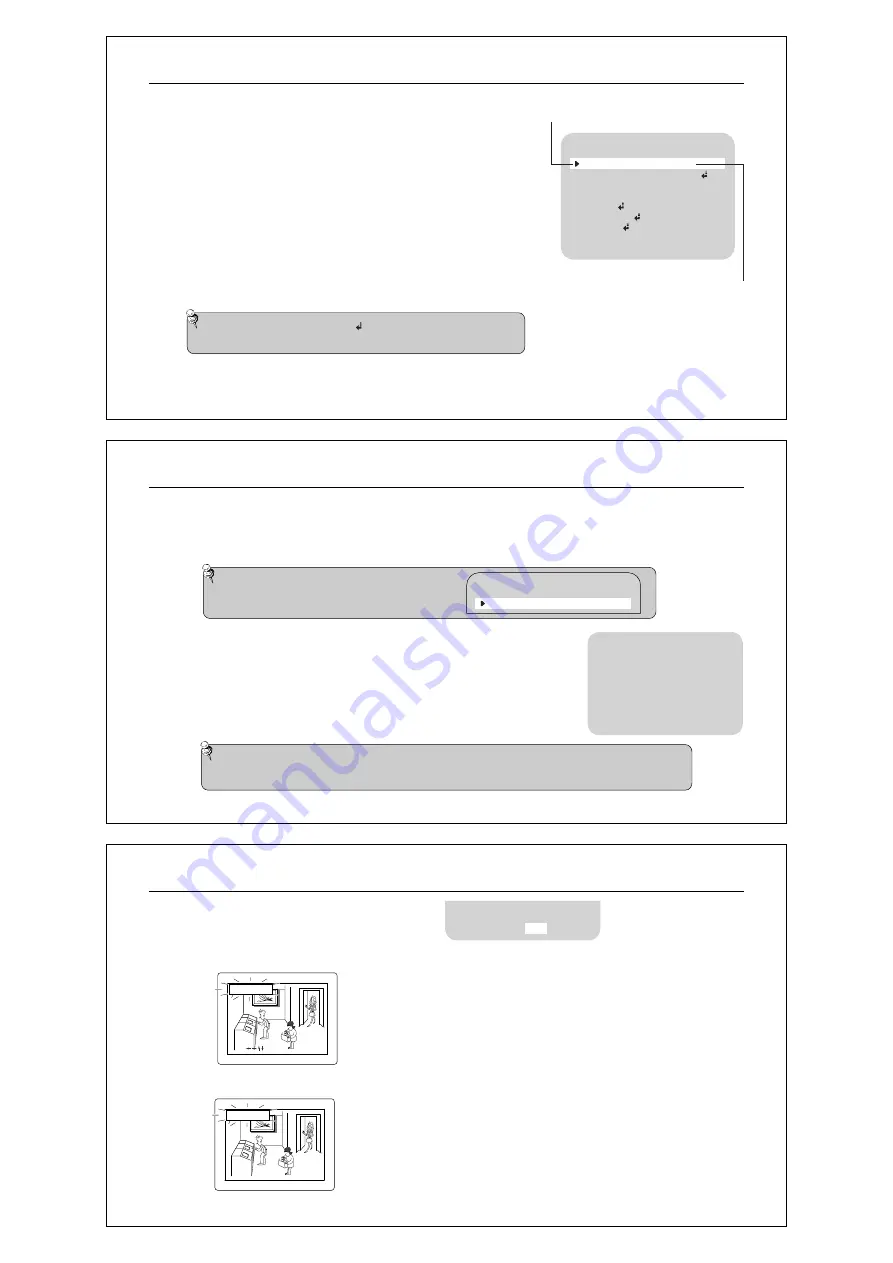
Press the SET button to access the main setup mode.

Main setup menu is displayed on the monitor screen. 

Select the desired feature using the TELE(UP) or WIDE(DOWN) button.

Each pressing of the TELE(UP) or WIDE(DOWN) button moves 

       the indicator to the next or previous feature.

Move the arrow indicator to the desired feature item.

Change the status of the selected feature using 

       the FAR(LEFT) or NEAR(RIGHT) button.

When completed, move the arrow indicator to 'EXIT' and press the SET button.

Day & Night 10X Zoom Camera

16

Note

Features marked with a       have an accessible submenu.

Access the submenu by pressing the SET button.

MAIN SETUP

CAM TITLE

WHITE BAL

BACKLIGHT

MOTION DET

FOCUS

EXPOSURE

SPECIAL

RESET

EXIT

OFF

ATW

OFF

OFF

Select feature using the TELE(UP) or WIDE(DOWN) button.

Change the status using the FAR(LEFT) or NEAR(RIGHT) button.

7.4.1 Cam Title

Use this feature to designate a name for the camera, which will display on the monitor screen.

Press the SET button to display the main setup menu and move the arrow indicator to 

       'CAM TITLE' using the TELE(UP) or WIDE(DOWN) button.

Set 'CAM TITLE' to 'ON' using the 

FAR(LEFT)

 or 

NEAR(RIGHT)

 button.

Press SET button.

You can enter up to 15 characters.

  j 

Move the cursor to the character entry field using  the FAR(LEFT)  or NEAR(RIGHT) button.

  k 

Use 

TELE(UP)

TELE(UP)

, FAR(LEFT), and NEAR(RIGHT) buttons to 

              select a desired character.

  l 

Press the SET button to confirm selection of the blinking character. 

              The character is then saved, and the cursor in the entry field moves to the next position.

  m 

Repeat steps 

j

 through 

l

 until the desired name has been entered.

Day & Night 10X Zoom Camera

17

Note

Correcting Mistakes

: Move the cursor to 'CLR' and press the SET button to clear the entire entry.

To modify one character, use or to position the cursor above the character to be modified and click 

the SET button after selecting the character to enter.

Note

If the CAM TITLE feature is set to 'OFF', 

    the name will not displayed in the monitor.

MAIN SETUP

CAM TITLE

OFF

A B C D E F G H I J K L M N O

P Q R S T U V W X Y Z a b c d

e f g h i j k l m n o p q r s

t u v w x y z 0 1 2 3 4 5 6 7

8 9 ( ) - / # ! ? , .

CAM  TITLE  SETUP

CLR POS

END

fg

Select on screen position of the CAM TITLE.

  j 

Move the cursor to 'POS' and press SET button.

  k 

The CAM TITLE is displayed on the top-left of the monitor screen. (Default position).

  l 

Select the position by using the 4-directional buttons, then press the SET button to confirm the position.

Day & Night 10X Zoom Camera

18

8 9 ( ) - / # ! ? , .

CLR

END

fg

POS

to Locate, then SET

to Locate, then SET

FRONT DOOR

FRONT DOOR

Summary of Contents for WDN-1003XP

Page 1: ... should conform to all local codes 1 0 Features l A F 10x Optical Zoom The built in WDN 1003XP optical zoom lens is a highly durable component It features auto focus auto iris and zoom functions l DNR Digital Noise Reduction The amount of low illuminance noise has been significantly reduced and the signal to noise ratio S N ratio as well as horizontal resolution have been improved resulting in a c...

Page 2: ...us personal injuries including death Indicates Never Allowed Indicates No Disassembling Indicates Must Observe Day Night 10X Zoom Camera 4 Correct Disposal of This Product Waste Electrical Electronic Equipment Applicable in the European Union and other European countries with separate collection systems This marking shown on the product or its literature indicates that it should not be disposed wi...

Page 3: ... menu screen N B T S A F Z W NEAR BLC TELE SHUTTER FOCUS ADJUST FAR TELEZOOM WIDE ZOOM Day Night 10X Zoom Camera 8 5 0 Names and Functions of Parts 5 1 Front u Lens protection cap Please cover the lens when not using it v Green LED In RS 485 LED turns ON OFF when receiving specific data w Yellow LED In RS 485 LED turns ON OFF when receiving specific data 5 2 Top Bottom x Mounting bracket screw hol...

Page 4: ...r as shown in the figure below The recommended adaptor specification for WDN 1003XP is DC 12V 500mA q Standard voltage for camera operation DC 12V 10 q There may be some deviation in voltage drop depending on the type of wire and the manufacturer Day Night 10X Zoom Camera 11 Monitor Adapter 485 CONTROL BOARD CONNECTION TERMINAL CONNECTION TERMINAL CONNECTION TERMINAL RS 485 CONTROL CABLE RED TRX W...

Page 5: ...plays operates in order of percedence of ESC 1 60 1 100 1 120 1 250 1 500 1 700 1 1000 1 1600 1 2500 1 5000 1 7000 1 10000 When ESC operates RED LED is OFF when shutter operates LED is on w BLC KEY BLC KEY operates BLC OFF BLD HIGH in order of precedence When BLC operates RED LED is ON when BLC is not operating LED turns off Day Night 10X Zoom Camera 13 N B T S A F Z W NEAR BLC TELE SHUTTER FOCUS ...

Page 6: ...ess SET button x You can enter up to 15 characters j Movethecursortothecharacterentryfieldusing theFAR LEFT orNEAR RIGHT button k Use TELE UP TELE UP FAR LEFT and NEAR RIGHT buttons to select a desired character l Press the SET button to confirm selection of the blinking character Thecharacteristhensaved andthecursorintheentryfieldmovestothenextposition m Repeat steps j through l until the desired...

Page 7: ...ges in lighting and subsequent change in brightness of an object as motion q With the feature enabled other algorithms may require additional time to operate than usual q This system does not guarantee prevention of fire or theft The manufacturer shall not be held responsible for any accident or damage incurred 7 4 2 White Balance Control Your camera provides three WHITE BAL control modes for your...

Page 8: ...ical zoom ZOOM or digital zoom DZOOM positions using the TELE UP or WIDE DOWN button while verifying the changes on screen Enabling D ZOOM ON means that digital zoom will activate once optical zoom ends Focus is automatically adjusted with moving zoom q ONE PUSH Focus is automatically adjusted just once after zoom position is changed Select ONE PUSH and press the SET button to confirm Increase or ...

Page 9: ...UP or WIDE DOWN button Press the SET button to confirm c END To revert to the main setup menu Day Night 10X Zoom Camera 25 FOCUS SETUP MODE ZOOM TRK ZOOM SPEED D ZOOM DISP ZOOM MAG ZOOM POS INIT LENS INIT AUTO ON FAST OFF OFF ON OFF FOCUS SETUP MODE ZOOM TRK ZOOM SPEED D ZOOM DISP ZOOM MAG ZOOM POS INIT LENS INIT END AUTO ON FAST OFF OFF ON ON Note q Preset setting has priority over a ZOOM POS INI...

Page 10: ...OWN button k Set SENS UP to the desired mode using the FAR LEFT or NEAR RIGHT button q AUTO Select this mode for use in night time or under low lighting conditions q OFF Disabled Day Night 10X Zoom Camera 29 EXPOSURE SETUP BRIGHTNESS IRIS SHUTTER AGC DNR SENS UP END 25 AUTO NORMAL LOW OFF Note q Once AUTO mode is set the user can configure Sens Up limit by increasing decreasing the shutter speed e...

Page 11: ... Mask area display q MASK TONE Adjust desired mask color level q TOP To move the mask area up q BOTTOM To move the mask area down q LEFT To move the mask area left q RIGHT To move the mask area right Day Night 10X Zoom Camera 32 SPECIAL SETUP USER PRESET PRIVACY DAY NIGHT OFF OFF COLOR SET PRIVACY GROUP SEL AREA SEL AREA MODE MASK TONE TOP BOTTOM LEFT RIGHT END GROUP 1 AREA 1 ON 50 45 110 45 95 No...

Page 12: ...y inverse the screen q SHARPNESS Increasing this value sharpens object edges Too high of a setting however produces noise and may obscure the image q COLOR AGAIN Adjusting this value affects the chroma level only the burst level is unaffected c END evert back to the USER PRESET menu 7 4 8 RESET To reset your camera to factory default condition 7 4 9 EXIT To finish setup menu Day Night 10X Zoom Cam...

Page 13: ... 8 Sens up Color 0 02Lux F1 8 B W LOW MIDDLE HIGH OFF Selectable Auto1 Auto2 COLOR B W ICR Normal High OFF Selectable ATW INDOOR 3 000K 10 500K OUTDOOR 1 800K 10 500K AWC MANUAL Day Night 10X Zoom Camera 39 Electronic shutter speed O S D Motion Detection DNR Focus Zoom Movement Speed IRIS Control Lens Initialize Camera Title Communication Privacy Function FLIP Preset ELEC NTSC MODEL AUTO X128 1 60...

Page 14: ...ex com oem weldex com Sale Branch Office Factory in Korea Hansol Bldg 6th Fl 322 Ha an 1Dong KwangMyoung City Kyung Ki Do Korea Phone 82 2 899 6030 Fax 82 2 899 6131 http www jwelectronics co kr Sales Branch Office in Germany Graf Adolf street 71 40210 Dusseldorf Germary Phone 49 0 211 600 7115 Fax 49 0 211 600 6957 http www weldex com ...

Reviews: