background image

2 / 4

48654

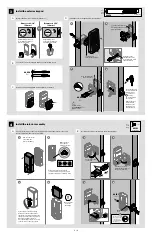
2-1/8"

54 mm

1-1/2"

38 mm

actual size

For 

Lock

Bag

(2x)

49191

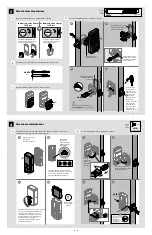
What is the diameter of the hole in the door?

Locate the screws for step 3D and keep them within reach. 

Install the exterior keypad and mounting plate.

A

B

D

Diameter is 2-1/8"  

(54 mm)

Diameter is 1-1/2"

(38 mm)

or

Adapter Ring is required 
for installation. Install on 
Exterior Assembly.

Adapter Ring is not 
needed for installation 
and may be discarded.

The cable goes 
 underneath the latch.

 Support the exterior 

assembly during mounting 
plate installation.

Route the cable 
through the center 
hole, then push it into 
the bottom hole. 

Insert the key and 
test the latch. If the 
latch does not  
         extend or  
         retract 
smoothly, adjust 
the screws. 

Remove the key 
when finished, 
and make sure 
the latch bolt is 
fully extended.

Keep parallel to the 

edge of the door.

Tighten screws 
evenly. 

DO NOT

 over 

tighten screws.

a

c

b

d

49191 

(2x)

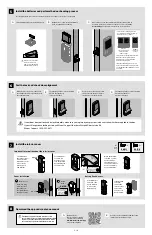
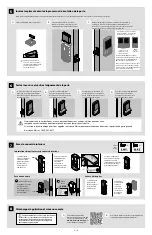
Ensure the turnpiece shaft is pointing up, and remove the interior cover and 
battery pack from the interior assembly.

Install the interior assembly onto the mounting plate.

A

B

a

c

b

d

If the turnpiece shaft is pointing 
down, place the cover back onto 
the interior assembly and rotate the 
turnpiece until you hear it click. You 
may need to apply some force.
Once the turnpiece shaft is correctly 
oriented, remove the cover again.

Make sure turn 
piece shaft is 
rotated as shown.

Do not install 

 batteries 

until step 5.

Ensure tight cable 
connection.

Lay the excess cable 
flat inside the bottom of 
the interior housing.

align

a

c

b

d

bottom 

hole

If turnpiece shaft is not oriented 
correctly, put the cover back on and 
rotate the turnpiece as shown in step C.

Remove the interior 
cover from the 
interior assembly.

Incorrect:

Ensure you are using 
the correct screws. 

Using incorrect 
screws will damage 
the product.

actual size

For 

Lock

Bag

(2x)

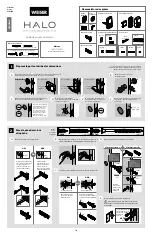
Remove the mounting plate from the interior assembly.

C

G

48654 

(2x)

48654 

(2x)

3

Install the exterior keypad

4

Install the interior assembly

Summary of Contents for HALO

Page 1: ...re to confirm that the hole in the door edge is 1 25 mm Measure to confirm that the door is between 1 3 8 and 2 35 mm and 51 mm thick Remove your existing deadbolt from your door C D E F B Latch A Keys Exterior Assembly Adapter Ring Batteries Mounting Plate Parts List For Latch Strike Interior Assembly SmartKey Tool Measure to confirm that the hole in the door is either 2 1 8 54 mm or 1 1 2 38 mm ...

Page 2: ...91 2x Ensure the turnpiece shaft is pointing up and remove the interior cover and battery pack from the interior assembly Install the interior assembly onto the mounting plate A B a c b d If the turnpiece shaft is pointing down place the cover back onto the interior assembly and rotate the turnpiece until you hear it click You may need to apply some force Once the turnpiece shaft is correctly orie...

Page 3: ...8611 actual size For Lock Bag actual size Failure flashing X pattern Download the app and create an account The Weiser app is needed to use this lock If this lock was professionally installed or installed by someone other than the homeowner make sure this step is performed by the homeowner Download the Weiser app by scanning the QR code or visiting www weiserlock com app on your smartphone Create ...

Page 4: ... pairings user associations and remove the lock from the account Status LED 1 Press and HOLD A for 10 seconds You will hear 1 short beep and see an amber LED Note After 3 seconds you will hear 1 short beep and see a blue LED You should continue to hold A to enter network reset mode 2 Release A You will see a blinking amber LED to indicate it is in network reset mode 3 Press and release the Program...

Page 5: ...4 po Mesurez pour confirmer que le trou pratiqué dans le chant de la porte est de 25 mm 1 po Mesurez pour confirmer que la porte mesure entre 35 mm et 51 mm 1 3 8 po et 2 po d épaisseur Retirez de votre porte le pêne dormant existant C D E F B Pêne demi tour A Clés Ensemble extérieur Bague d adaptation Piles Plaque support Nomenclature des pièces Pour pêne demi tour gâche Ensemble intérieur Outil ...

Page 6: ...rez vous que l axe du taquet pointe vers le haut et retirez le couvercle intérieur et le bloc piles de l ensemble intérieur Posez l ensemble intérieur sur la plaque support A B a c b d Si l axe du taquet pointe vers le bas replacez le couvercle sur l ensemble intérieur et tournez le taquet jusqu à ce que vous entendiez qu il s encliquette Il se peut que vous deviez le forcer légèrement Une fois qu...

Page 7: ...ration de porte gauchie Assistance Weiser 1 800 501 9471 64109 68611 taille réelle Sachet pour serrure taille réelle Échec motif X clignotant Téléchargez l application et créez un compte L application Weiser est nécessaire pour utiliser cette serrure Si cette serrure a été posée par un professionnel ou par une personne autre que le propriétaire assurez vous que cette étape soit effectuée par le pr...

Page 8: ...eau 3 Appuyez sur le bouton programme et relâchez le pour confirmer la réinitialisation de réseau 4 Si l opération a réussi vous entendrez un bip long et un voyant vert s allumera Si la programmation a échoué vous entendrez cinq bips rapides et un voyant clignotera en rouge Si la programmation a échoué recommencez depuis l étape 1 10s Bouton programme Bouton programme Vous devez appuyer sur le bou...

Reviews: