61
INSTALLATION
EN
Connecting the hob to the mains
power supply
CAUTIONS!
1. The ceramic cooker hob must be installed
by qualified personnel or technicians. We have
professionals at yourservice. Please never
conductthe operation byyourself.
2. The ceramic cooker hob shall not be mounted
to cooling equipment, dishwashers and rotary
dryers.
3. The ceramic cooker hob shall be installed
such that better heat radiation can be ensured
to enhance its reliability.
4. The wall and induced heating zone above the
work surfaceshall with stand heat.
5. To avoid any damage, the sandwich layer and
adhesive must be resistant to heat.
6. A steam cleaner is not to be used.
The power supply should be connected in
compliance with the relevant standard, or a
single-pole circuit breaker.
1. If the cable is damaged or needs replacing, this
should be done by an after-sales technician using
the propertools, so as to avoid any accidents.
2. If the appliance is being connected directly to
the mains supply, an omnipolar circuit breaker
must be installed with a minimum gap of 3mm
between the contacts.
3. The installer must ensure that the correct
electrical connection has been made and that it
complies with safety regulations.
4. The cable must not be bent or compressed.
5. The cable must be checked regularly and only
replaced by a properly qualified person.
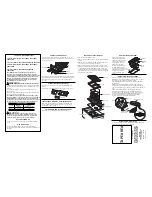
The wires in the power
cable are shown according
to the following scheme:
yellow-green - earth
blue - neutral (N)
brown - phase (L)
WARNING!
Connecting the hob to the safety of household
appliances is potentially dangerous. The
manufacturer is not liable for damage to health
or personal property, if it was caused by non-
observance of the specified rules and norms
for the installation of electrical appliances with
high power.
Summary of Contents for WIS 322
Page 1: ...INSTRUCTIONS FOR USE WIS 322 WIS 640 WIS 642 WIS 644 Induction hob...
Page 3: ...3 UA 3 Weilor Weilor...
Page 4: ...4 UA 8 8...
Page 5: ...5 UA...
Page 10: ...10 UA 1 ON OFF 2 3 4 1 Pan detect 1 ON OFF 2 3 0...
Page 11: ...11 Lo 1 2 ON OFF ON OFF ON OFF 1 2 3 4 5 6 7 8 9 8 8 8 4 4 4 2 2 2 UA...
Page 13: ...13 UA 99 1 2 3 99 00 99 4 5 5 6 30 99 0 3 5 4 5 1 2 1...
Page 14: ...14 UA...
Page 15: ...15 UA 85 1 2 3 2 4 5 6 7 1 2 3 4 2 8 5...
Page 16: ...16 UA 1 2 3 4 5 6 7 8 9...
Page 17: ...17 UA 1 2 3 4 1 2 30 3 4 2 4 1 2 3 4 5...
Page 18: ...18 1 2 Weilor UA...
Page 19: ...19 UA F5 F9 Weilor F3 F4 Weilor E1 E2 E3 E4 Weilor E5 E6 E0 ED EC...
Page 21: ...21 UA 1 2 3 4 5 6 1 2 3 3 4 5 N L...
Page 23: ...23 RU 3 Weilor Weilor...
Page 24: ...24 RU 8 8...
Page 25: ...25 RU...
Page 30: ...30 RU 1 ON OFF 2 3 4 1 Pan detect 1 ON OFF 2 3 0...
Page 31: ...31 RU H Lo 1 2 ON OFF ON OFF ON OFF 1 2 3 4 5 6 7 8 9 8 8 8 4 4 4 2 2 2...
Page 33: ...33 RU 99 1 2 3 99 00 99 4 5 5 6 30 99 0 3 5 4 5 1 2...
Page 34: ...34 RU...
Page 35: ...35 RU 85 C 1 2 3 2 4 5 6 7 1 2 3 4 2 8 5...
Page 36: ...36 RU 1 2 3 4 5 6 7 8 9...
Page 37: ...37 RU 1 2 3 4 1 2 30 3 4 2 4 1 2 3 4 5...
Page 38: ...38 1 2 Weilor RU...
Page 39: ...39 RU F5 F9 Weilor F3 F4 Weilor E1 E2 E3 E4 Weilor E5 E6 E0 ED EC...
Page 41: ...41 RU 1 2 3 4 5 6 1 2 3 3 4 5 N L...
Page 63: ......