


47 |
P a g e
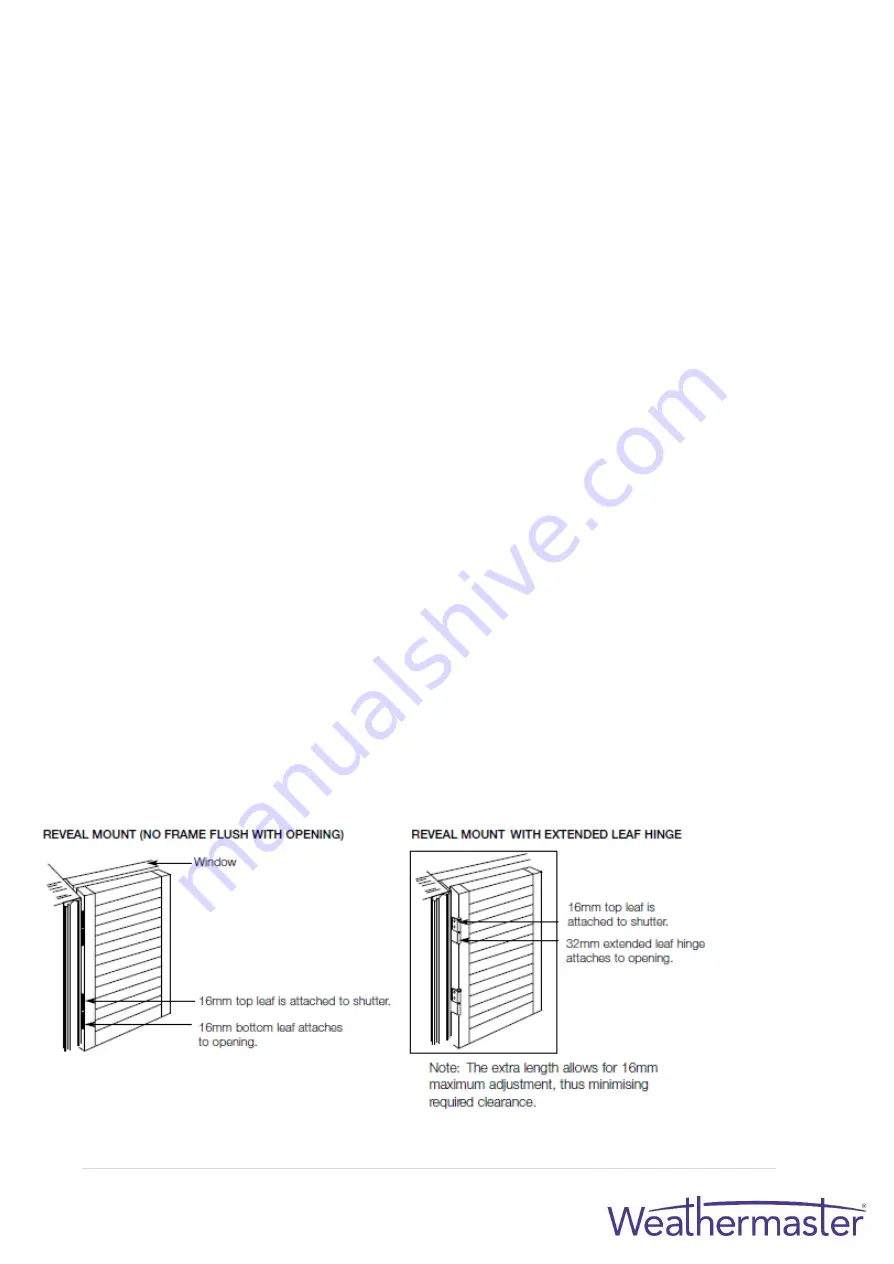
INSTALLATION REVEAL MOUNT WITH NO FRAME
1.
INSTALL TOP HINGE
•
Starting with the left panel(s), place panel into opening.
•
Position the panel so it has equal clearance at the top and bottom. Make a
pencil mark under the top hinge.
•
Install one screw into the window jamb hinge that goes below the top hinge.
•
Check to see if the position is accurate by placing the panel into the opening.
Insert the top hinge pin into the panel and jamb. If accurate, remove the panel
and insert the second screw into the top hinge on the jamb.
2.
INSTALL BOTTOM HINGE
•
Place the panel into position by inserting the top hinge pin into the panel and
jamb hinge.
•
Mark the jamb where the bottom of the lowest hinge is on the panel.
•
Install one screw into the window jamb hinge that goes below the bottom hinge.
•
Check if position is accurate by installing the panel from the top and bottom
hinges.
•
Shim using available hinge shims if necessary.
3.
LEVEL PANELS
•
If more panels are to be installed, repeat the first two processes by lining up the
panel as the main concern.
•
If minor support or levelling is required, turn adjustable jamb cap at the bottom of
the vertical jamb to the required spot (if used).
4.
INSTALL REMAINING HINGES
•
Once panels are level, install the remaining panel hinges while the panels are
hanging. Simply open the panels, insert the hinge pin into the hinges and screw
the hinges into the window jambs.
•
Shim using available hinge shims if necessary.
5.
INSTALL MAGNETS AND PLATES
•
See previous pages on installation of magnets and plates
Summary of Contents for Eclipse Shutters
Page 1: ...Eclipse Shutters Installation Manual ...
Page 3: ...3 P a g e GENERAL INFORMATION SHUTTER PANEL PARTS DIAGRAM ...
Page 5: ...5 P a g e SHUTTER PANEL PARTS ...
Page 15: ...15 P a g e SLIDING OPEN SLIDING SHUTTERS TRACK SYSTEM SLIDING SHUTTERS TRACK SYSTEM DIAGRAM ...
Page 16: ...16 P a g e SLIDING SHUTTERS TRACK SYSTEM DIAGRAM OPEN SLIDING ...
Page 20: ...20 P a g e SLIDING SHUTTERS RECESS MOUNT APPLICATION ...
Page 21: ...21 P a g e SLIDING SHUTTERS RECESS MOUNT APPLICATION ...
Page 22: ...22 P a g e SLIDING SHUTTERS FACE MOUNT APPLICATION ...
Page 23: ...23 P a g e SLIDING SHUTTERS FACE MOUNT APPLICATION ...
Page 27: ...27 P a g e TRIPLE SLIDING SHUTTERS TRACK SYSTEM DIAGRAM ...
Page 30: ...30 P a g e SLIDING SHUTTERS RECESS MOUNT APPLICATION ...
Page 31: ...31 P a g e SLIDING SHUTTERS FACE MOUNT APPLICATION ...
Page 35: ...35 P a g e BI FOLD TRACK SYSTEM DIAGRAM Clearance 15mm Internal Tracks Nominal ...
Page 38: ...38 P a g e BI FOLD SHUTTERS DIAGRAM D FACE MOUNT ...
Page 39: ...39 P a g e BI FOLD SHUTTERS DIAGRAM E RECESS MOUNT ...
Page 41: ...41 P a g e BI FOLD SHUTTERS FRAME EXTENSIONS ...
Page 45: ...45 P a g e VALANCE RETURN OPTIONS RECESS MOUNT FULLY RECESSED FRAME SQUARE CUT VALANCE ...
Page 46: ...46 P a g e FACE MOUNT STANDARD FULL LENGTH VALANCE RETURNS ...


