


PWSR Series Softeners
13
Control Programming
General Operation
User (U) Displays/Settings
When the system is operating one of two displays will be
shown. Pressing NEXT will alternate between the displays.
One of the displays is always the current time of day. The
second display is one of the following: days remaining or
gallons remaining. Days remaining are the number of days
left before the system goes through a regeneration cycle.
Capacity remaining is the number of gallons that will be treat-
ed before the system goes through a regeneration cycle. The
user can scroll between the displays as desired.
If the system has called for a regeneration that will occur at
the preset time of regeneration, the words REGEN TODAY
will appear on the display.
When water is being treated (i.e. water is flowing through the
system) the word “Softening” flashes on the display.
REGENERATION MODE
Typically a system is set to regener-
ate at a time of low water usage. An
example of a time with low water
usage is when a household is asleep.
If there is a demand for water when the system is regenerating,
untreated water will be used.
When the system begins to regenerate, the display will change
to include information about the step of the regeneration process
and the time remaining for that step to be completed. The system
runs through the steps automatically and will reset itself to pro-
vide treated water when the regeneration has been completed.
MANUAL
REGENERATION
Sometimes there is a
need to regenerate
the system, sooner
than when the system calls for it, usually referred to as manual
regeneration. There may be a period of heavy water usage
because of guests or a heavy laundry day.
To initiate a manual regeneration at the preset delayed regener-
ation time, when the regeneration time option is set to “NORMAL”
or “ on 0”, press and release “REGEN”. The words
“REGEN TODAY” will flash on the display to indicate that the sys-
tem will regenerate at the preset delayed regeneration time. If
you pressed the “REGEN” button in error, pressing the button
again will cancel the request. Note: If the regeneration time
option is set to “on 0” there is no set delayed regeneration time
so “REGEN TODAY” will not activate if “REGEN” button is
pressed.
To initiate a manual regeneration immediately, press and hold the
“REGEN” button for three seconds. The system will begin to
regenerate immediately. The request cannot be cancelled.
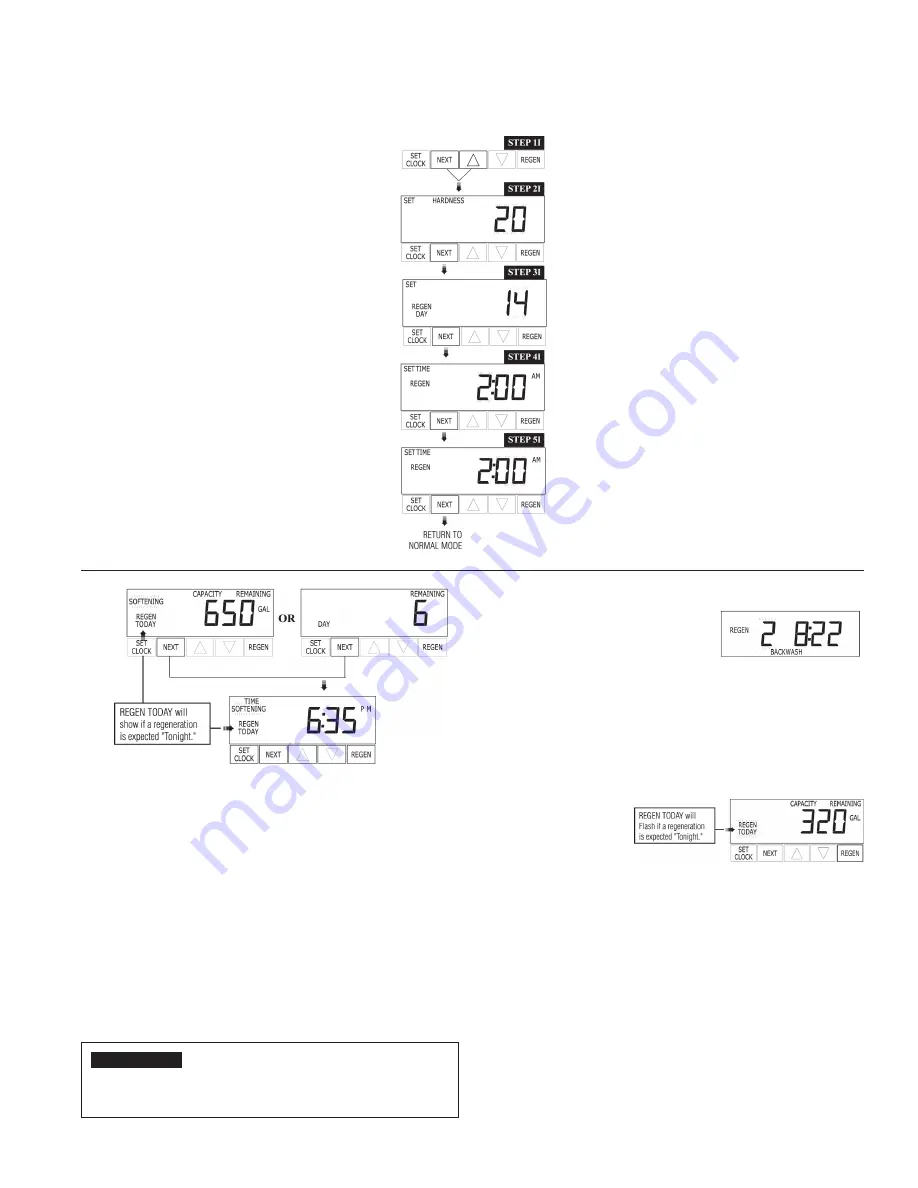
11
CONTROL PROGRAMMING
INSTALLER (
I
) Displays/Settings
STEP 1
I
– Press NEXT and arrow up simulta-
neously for 3 seconds.
STEP 2
I
– Hardness: Set the amount of hard-
ness in grains of hardness as calcium carbonate
per gallon using, arrow down or arrow up but-
tons. The default is 20 with value ranges from 1
to 150 in 1 grain increments. Note the grains per
gallon can be increased if soluble iron needs to
be reduced. Press NEXT to go to step 3I. Press
REGEN to exit Installer Displays/Settings.
STEP 3
I
– Day Override: When gallon capacity
is set to off, sets the number of days between
regeneration’s. When gallon capacity is set to
AUTO or to a number sets the maximum number
of days between regeneration. If value set to “off”
regeneration initiation is based solely on gallons
used. If value is set as a number (allowable
range from 1 to 28) a regeneration initiation
will be called for on that day even if sufficient
number of gallons were not used to call for
a regeneration. Set Day Override using arrow
buttons: number to days between regeneration
(1 to 28); or OFF.
Press NEXT to go to step 4
I
. Press REGEN to
return to previous step.
STEP 4
I
– Next Regeneration Time (hour): Set
the hour of day for regeneration using down or up
arrow buttons. AM/PM toggles after 12. The
default time is 2:00 am. This display shows
“REGEN on 0 GAL” if “on 0” is selected in Step
9S or Step 7F. Press NEXT to go to step 5
I
.
Press REGEN to return to previous step.
STEP 5
I
– Next Regeneration Time (minutes):
Set the minutes of day regeneration using down
or up arrow buttons. This display not be shown if
“on 0” is selected in Step 9S or Step 7F. Press
NEXT to exit Installer Displays/ Settings. Press
REGEN to return to previous step.
To initiate a manual regeneration immediately,
press and hold the “REGEN” button for three
seconds. The system will beam to regenerate
immediately. The control valve may be stepped
through the various regeneration cycles by
pressing the “REGEN” button.
Note: If brine tank does not contain salt, fill with salt
and wait at least two hours before regenerating.
Installer (I) Displays/Settings
STEP 1I –
Press NEXT and arrow up simultaneously
for 3 seconds .
STEP 2I –
Hardness: Set the amount of hardness
in grains of hardness as calcium carbonate per
gallon using, arrow down or arrow up but-tons . The
default is 20 with value ranges from 1 to 150 in 1
grain increments . Note the grains per gallon can be
increased if soluble iron needs to be reduced . Press
NEXT to go to step 3I . Press REGEN to exit Installer
Displays/Settings .
STEP 3I –
Day Override: When gallon capacity
is set to off, sets the number of days between
regeneration’s . When gallon capacity is set to AUTO
or to a number sets the maximum number of days
between regeneration . If value set to “off” regeneration
initiation is based solely on gallons used . If value is
set as a number (allowable range from 1 to 28) a
regeneration initiation will be called for on that day
even if sufficient number of gallons were not used to
call for a regeneration . Set Day Override using arrow
buttons: number to days between regeneration (1 to
28); or OFF .
Press NEXT to go to step 4I . Press REGEN to return
to previous step .
STEP 4I –
Next Regeneration Time (hour): Set the
hour of day for regeneration using down or up arrow
buttons . AM/PM toggles after 12 . The default time is
2:00 am . This display shows “REGEN on 0 GAL” if “on
0” is selected in Step 9S or Step 7F . Press NEXT to go
to step 5I . Press REGEN to return to previous step .
STEP 5I –
Next Regeneration Time (minutes): Set the
minutes of day regeneration using down or up arrow
buttons . This display not be shown if “on 0” is selected
in Step 9S or Step 7F . Press NEXT to exit Installer
Displays/ Settings . Press REGEN to return to previous
step .
To initiate a manual regeneration immediately, press
and hold the “REGEN” button for three seconds .
The system will beam to regenerate immediately . The
control valve may be stepped through the various
regeneration cycles by pressing the “REGEN” button .
General Operation
User (U) Displays/Settings
When the system is operating one of two displays will be
shown. Pressing NEXT will alternate between the displays.
One of the displays is always the current time of day. The
second display is one of the following: days remaining or
gallons remaining. Days remaining are the number of days
left before the system goes through a regeneration cycle.
Capacity remaining is the number of gallons that will be treat-
ed before the system goes through a regeneration cycle. The
user can scroll between the displays as desired.
If the system has called for a regeneration that will occur at
the preset time of regeneration, the words REGEN TODAY
will appear on the display.
When water is being treated (i.e. water is flowing through the
system) the word “Softening” flashes on the display.
REGENERATION MODE
Typically a system is set to regener-
ate at a time of low water usage. An
example of a time with low water
usage is when a household is asleep.
If there is a demand for water when the system is regenerating,
untreated water will be used.
When the system begins to regenerate, the display will change
to include information about the step of the regeneration process
and the time remaining for that step to be completed. The system
runs through the steps automatically and will reset itself to pro-
vide treated water when the regeneration has been completed.
MANUAL
REGENERATION
Sometimes there is a
need to regenerate
the system, sooner
than when the system calls for it, usually referred to as manual
regeneration. There may be a period of heavy water usage
because of guests or a heavy laundry day.
To initiate a manual regeneration at the preset delayed regener-
ation time, when the regeneration time option is set to “NORMAL”
or “ on 0”, press and release “REGEN”. The words
“REGEN TODAY” will flash on the display to indicate that the sys-
tem will regenerate at the preset delayed regeneration time. If
you pressed the “REGEN” button in error, pressing the button
again will cancel the request. Note: If the regeneration time
option is set to “on 0” there is no set delayed regeneration time
so “REGEN TODAY” will not activate if “REGEN” button is
pressed.
To initiate a manual regeneration immediately, press and hold the
“REGEN” button for three seconds. The system will begin to
regenerate immediately. The request cannot be cancelled.
11
CONTROL PROGRAMMING
INSTALLER (
I
) Displays/Settings
STEP 1
I
– Press NEXT and arrow up simulta-
neously for 3 seconds.
STEP 2
I
– Hardness: Set the amount of hard-
ness in grains of hardness as calcium carbonate
per gallon using, arrow down or arrow up but-
tons. The default is 20 with value ranges from 1
to 150 in 1 grain increments. Note the grains per
gallon can be increased if soluble iron needs to
be reduced. Press NEXT to go to step 3I. Press
REGEN to exit Installer Displays/Settings.
STEP 3
I
– Day Override: When gallon capacity
is set to off, sets the number of days between
regeneration’s. When gallon capacity is set to
AUTO or to a number sets the maximum number
of days between regeneration. If value set to “off”
regeneration initiation is based solely on gallons
used. If value is set as a number (allowable
range from 1 to 28) a regeneration initiation
will be called for on that day even if sufficient
number of gallons were not used to call for
a regeneration. Set Day Override using arrow
buttons: number to days between regeneration
(1 to 28); or OFF.
Press NEXT to go to step 4
I
. Press REGEN to
return to previous step.
STEP 4
I
– Next Regeneration Time (hour): Set
the hour of day for regeneration using down or up
arrow buttons. AM/PM toggles after 12. The
default time is 2:00 am. This display shows
“REGEN on 0 GAL” if “on 0” is selected in Step
9S or Step 7F. Press NEXT to go to step 5
I
.
Press REGEN to return to previous step.
STEP 5
I
– Next Regeneration Time (minutes):
Set the minutes of day regeneration using down
or up arrow buttons. This display not be shown if
“on 0” is selected in Step 9S or Step 7F. Press
NEXT to exit Installer Displays/ Settings. Press
REGEN to return to previous step.
To initiate a manual regeneration immediately,
press and hold the “REGEN” button for three
seconds. The system will beam to regenerate
immediately. The control valve may be stepped
through the various regeneration cycles by
pressing the “REGEN” button.
Note: If brine tank does not contain salt, fill with salt
and wait at least two hours before regenerating.
General Operation
User (U) Displays/Settings
When the system is operating one of two displays will be shown .
Pressing NEXT will alternate between the displays . One of the
displays is always the current time of day . The second display is one
of the following: days remaining or gallons remaining . Days remaining
are the number of days left before the system goes through a
regeneration cycle . Capacity remaining is the number of gallons that
will be treated before the system goes through a regeneration cycle .
The user can scroll between the displays as desired .
If the system has called for a regeneration that will occur at the
preset time of regeneration, the words REGEN TODAY will appear on
the display .
When water is being treated (i .e . water is flowing through the system)
the word “Softening” flashes on the display .
NOTICE
If brine tank does not contain salt, fill with salt and wait at least
two hours before regenerating .
Regeneration Mode
Typically a system is set to regenerate at
a time of low water usage . An example
of a time with low water usage is when a
household is asleep .
If there is a demand for water when the system is regenerating,
untreated water will be used .
When the system begins to regenerate, the display will change
to include information about the step of the regeneration process
and the time remaining for that step to be completed . The system
runs through the steps automatically and will reset itself to pro-vide
treated water when the regeneration has been completed .
Manual
Regeneration
Sometimes there is a
need to regenerate the
system, sooner than when
the system calls for it, usually referred to as manual regeneration .
There may be a period of heavy water usage because of guests or a
heavy laundry day .
To initiate a manual regeneration at the preset delayed regeneration
time, when the regeneration time option is set to “NORMAL” or
“ on 0”, press and release “REGEN” . The words “REGEN
TODAY” will flash on the display to indicate that the system will
regenerate at the preset delayed regeneration time . If you pressed
the “REGEN” button in error, pressing the button again will cancel
the request . Note: If the regeneration time option is set to “on 0”
there is no set delayed regeneration time so “REGEN TODAY” will
not activate if “REGEN” button is pressed .
To initiate a manual regeneration immediately, press and hold
the “REGEN” button for three seconds . The system will begin to
regenerate immediately . The request cannot be cancelled .
General Operation
User (U) Displays/Settings
When the system is operating one of two displays will be
shown. Pressing NEXT will alternate between the displays.
One of the displays is always the current time of day. The
second display is one of the following: days remaining or
gallons remaining. Days remaining are the number of days
left before the system goes through a regeneration cycle.
Capacity remaining is the number of gallons that will be treat-
ed before the system goes through a regeneration cycle. The
user can scroll between the displays as desired.
If the system has called for a regeneration that will occur at
the preset time of regeneration, the words REGEN TODAY
will appear on the display.
When water is being treated (i.e. water is flowing through the
system) the word “Softening” flashes on the display.
REGENERATION MODE
Typically a system is set to regener-
ate at a time of low water usage. An
example of a time with low water
usage is when a household is asleep.
If there is a demand for water when the system is regenerating,
untreated water will be used.
When the system begins to regenerate, the display will change
to include information about the step of the regeneration process
and the time remaining for that step to be completed. The system
runs through the steps automatically and will reset itself to pro-
vide treated water when the regeneration has been completed.
MANUAL
REGENERATION
Sometimes there is a
need to regenerate
the system, sooner
than when the system calls for it, usually referred to as manual
regeneration. There may be a period of heavy water usage
because of guests or a heavy laundry day.
To initiate a manual regeneration at the preset delayed regener-
ation time, when the regeneration time option is set to “NORMAL”
or “ on 0”, press and release “REGEN”. The words
“REGEN TODAY” will flash on the display to indicate that the sys-
tem will regenerate at the preset delayed regeneration time. If
you pressed the “REGEN” button in error, pressing the button
again will cancel the request. Note: If the regeneration time
option is set to “on 0” there is no set delayed regeneration time
so “REGEN TODAY” will not activate if “REGEN” button is
pressed.
To initiate a manual regeneration immediately, press and hold the
“REGEN” button for three seconds. The system will begin to
regenerate immediately. The request cannot be cancelled.
11
CONTROL PROGRAMMING
INSTALLER (
I
) Displays/Settings
STEP 1
I
– Press NEXT and arrow up simulta-
neously for 3 seconds.
STEP 2
I
– Hardness: Set the amount of hard-
ness in grains of hardness as calcium carbonate
per gallon using, arrow down or arrow up but-
tons. The default is 20 with value ranges from 1
to 150 in 1 grain increments. Note the grains per
gallon can be increased if soluble iron needs to
be reduced. Press NEXT to go to step 3I. Press
REGEN to exit Installer Displays/Settings.
STEP 3
I
– Day Override: When gallon capacity
is set to off, sets the number of days between
regeneration’s. When gallon capacity is set to
AUTO or to a number sets the maximum number
of days between regeneration. If value set to “off”
regeneration initiation is based solely on gallons
used. If value is set as a number (allowable
range from 1 to 28) a regeneration initiation
will be called for on that day even if sufficient
number of gallons were not used to call for
a regeneration. Set Day Override using arrow
buttons: number to days between regeneration
(1 to 28); or OFF.
Press NEXT to go to step 4
I
. Press REGEN to
return to previous step.
STEP 4
I
– Next Regeneration Time (hour): Set
the hour of day for regeneration using down or up
arrow buttons. AM/PM toggles after 12. The
default time is 2:00 am. This display shows
“REGEN on 0 GAL” if “on 0” is selected in Step
9S or Step 7F. Press NEXT to go to step 5
I
.
Press REGEN to return to previous step.
STEP 5
I
– Next Regeneration Time (minutes):
Set the minutes of day regeneration using down
or up arrow buttons. This display not be shown if
“on 0” is selected in Step 9S or Step 7F. Press
NEXT to exit Installer Displays/ Settings. Press
REGEN to return to previous step.
To initiate a manual regeneration immediately,
press and hold the “REGEN” button for three
seconds. The system will beam to regenerate
immediately. The control valve may be stepped
through the various regeneration cycles by
pressing the “REGEN” button.
Note: If brine tank does not contain salt, fill with salt
and wait at least two hours before regenerating.
General Operation
User (U) Displays/Settings
When the system is operating one of two displays will be
shown. Pressing NEXT will alternate between the displays.
One of the displays is always the current time of day. The
second display is one of the following: days remaining or
gallons remaining. Days remaining are the number of days
left before the system goes through a regeneration cycle.
Capacity remaining is the number of gallons that will be treat-
ed before the system goes through a regeneration cycle. The
user can scroll between the displays as desired.
If the system has called for a regeneration that will occur at
the preset time of regeneration, the words REGEN TODAY
will appear on the display.
When water is being treated (i.e. water is flowing through the
system) the word “Softening” flashes on the display.
REGENERATION MODE
Typically a system is set to regener-
ate at a time of low water usage. An
example of a time with low water
usage is when a household is asleep.
If there is a demand for water when the system is regenerating,
untreated water will be used.
When the system begins to regenerate, the display will change
to include information about the step of the regeneration process
and the time remaining for that step to be completed. The system
runs through the steps automatically and will reset itself to pro-
vide treated water when the regeneration has been completed.
MANUAL
REGENERATION
Sometimes there is a
need to regenerate
the system, sooner
than when the system calls for it, usually referred to as manual
regeneration. There may be a period of heavy water usage
because of guests or a heavy laundry day.
To initiate a manual regeneration at the preset delayed regener-
ation time, when the regeneration time option is set to “NORMAL”
or “ on 0”, press and release “REGEN”. The words
“REGEN TODAY” will flash on the display to indicate that the sys-
tem will regenerate at the preset delayed regeneration time. If
you pressed the “REGEN” button in error, pressing the button
again will cancel the request. Note: If the regeneration time
option is set to “on 0” there is no set delayed regeneration time
so “REGEN TODAY” will not activate if “REGEN” button is
pressed.
To initiate a manual regeneration immediately, press and hold the
“REGEN” button for three seconds. The system will begin to
regenerate immediately. The request cannot be cancelled.
11
CONTROL PROGRAMMING
INSTALLER (
I
) Displays/Settings
STEP 1
I
– Press NEXT and arrow up simulta-
neously for 3 seconds.
STEP 2
I
– Hardness: Set the amount of hard-
ness in grains of hardness as calcium carbonate
per gallon using, arrow down or arrow up but-
tons. The default is 20 with value ranges from 1
to 150 in 1 grain increments. Note the grains per
gallon can be increased if soluble iron needs to
be reduced. Press NEXT to go to step 3I. Press
REGEN to exit Installer Displays/Settings.
STEP 3
I
– Day Override: When gallon capacity
is set to off, sets the number of days between
regeneration’s. When gallon capacity is set to
AUTO or to a number sets the maximum number
of days between regeneration. If value set to “off”
regeneration initiation is based solely on gallons
used. If value is set as a number (allowable
range from 1 to 28) a regeneration initiation
will be called for on that day even if sufficient
number of gallons were not used to call for
a regeneration. Set Day Override using arrow
buttons: number to days between regeneration
(1 to 28); or OFF.
Press NEXT to go to step 4
I
. Press REGEN to
return to previous step.
STEP 4
I
– Next Regeneration Time (hour): Set
the hour of day for regeneration using down or up
arrow buttons. AM/PM toggles after 12. The
default time is 2:00 am. This display shows
“REGEN on 0 GAL” if “on 0” is selected in Step
9S or Step 7F. Press NEXT to go to step 5
I
.
Press REGEN to return to previous step.
STEP 5
I
– Next Regeneration Time (minutes):
Set the minutes of day regeneration using down
or up arrow buttons. This display not be shown if
“on 0” is selected in Step 9S or Step 7F. Press
NEXT to exit Installer Displays/ Settings. Press
REGEN to return to previous step.
To initiate a manual regeneration immediately,
press and hold the “REGEN” button for three
seconds. The system will beam to regenerate
immediately. The control valve may be stepped
through the various regeneration cycles by
pressing the “REGEN” button.
Note: If brine tank does not contain salt, fill with salt
and wait at least two hours before regenerating.
Summary of Contents for PWSR Series
Page 27: ...NOTES ...


